バックグラウンドによるファイル転送(前編)
2011年9月9日(金)

MainPage.xamlの編集とコントロールの追加
x:NameがApplicationTitleとPageTitleというTextBlockコントロールを削除し、代わりにButtonコントロールを配置します。ContentプロパティにはWebBrowserと指定します。ListBoxコントロールを1個配置します。
書き出されるXAMLコードをリスト2のように編集します。
リスト2 書き出され編集されたXAMLコード(MainPage.xaml)
(1)<phone:PhoneApplicationPage.Resources>プロパティ要素内の、<DataTemplate>にListBoxTemplateというキー名を付け、中に、<TextBlock>と<Image>、<Button> 要素を配置します。
(2)<TextBlock>要素はラベルとなるものと、Textプロパティに、「RequestUri」、「TransferStatus」、「BytesReceived」、「TotalBytesToReceive」をバインドするものとを配置しています。これらの名称は、BackgroundTransferRequestクラスのプロパティです。各プロパティの意味は表1を参照してください。
表1:BackgroundTransferRequestのプロパティ
| プロパティ名 | 役割 |
|---|---|
| RequestUri | リクエストに関連付けられたターゲットURIを取得します。 |
| TransferStatus | リクエストの状態を取得します。 |
| BytesReceived | ダウンロードされたバイト数を取得します。 |
| RequestId | リクエストに関連付けられた一意の識別子を取得します。 |
| TotalBytesToReceive | ダウンロードされる合計バイト数を取得します。 |
詳細については、下記のURIを参照してください(英語)。
→参照:BackgroundTransferRequest Members
(3)<Image>要素のSourceプロパティには、「RequestUri」をバインドしておきます。
(4)<Button>要素のTagプロパティに「RequestId」をバインドしておきます。Clickイベントには、RemoveButton_Clickイベントハンドラを指定します。<Button>の子要素として<Grid>要素を配置し子要素として2個の<Image>要素を配置します。Sourceには「円」であるImageフォルダ内の、en.pngと「+」であるImageフォルダ内の、add.pngを指定します。これで、+の「追加」アイコンが表示されます。
(5)<DataTemplate>要素にListBoxTemplate2というキー名を付け、中に、<TextBlock>と<MediaElement>、<Button> 要素を配置します。<TextBlock>、<Button>要素の設定は(2)、(4)に同じです。このテンプレートはWMVファイルが選択された場合に適用されるテンプレートです。
(6)<MediaElement>要素のSourceプロパティには、「RequestUri」をバインドしておきます。AutoPlayプロパティにTrueを指定して、自動再生を可能としておきます。またStretchプロパティにはUniformを指定します。
(7)TitlePanelという名前を持つ<StackPanel>要素内の、ApplicationTitleとPageTitleという名前を持つTextBlockを削除して、<Button>コントロールを配置します。ContentプロパティにWebBrowserと指定します。
(8)ContentPanelという名前を持つ<Grid>要素内に<TextBlock>と<ListBox>要素を配置します。<TextBlock>要素のTextプロパティには「登録なし」と指定しておきます。VisibilityにCollaspedを指定して非表示としておきます。<ListBox>要素のNameには、TransferListBoxと指定しておきます。
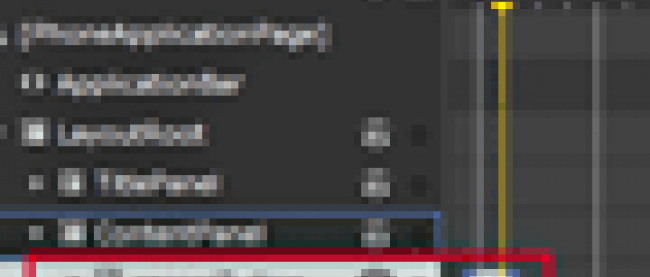
(9)<!-- -->でコメントアウトされていた、<phone:PhoneApplicationPage.ApplicationBar>~</phone:PhoneApplicationPage.ApplicationBar>のコメントを外し、<shell:ApplicationBarIconButton>要素を2個配置し、IconUriプロパティにImageフォルダ内のadd.pngとremove.pngを指定します。Textプロパティに「追加」と指定し、ClickイベントにAddData_Clickイベントハンドラを指定します。もう一つには、Textプロパティに「削除」と指定し、ClickイベントにRemoveAllData_Clickイベントハンドラを指定します。全て設定すると図6のようになります。
<phone:PhoneApplicationPage
x:Class="WP71_BackgroundTransfer.MainPage"
xmlns="http://schemas.microsoft.com/winfx/2006/xaml/presentation"
xmlns:x="http://schemas.microsoft.com/winfx/2006/xaml"
xmlns:phone="clr-namespace:Microsoft.Phone.Controls;assembly=Microsoft.Phone"
xmlns:shell="clr-namespace:Microsoft.Phone.Shell;assembly=Microsoft.Phone"
xmlns:d="http://schemas.microsoft.com/expression/blend/2008"
xmlns:mc="http://schemas.openxmlformats.org/markup-compatibility/2006"
mc:Ignorable="d" d:DesignWidth="480" d:DesignHeight="696"
FontFamily="{StaticResource PhoneFontFamilyNormal}"
FontSize="{StaticResource PhoneFontSizeNormal}"
Foreground="{StaticResource PhoneForegroundBrush}"
SupportedOrientations="PortraitOrLandscape" Orientation="Portrait"
shell:SystemTray.IsVisible="True">
<phone:PhoneApplicationPage.Resources>
<DataTemplate x:Key="ListBoxTemplate"> ■(1)
<Grid Background="Transparent" Margin="0,0,0,30">
<Grid.RowDefinitions>
<RowDefinition/>
<RowDefinition/>
</Grid.RowDefinitions>
<Grid Grid.Row="0">
<StackPanel VerticalAlignment="Top">
<TextBlock Text="{Binding RequestUri}" Foreground="Crimson" FontWeight="Bold" FontSize="17" /> ■(2)
</StackPanel>
<StackPanel Orientation="Horizontal" Margin="0,20,0,0">
<Image Source="{Binding RequestUri}" Width="140" Height="100" Margin="10" Stretch="Fill" HorizontalAlignment="Left"/> ■(3)
<StackPanel Orientation="Vertical" VerticalAlignment="Center">
<StackPanel Orientation="Horizontal">
<TextBlock Text="状態: "/> ■(2)
<TextBlock Text="{Binding TransferStatus}" HorizontalAlignment="Left"/>
</StackPanel> ■(2)
<StackPanel Orientation="Horizontal">
<TextBlock Text="受信Byte数: "/> ■(2)
<TextBlock Text="{Binding BytesReceived}" HorizontalAlignment="Left"/> ■(2)
</StackPanel>
<StackPanel Orientation="Horizontal">
<TextBlock Text="総Byte数: "/> ■(2)
<TextBlock Text="{Binding TotalBytesToReceive}" HorizontalAlignment="Left"/> ■(2)
</StackPanel>
</StackPanel>
</StackPanel>
</Grid>
<Grid Grid.Row="1">
<Button Tag="{Binding absoluteUri}" Name="button1" BorderThickness="0" Click="AddFile_Click"> ■(4)
<Grid>
<Image Source="Image/en.png"/>
<Image Source="Image/add.png"/>
</Grid>
</Button> ■(4)
</Grid>
</Grid>
</DataTemplate>
<DataTemplate x:Key="ListBoxTemplate2"> ■(5)
<Grid Background="Transparent" Margin="0,0,0,30">
<Grid.RowDefinitions>
<RowDefinition/>
<RowDefinition/>
</Grid.RowDefinitions>
<Grid Grid.Row="0">
<StackPanel VerticalAlignment="Top">
<TextBlock Text="{Binding RequestUri}" Foreground="Crimson" FontWeight="Bold" FontSize="17" />
</StackPanel>
<StackPanel Orientation="Horizontal" Margin="0,20,0,0">
<MediaElement Source="{Binding RequestUri}" Width="100" Height="200" Margin="10" Stretch=" Uniform" AutoPlay="True"/> ■(6)
<StackPanel Orientation="Vertical" VerticalAlignment="Center">
<StackPanel Orientation="Horizontal">
<TextBlock Text="状態: "/>
<TextBlock Text="{Binding TransferStatus}" HorizontalAlignment="Left"/>
</StackPanel>
<StackPanel Orientation="Horizontal">
<TextBlock Text="受信Byte数: "/>
<TextBlock Text="{Binding BytesReceived}" HorizontalAlignment="Left"/>
</StackPanel>
<StackPanel Orientation="Horizontal">
<TextBlock Text="総Byte数: "/>
<TextBlock Text="{Binding TotalBytesToReceive}" HorizontalAlignment="Left"/>
</StackPanel>
</StackPanel>
</StackPanel>
</Grid>
<Grid Grid.Row="1">
<Button Tag="{Binding RequestId}" Click="RemoveButton_Click" Content="削除" FontSize="16" BorderBrush="Red" Foreground="Red" Background="Gold" Width="150" VerticalAlignment="Top"></Button>
</Grid>
</Grid>
</DataTemplate>
</phone:PhoneApplicationPage.Resources>
<!--LayoutRoot is the root grid where all page content is placed-->
<Grid x:Name="LayoutRoot" Background="Transparent">
<Grid.RowDefinitions>
<RowDefinition Height="Auto"/>
<RowDefinition Height="*"/>
</Grid.RowDefinitions>
<!--TitlePanel contains the name of the application and page title-->
<StackPanel x:Name="TitlePanel" Grid.Row="0" Margin="12,17,0,28">
<Button x:Name="browserButton" Content="WebBrowser"/> ■(7)
</StackPanel>
<!--ContentPanel - place additional content here-->
<Grid x:Name="ContentPanel" Grid.Row="1" Margin="12,0,12,0"> ■(8)
<TextBlock Text="登録なし" Name="TextBlock1" Width="Auto" Visibility="Collapsed"/>
<ListBox Height="549" HorizontalAlignment="Left" Margin="12,16,0,0" Name="TransferListBox" VerticalAlignment="Top" Width="438"/>
</Grid>
</Grid>
<!--Sample code showing usage of ApplicationBar-->
<phone:PhoneApplicationPage.ApplicationBar> ■(9)
<shell:ApplicationBar IsVisible="True" IsMenuEnabled="True">
<shell:ApplicationBarIconButton IconUri="/Image/add.png" Text="追加" Click="AddData_Click"/> ■(9)
<shell:ApplicationBarIconButton IconUri="/Image/remove.png" Text="削除" Click="RemoveAllData_Click"/> ■(9)
</shell:ApplicationBar>
</phone:PhoneApplicationPage.ApplicationBar>
</phone:PhoneApplicationPage>
|
|
| 図6:リスト2を設定して表示されるデザイン画面。「追加」アイコンや「削除」アイコンは実行時に表示される(クリックで拡大) |

「バックグラウンドによるファイル転送(前編)」サンプルプログラム


連載バックナンバー

Think ITメルマガ会員登録受付中
Think ITでは、技術情報が詰まったメールマガジン「Think IT Weekly」の配信サービスを提供しています。メルマガ会員登録を済ませれば、メルマガだけでなく、さまざまな限定特典を入手できるようになります。
他にもこの記事が読まれています


全文検索エンジンによるおすすめ記事
- バックグラウンドによるファイル転送(後編)
- カメラで写した写真を分離ストレージに保存し、写真の一覧を表示する
- 読み込んだ画像に装飾を施し、PictureHUBに保存する
- 撮影した写真を分離ストレージとPicturesHUBに保存する
- 「住所の位置をBing Mapsに表示する」と「位置に画像付きピンを表示する」のサンプル
- モーションセンサーとShareStatusTask、MediaPlayerLauncherを使う
- タッチパネルでドラッグ&ドロップを使う汎用的なサンプル
- 写真をハート型に切り抜いて撮影するサンプル
- メッセージボックスの処理を分岐させる+2つのサンプル
- ContextMenuコントロールを使う、加速度センサー、GPSでの位置情報取得