はじめに
前回までの記事を通じて、JBoss Fuseの概要の理解、そして実行環境の構築まで準備が整いました。今回からはいよいよ活用編として、「JBoss Fuseを使ってみる」と題して、チュートリアルを実践しながら、Fuseについてより深く理解していきたいと思います。
本チュートリアルでは、ファイル操作をするシナリオを実装します。単純なファイルコピー操作の実装手順、そして、ファイルのコンテンツに応じてルートを変更するコンテンツベースルーティングを実装しながら、Fuseへの理解を深めていきます。
本チュートリアルの完成図を、図1に示します。
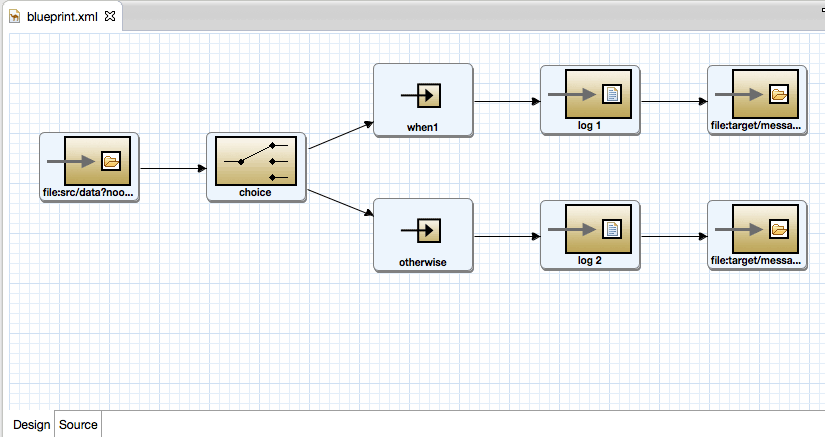
図1:今回作成するシナリオの完成図
ルートの作成
Fuse Projectの作成
まずJBoss Developer Studioを起動して、以下の手順で新規Fuseプロジェクトを作成します。[File]−[New]−[Other...]−Wizardsの検索に「Fuse」とタイプ 、[Fuse Project]を選択、[Next]−[New Fuse Project]の画面はデフォルトのまま[Next]を選択。
プロジェクトの設定項目は、図2のように指定します。
| Group Id | tutorial |
|---|---|
| Artifact Id | simple-route |
| Version | 1.0.0-SNAPSHOT |
| Package | tutorial.simple.route |
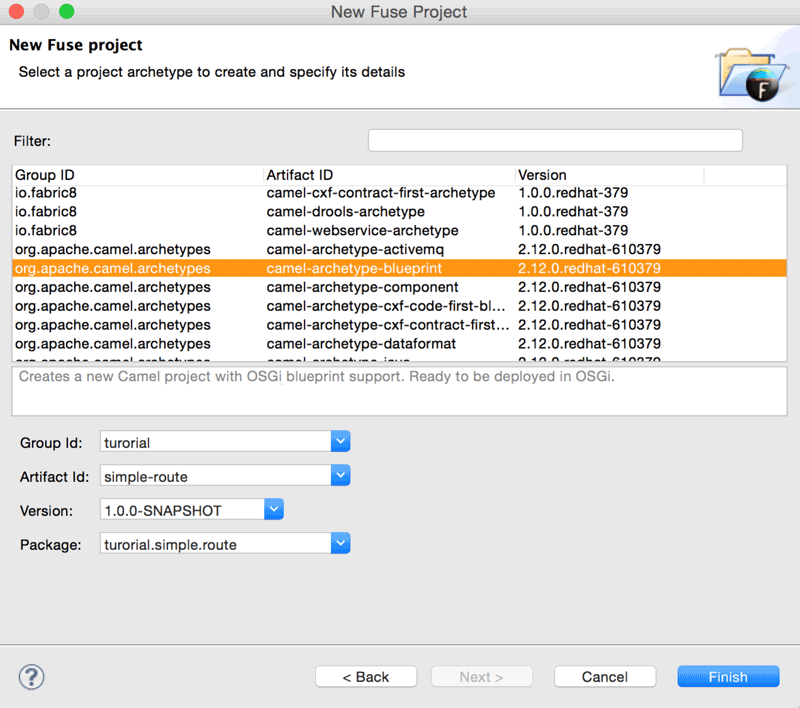
図2:新規Fuseプロジェクトの設定項目
作成後、以下の2つのファイルが生成されていることを確認してください(図3)。
- simple-route/pom.xml
Mavenプロジェクトファイル - simple-route/src/main/resources/OSGI-NF/blueprint/blueprint.xml
デフォルトで生成されるCamel Context XMLファイル
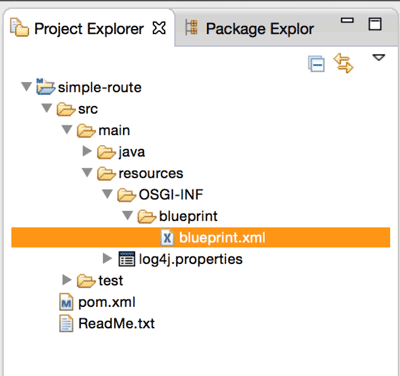
図3:プロジェクト作成により作られるファイルの確認
新規ルートの作成
最初は操作に慣れるために、シンプルなファイル操作シナリオを実装するまでの手順を紹介します。まず、プロジェクトエクスプローラーからsimple-route/src/main/resources/OSGI-NF/blueprint/blueprint.xmlを選択して、右クリックメニューから[Delete]を選択して削除します。続いてsimple-route/src/main/resources/OSGI-NF/blueprint/を選択して、右クリックメニューから[New]−[Camel XML File]を選択します。File nameとFrameworkは、それぞれ以下のように指定します。
| File name | blueprint.xml |
|---|---|
| Framework | OSGi Blueprint |

図4:Camel Context XMLを新しく作る
Camel Context XMLのファイルエディタが表示されます。キャンパスの下部にある[Source]タブをクリックすると、Camel Context XMLファイルのソースコードが参照できます(図5)。
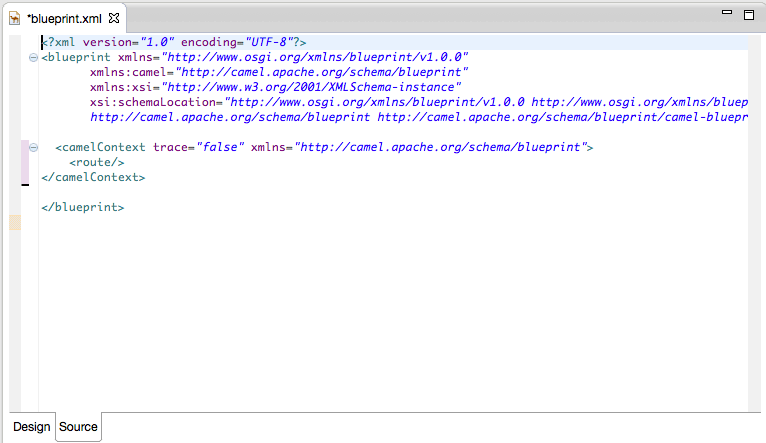
図5:Camel Context XMLファイルの内容を確認
次に[Source]タブの隣、[Design]タブをクリックします。JBoss Developer Studioの右側に配置されたPaletteペインを確認します(図6)。Camel Contextのルートは、このPaletteから必要なノードをキャンバス上に配置することで定義します。
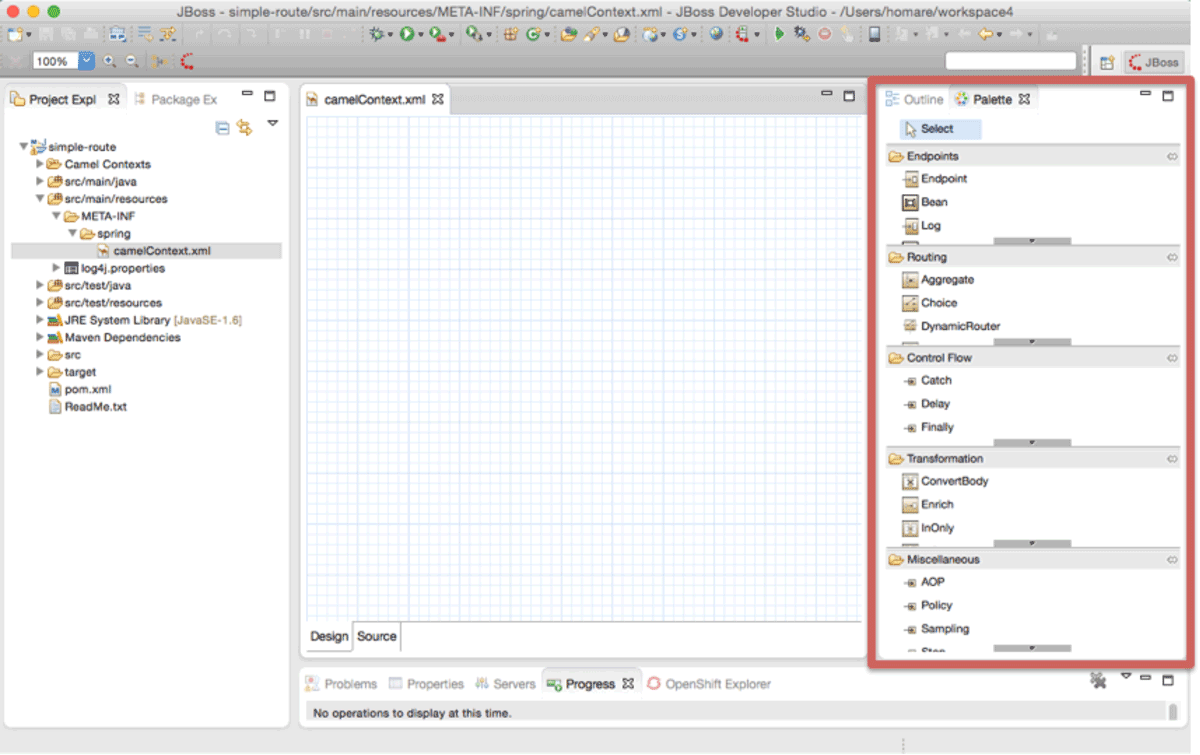
図6:Paletteペイン
Paletteペインから、[Endpoints]カテゴリにある[Endpoint]を2点、図7のようにキャンパスへドラッグ&ドロップします。

図7:Endpointをキャンパス上に2つ並べる
図7の左側に配置した[Endpoint]のプロパティに、以下の値を入力します(図8)。
| Uri | file:src/data?noop=true |
|---|
これは、「src/dataディレクトリ配下のファイルを読み込む」ということです。「noop=true」は、ファイルを取得後、ファイルはそのまま(削除しない)というオプションです。fileコンポーネントで扱える操作については、以下のマニュアルを参照してください。
その他のフィールドは、空白のままでかまいません。
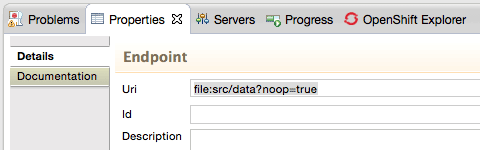
図8:EndpointのUriを指定する
同様に、右側に配置した[Endpoint]のプロパティも入力します(図9)。
| Uri | file:target/messages/others |
|---|
こちらも、その他のフィールドは空白のままです。
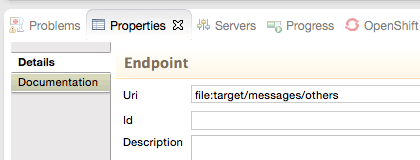
図9:EndpointのUriを指定する
[Endpoint](Uri: file:src/data?noop=true)にマウスカーソルを乗せると、ゴミ箱と矢印のメニューが表示されます(図10)。
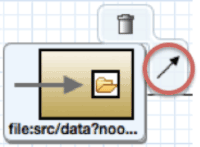
図10:マウスカーソルを乗せると、メニューが表示される
この矢印アイコンをドラッグ&ドロップして、[Endpoint](Uri: file:target/messages/others)へと繋げます(図11)。
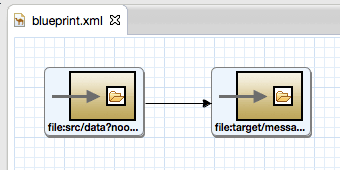
図11:2つのEndpointを矢印で繋いで完成
ここまで作成したCamel Context XMLファイルのソースコードを見てみましょう(リスト1)。
リスト1:作成したCamel Context XMLファイル
<?xml version="1.0" encoding="UTF-8"?>
<blueprint xmlns="http://www.osgi.org/xmlns/blueprint/v1.0.0"
       xmlns:camel="http://camel.apache.org/schema/blueprint"
       xmlns:xsi="http://www.w3.org/2001/XMLSchema-instance"
       xsi:schemaLocation="http://www.osgi.org/xmlns/blueprint/v1.0.0 http://www.osgi.org/xmlns/blueprint/v1.0.0/blueprint.xsd
       http://camel.apache.org/schema/blueprint http://camel.apache.org/schema/blueprint/camel-blueprint.xsd">
<camelContext trace="false" xmlns="http://camel.apache.org/schema/blueprint">
    <route>
        <from uri="file:src/data?noop=true"/>
        <to uri="file:target/messages/others"/>
    </route>
</camelContext>
</blueprint>
デフォルトで生成されるCamel Context XMLファイル(図5)との差分、
以上の手順で、簡単なファイルのコピー操作を実現するCamel Contextの実装ができました。続いて実行して、動作を確認してみましょう。
ルートの実行
作成したCamel Context XMLファイルをローカルで、テスト実行します。準備のために、以下のフォルダとファイルを作成します。ファイルの内容は、リスト2、リスト3の通りです。
- simple-route/src/data/message1.xml
- simple-route/src/data/message2.xml
- simple-route/target/messages/others
リスト2:message1.xml
<?xml version="1.0" encoding="UTF-8"?>
<person user="james">
  <firstName>James</firstName>
  <lastName>Strachan</lastName>
  <city>London</city>
</person>
リスト3:message2.xml
<?xml version="1.0" encoding="UTF-8"?>
<person user="hiram">
  <firstName>Hiram</firstName>
  <lastName>Chirino</lastName>
  <city>Tampa</city>
</person>
simple-route/src/main/resources/OSGI-NF/blueprint/blueprint.xmlを選択して、右クリックメニューから[Run As]−[Local Camel Context (without tests)]を選択します
リスト4:ローカルテスト時の出力
[         Blueprint Extender: 1] BlueprintContainerImpl         INFO  Bundle simple-route is waiting for namespace handlers [http://camel.apache.org/schema/blueprint]
[         Blueprint Extender: 1] BlueprintCamelContext          INFO  Apache Camel 2.12.0.redhat-610379 (CamelContext: camel-1) is starting
[         Blueprint Extender: 1] ManagedManagementStrategy      INFO  JMX is enabled
[         Blueprint Extender: 1] BlueprintCamelContext          INFO  AllowUseOriginalMessage is enabled. If access to the original message is not needed, then its recommended to turn this option off as it may improve performance.
[         Blueprint Extender: 1] BlueprintCamelContext          INFO  StreamCaching is not in use. If using streams then its recommended to enable stream caching. See more details at http://camel.apache.org/stream-caching.html
[         Blueprint Extender: 1] FileEndpoint                   INFO  Endpoint is configured with noop=true so forcing endpoint to be idempotent as well
[         Blueprint Extender: 1] FileEndpoint                   INFO  Using default memory based idempotent repository with cache max size: 1000
[         Blueprint Extender: 1] BlueprintCamelContext          INFO  Route: route1 started and consuming from: Endpoint[file://src/data?noop=true]
[         Blueprint Extender: 1] BlueprintCamelContext          INFO  Total 1 routes, of which 1 is started.
[         Blueprint Extender: 1] BlueprintCamelContext          INFO  Apache Camel 2.12.0.redhat-610379 (CamelContext: camel-1) started in 0.202 seconds
リスト4のようなメッセージがコンソール上に表示されたら、実行は成功です。ターゲットのディレクトリ配下に「message1.xml」、「message2.xml」がコピーされていることを確認しましょう(図12)。
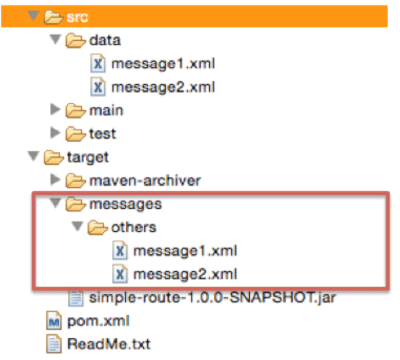
図12:ファイルのコピーが正しく実行されていることを確認
コンテンツベースルーティングの実装
続いて、先ほど作成したルートを編集して、Enterprise Service Busの要件として求められる「コンテンツベースルーティング」の実装を紹介します。
まずtarget/messages/配下に新たに「uk」というフォルダを作成します(図13)。
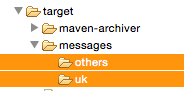
図13:追加でukフォルダを作成
Paletteペインの[Routing]カテゴリから[Choice]ノード(図14)をキャンパスへドラッグ&ドロップします(図15)。
![[Choice]ノード](/sites/default/files/589814.png)
図14:[Choice]ノード
![キャンパス上に[choice]ノードを追加](/sites/default/files/589815.png)
図15:キャンパス上に[choice]ノードを追加
新しいノードは、既存ノードの右クリックメニューからも追加できます。試しに、[choice]ノードの右クリックメニューから、[Add]−[Routing]−[When]を選択して、[When]ノードを追加してみます(図16)。
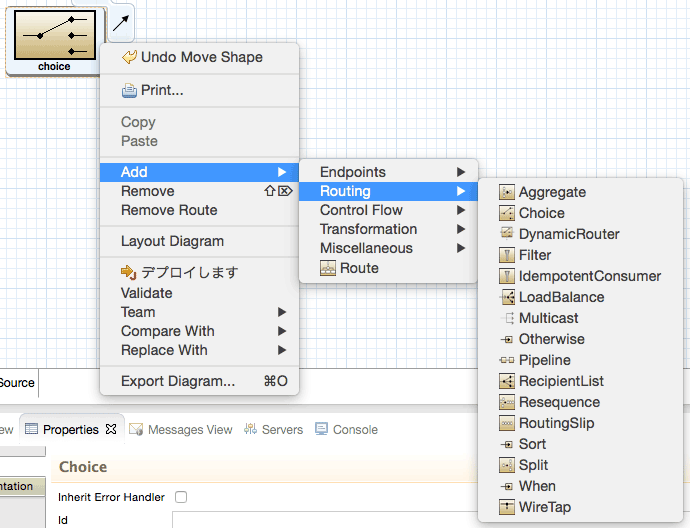
図16:右クリックメニューからのノード追加
[When]ノードのプロパティには、以下のように入力します(図17)。
| Expression | person/city='London' |
|---|---|
| Language | xpath |
| Id | when1 |
![[when]ノードのプロパティ](/sites/default/files/589817.png)
図17:[when]ノードのプロパティ
[choice]ノードの右クリックメニューから、[Add]−[Routing]−[Otherwise]を選択し、ノードを追加します。追加した[Otherwise]ノードは、[choice]ノードと接続された状態で配置されます。このノードは、[when]ノードの条件式を満たさないメッセージが通過するノードです。
[when1]ノードの右クリックメニューから、[Add]−[Endpoints]−[Log]を選択し、ノードを追加します。[Log]ノードは、[when1]ノードと接続された状態で配置されます。[Log]ノードのプロパティには、以下のように入力します(図18)。
| Message | uk messages |
|---|---|
| Log Name | 1 |
| 上記以外は空白 |
![[Log1]ノードのプロパティ](/sites/default/files/589818.png)
図18:[Log1]ノードのプロパティ
同様の手順で、[otherwise]ノードの右クリックメニューから、[Add]−[Endpoints]−[Log]を選択します。ここで生成した[Log]ノードのプロパティは、以下の通りです。
| Message | other messages |
|---|---|
| Log Name | 2 |
| 上記以外は空白 |
続いて、[log 1]ノードの右クリックメニューから、[Add]−[Endpoints]−[Endpoint]を選択します(図19)。作成した[Endpoint]ノードのプロパティは、以下の通りに設定します。(図20)。
| Uri | file:target/messages/uk |
|---|---|
| 上記以外は空白 |
![[Endpoint]を配置させた状態のキャンパス](/sites/default/files/589819.png)
図19:[Endpoint]を配置させた状態のキャンパス
![[Endpoint]ノードのプロパティ](/sites/default/files/589820.png)
図20:[Endpoint]ノードのプロパティ
[log 2]の矢印アイコンを、図11に示した[Endpoint](file:target/messages/others)へ接続します。
最後に図11に示した[Endpoint](Uri: file:src/data?noop=true)から[choice]ルートへ、矢印コネクタを繋ぎます。コンテンツベースルーティングの定義は以上です(図21)。
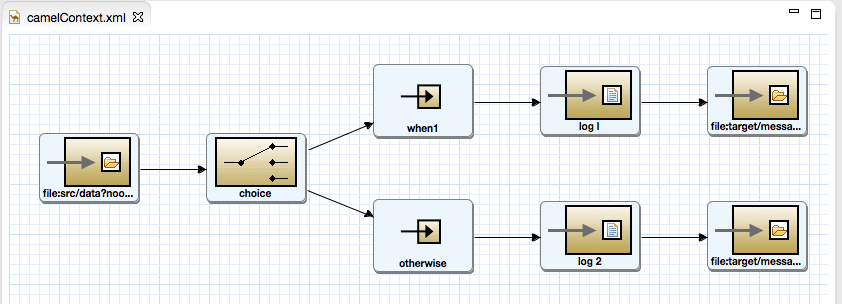
図21:できあがった完成図
ツールバーから[File]−[Save]を選択して保存します。完成したCamel ContextのXMLコードを確認します(リスト5)。
リスト5:完成したCamel Context XMLファイルのコンテンツ
<?xml version="1.0" encoding="UTF-8"?>
<blueprint xmlns="http://www.osgi.org/xmlns/blueprint/v1.0.0"
       xmlns:camel="http://camel.apache.org/schema/blueprint"
       xmlns:xsi="http://www.w3.org/2001/XMLSchema-instance"
       xsi:schemaLocation="http://www.osgi.org/xmlns/blueprint/v1.0.0 http://www.osgi.org/xmlns/blueprint/v1.0.0/blueprint.xsd
       http://camel.apache.org/schema/blueprint http://camel.apache.org/schema/blueprint/camel-blueprint.xsd">
<camelContext trace="false" xmlns="http://camel.apache.org/schema/blueprint">
    <route>
        <from uri="file:src/data?noop=true"/>
        <choice>
            <when id="when1">
                <xpath>person/city='London'</xpath>
                <log message="uk message" logName="1"/>
                <to uri="file:target/messages/uk"/>
            </when>
            <otherwise>
                <log message="other messages" logName="2"/>
                <to uri="file:target/messages/others"/>
            </otherwise>
        </choice>
    </route>
</camelContext>
</blueprint>
- この記事のキーワード
バックナンバー
この記事の筆者

Think ITでは、技術情報が詰まったメールマガジン「Think IT Weekly」の配信サービスを提供しています。メルマガ会員登録を済ませれば、メルマガだけでなく、さまざまな限定特典を入手できるようになります。
