| ||||||||||||||||||||||||||||
| 前のページ 1 2 3 4 次のページ | ||||||||||||||||||||||||||||
| ボタン(Button) | ||||||||||||||||||||||||||||
SWTのorg.eclipse.swt.widgets.Buttonクラスは、SwingのJButton、JCheckBox、JRadioButton、JToggleButtonに対応します。スタイルを変更することで、以下のような様々な種類のボタンを作成できます。 通常のボタン | ||||||||||||||||||||||||||||
Button normalButton = new Button(parent, SWT.NONE); | ||||||||||||||||||||||||||||
フラットボタン | ||||||||||||||||||||||||||||
Button flatButton = new Button(parent, SWT.FLAT); | ||||||||||||||||||||||||||||
チェックボタン(チェックボックス) | ||||||||||||||||||||||||||||
Button checkButton = new Button(parent, SWT.CHECK); | ||||||||||||||||||||||||||||
ラジオボタン(グループなし) グループの指定をせずにラジオボタンを作成すると、同一のコンポジットに属するボタンに対して自動的に排他制御がかかります。画面内のラジオボタンに細かく排他制御を設定したい場合は、下記のラジオボタン(グループあり)を参照して下さい。  | ||||||||||||||||||||||||||||
Button radioButton1 = new Button(parent, SWT.RADIO); | ||||||||||||||||||||||||||||
ラジオボタン(グループあり) 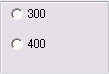 | ||||||||||||||||||||||||||||
⁄⁄ グループの生成 | ||||||||||||||||||||||||||||
トグルボタン | ||||||||||||||||||||||||||||
Button toggleButton = new Button(parent, SWT.TOGGLE); | ||||||||||||||||||||||||||||
| テキスト(Text) | ||||||||||||||||||||||||||||
SWTのorg.eclipse.swt.widgets.Textクラスは、SwingのJTextField、JTextAreaに対応します。スタイルを変更することで、以下のような様々な種類のテキストを作成できます。 入力テキスト | ||||||||||||||||||||||||||||
Text inputText = new Text(parent, SWT.BORDER | SWT.NONE); | ||||||||||||||||||||||||||||
パスワードテキスト | ||||||||||||||||||||||||||||
Text passwordText = new Text(parent, SWT.BORDER | SWT.PASSWORD); | ||||||||||||||||||||||||||||
スクロールテキスト 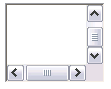 | ||||||||||||||||||||||||||||
Text scrollableText = new Text(parent, SWT.BORDER | SWT.V_SCROLL | SWT.H_SCROLL); | ||||||||||||||||||||||||||||
入力値のチェックや日本語入力の制御などもリスナーを使用して行います。たとえば数値だけ入力できるテキストを作成する場合は、以下のようにorg.eclipse.swt.events.FocusAdapterクラスを継承したクラスを作成し、addFocusListener(new TextFocusAdapter());でリスナーとして追加します。 | ||||||||||||||||||||||||||||
⁄** | ||||||||||||||||||||||||||||
| 前のページ 1 2 3 4 次のページ | ||||||||||||||||||||||||||||
| ||||||||||||||||||||||||||||
| ||||||||||||||||||||||||||||
| ||||||||||||||||||||||||||||
| ||||||||||||||||||||||||||||
| ||||||||||||||||||||||||||||
| ||||||||||||||||||||||||||||
-
-
連載


新着記事
焦りは禁物?「特化」の前に「汎用」を。エクサウィザーズが語る東海製造業における生成AI成功の秘訣 6:30 SUSE、インフラのレジリエンスとオープンソースAIで日本のDXを加速——ベンダーロックインからの脱却を支援 6:20 「HAMi」でKubernetes上のGPUメモリ分離の仕組みを理解し、共有を試してみよう 7月15日 6:30 「C/C++」の「RayLib」でコンソールゲーム「Color」を開発してみよう 7月15日 6:30 Gartner、エージェント型AIによってエンタープライズ・アプリケーション向け支出の2,340億ドルがリスクにさらされるとの見解を発表 7月14日 6:30