RESTful Webサービス化
RESTful Webサービス化
CamelルートをRESTful Webサービス化する際には、CXFRSコンポーネントを利用します。手順はSOAPの場合とほぼ同じですので、もう少し中身を実装します。
【手順1】通信で使用するデータフォーマットの設定
RESTful Webサービスの通信で利用するデータフォーマットは、Javaのクラスとして作成します。ここでは、Cutromer.java(リスト5)、CustomerList.java(リスト6)の2つのクラスを作成します。
リスト5:Customer.java
package com.mycompany.wsserver.rest;

import javax.xml.bind.annotation.XmlAttribute;
import javax.xml.bind.annotation.XmlElement;

public class Customer {
        private String id;
        private String firstName;
        private String lastName;
        private int age;
        public Customer(){}
        public Customer(String id, String firstName, String lastName, int age) {
                this.id = id;
                this.firstName = firstName;
                this.lastName = lastName;
                this.age = age;
        }
        public String getId() {
                return id;
        }
        @XmlAttribute
        public void setId(String id) {
                this.id = id;
        }
        public String getFirstName() {
                return firstName;
        }
        @XmlElement
        public void setFirstName(String firstName) {
                this.firstName = firstName;
        }
        public String getLastName() {
                return lastName;
        }
        @XmlElement
        public void setLastName(String lastName) {
                this.lastName = lastName;
        }
        public int getAge() {
                return age;
        }
        @XmlElement
        public void setAge(int age) {
                this.age = age;
        }
        @Override
        public String toString() {
                StringBuilder builder = new StringBuilder();
                builder.append("Customer [id=").append(id).append(", firstName=")
                                .append(firstName).append(", lastName=").append(lastName)
                                .append(", age=").append(age).append("]");
                return builder.toString();
        }
}
リスト6:CustomerList.java
package com.mycompany.wsserver.rest;

import java.util.ArrayList;
import java.util.List;
import javax.xml.bind.annotation.XmlElement;
import javax.xml.bind.annotation.XmlRootElement;

@XmlRootElement(name="CustomerList")
public class CustomerList {
        private List<Customer> customers;
        public CustomerList(){
                setCustomers(new ArrayList<Customer>());
        }
        public List<Customer> getCustomers() {
                return customers;
        }
        @XmlElement(name="customer")
        public void setCustomers(List<Customer> customers) {
                this.customers = customers;
        }
        public void addCustomer(Customer customer){
                customers.add(customer);
        }
}
XML要素にはjavax.xml.bind.annotation.XmlElementアノテーションを付与します。その他、XmlRootElement、XmlAttributeアノテーションも同様です。
【手順2】インターフェース作成
SOAPの場合と同様にインターフェースを作成します。
リスト7:インターフェースの作成(CustomerEndpoint.java)
package com.mycompany.wsserver.rest;

import javax.ws.rs.GET;
import javax.ws.rs.Path;
import javax.ws.rs.PathParam;
import javax.ws.rs.Produces;

public interface CustomerEndpoint {
        @GET
        @Path("/list")
        @Produces("application/xml")
        public CustomerList listCustomer();

        @GET
        @Path("/add/{id}/{firstname}/{lastname}/{age}")
        @Produces("application/xml")
        public CustomerList addCustomer(@PathParam("id") String id, @PathParam("firstname") String firstname, @PathParam("lastname") String lastname, @PathParam("age") int age);
}
javax.ws.rsで提供されている各種アノテーションを付与するところがポイントです。またそれぞれの戻り値として、CustomerListクラスを設定します。
【手順3】データ処理クラス作成
RESTfulインターフェースを介して、Camelルートに入ってきたデータを処理するためのクラスを作成します。上記listCustomerメソッド、addCustomerが呼ばれた際の処理内容を以下のように実装します(リスト8、リスト9)。
リスト8:listCustomerメソッドに対する処理(ListCustomerProcessor.java)
package com.mycompany.wsserver.rest;

import javax.ws.rs.core.Response;
import org.apache.camel.Processor;
import org.apache.camel.Exchange;

public class ListCustomerProcessor implements Processor {

    @Override
    public void process(Exchange exchange) throws Exception {   CustomerList list = new CustomerList ();
        list.addCustomer(new Customer("0001", "一郎", "佐藤", 20));
        list.addCustomer(new Customer("0002", "花子", "鈴木", 24));
        Response r = Response.status(200).entity(list).build();
        exchange.getOut().setBody(r);
    }
}
リスト9:addCustomerメソッドに対する処理(AddCustomerProcessor.java)
package com.mycompany.wsserver.rest;

import java.util.List;
import javax.ws.rs.core.Response;
import org.apache.camel.Exchange;
import org.apache.camel.Message;
import org.apache.camel.Processor;

public class AddCustomerProcessor implements Processor {

        @Override
        public void process(Exchange exchange) throws Exception {
                Message message = exchange.getIn();
                @SuppressWarnings("unchecked")
                List<Object> listBody = (List<Object>) message.getBody();

                CustomerList list = new CustomerList();
                String id = (String) listBody.get(0);
                String firstname = (String) listBody.get(1);
                String lastname = (String) listBody.get(2);
                int age = (Integer) listBody.get(3);
                list.addCustomer(new Customer(id,firstname,lastname,age));
                Response r = Response.status(200).entity(list).build();
                exchange.getOut().setBody(r);
        }

}
Camelルート内に処理を埋め込む際には、org.apache.camel.Processorインターフェースを実装したクラスを作成します。このクラスでは、Camelルート内を流れるメッセージのコンテナであるorg.apache.camel.Exchangeクラスを操作します。ExchangeはJBoss Fuseを理解する上で重要なものなので、別途このページの最後で詳説します。また、RESTのレスポンスはjavax.ws.rs.core.Responseクラスを使用しています。
【手順4】Camelルート作成
ここまでに作成したJavaプログラムを利用する形で、以下のような新しいCamelルートを作成します。
RESTサーバーのCamelルート設定
| 設定 | 値 |
|---|---|
| RouteContainer | /wsserver/src/main/resources/OSGI-INF/blueprint |
| File name | restServer.xml |
| Framework | OSGi Blueprint |
Designモード
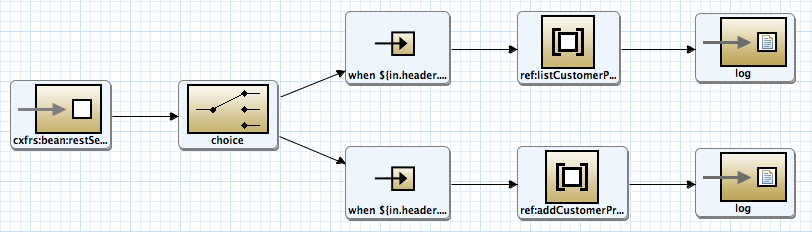
図9:RESTサーバーのCamelルート
リスト10:RESTサーバー(Sourceモード)
<?xml version="1.0" encoding="UTF-8"?>
<blueprint xmlns="http://www.osgi.org/xmlns/blueprint/v1.0.0"
       xmlns:camel="http://camel.apache.org/schema/blueprint"
       xmlns:cxf="http://camel.apache.org/schema/blueprint/cxf"
       xmlns:xsi="http://www.w3.org/2001/XMLSchema-instance"
       xsi:schemaLocation="http://www.osgi.org/xmlns/blueprint/v1.0.0 http://www.osgi.org/xmlns/blueprint/v1.0.0/blueprint.xsd
       http://camel.apache.org/schema/blueprint/cxf http://camel.apache.org/schema/blueprint/cxf/camel-cxf.xsd
       http://camel.apache.org/schema/blueprint http://camel.apache.org/schema/blueprint/camel-blueprint.xsd">

  <cxf:rsServer id="restServer" address="/customer"/>
  <bean id="listCustomerProcessor" class="com.mycompany.wsserver.rest.ListCustomerProcessor"/>
  <bean id="addCustomerProcessor" class="com.mycompany.wsserver.rest.AddCustomerProcessor"/>
  <camelContext trace="false" xmlns="http://camel.apache.org/schema/blueprint">
    <route>
        <from uri="cxfrs:bean:restServer?resourceClasses=com.mycompany.wsserver.rest.CustomerEndpoint"/>
        <choice>
            <when>
                <simple>${in.header.operationName} == 'listCustomer'</simple>
                <process ref="listCustomerProcessor"/>
                <log message="${body}"/>
            </when>
            <when>
                <simple>${in.header.operationName} == 'addCustomer'</simple>
                <process ref="addCustomerProcessor"/>
                <log message="${body}"/>
            </when>
        </choice>
    </route>
</camelContext>
</blueprint>
強調している行が、RESTサービスの設定です。SOAPの場合、参照クラスは別箇所で設定しましたが、RESTの場合は、URIに記述する点に注意してください。Javaによる実装を参照する場合には、
【手順5】ビルド、インストール、確認
ビルドや設定の確認方法は、全てSOAPの場合と同様です。JBoss Fuseへのインストールについてはすでにインストール済みなので、アップデートを行います。先ほどのBundle IDを控えていればそれを利用できますが、ない場合は、osgi:listコマンドで確認できます。特に作業をしていなければ、一番下に表示されるOSGiバンドルが該当のものなので、そのBundle IDを用いてosgi:updateを行います。
JBossFuse:admin@root> osgi:list
START LEVEL 100 , List Threshold: 50
   ID   State         Blueprint      Spring    Level  Name
[  66] [Active     ] [Created     ] [       ] [   50] Fabric8 :: Karaf Commands (1.0.0.redhat-379)
・・・ (全てのOSGiバンドルが表示される)
[ 305] [Active     ] [            ] [       ] [   60] wrap_mvn_org.postgresql_postgresql_9.3-1100-jdbc41 (0)
 [ 334] [Active     ] [Created     ] [       ] [   60] WS Server (1.0.0.SNAPSHOT)
JBossFuse:admin@root> osgi:update 334
JBossFuse:admin@root>
「http://localhost:8181/cxf」では、以下のように確認できます(図14)。
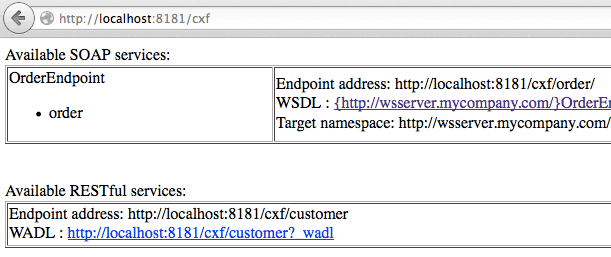
図10:RESTサーバーの確認
WADLも自動的に生成されているのが分かります。動作確認はブラウザを利用して行えます。
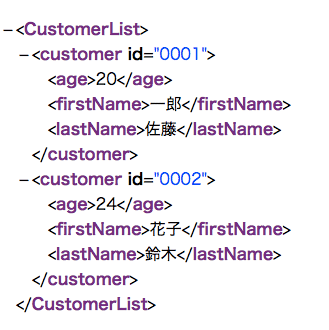
図11:List(http://localhost:8181/cxf/customer/list)のレスポンス
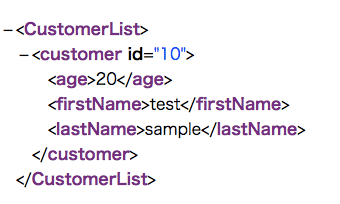
図12:Add(http://localhost:8181/cxf/customer/add/10/test/sample/20)処理のレスポンス
Exchangeについて
Exchangeは、Camelルート内を流れるメッセージのコンテナです。下図のような構成となっています。
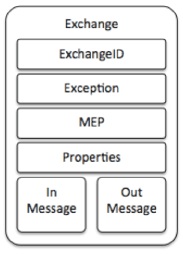
図13:Exchangeの構成
Exchangeの構成要素一覧
| 項目 | 概要 |
|---|---|
| ExchangeID | Camelが自動採番するID |
| Exception | エラー発生時に設定される |
| MEP(Message Exchange Pattern) | InOnly(片方向)、InOut(双方向) |
| Properties | ルート全体のプロパティ |
| In Message | メッセージを保持する |
| Out Message | MEPがInOutの時だけ存在する。 応答メッセージを保持する。 |
この中のIn Message、Out MessageのMessage(org.apache.camel.Message)は、次のような構造になっています。
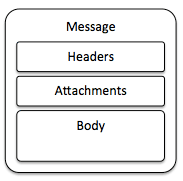
図14:Messageの構成
Messageの構成要素一覧
| 項目 | 概要 |
|---|---|
| Headers | ヘッダ情報。java.util.Mapで実装されている |
| Attachments | Webサービスやe-mailなどで使用されるアタッチメント |
| Body | メッセージが運ぶデータ本体。データ型はObjectとして定義されている。 |
| faultフラグ | outputとfaultを区別するためのフラグ |
Apache Camelは、Camelルートの中でこのExchangeに含まれるMessageを加工していくことで処理を行います。

図15:Camelルート処理イメージ
図11のようなCamelルートがある場合、Exchangeは次のように動きます(一例です)。

図16:Exchangeの推移
各EndpointやProcessorにおいて、Out Messageがnullの場合、In Messageが次の処理にそのまま引き継がれます。一方Out Messageに値が入っている場合、その値がそのまま次の処理のIn Messageとなります。Out Messageに値が入ってくるかどうかは、MEPの設定に依存する場合があります。MEPが「InOnly」の設定になっている場合(多くのEndpointでデフォルト設定)、Camelは処理を呼び出して、そのレスポンスを受け取りません。また、上記ルートでConsumer Endpointが「InOut」の設定になっている場合、Consumer Endpointに返される内容は、Producer EndpointのOut Messageになります。
- この記事のキーワード
バックナンバー
この記事の筆者

Think ITでは、技術情報が詰まったメールマガジン「Think IT Weekly」の配信サービスを提供しています。メルマガ会員登録を済ませれば、メルマガだけでなく、さまざまな限定特典を入手できるようになります。
