はじめに
前回の記事では、APIとAPI管理の基本的なことについて説明し、オープンソースのAPI管理製品である3scaleをご紹介しました。本記事では、API管理基盤となる3scaleのインストール方法をご紹介したいと思います。
前回記事にもある通り3scaleのソースコードはGitHubで公開され、コミュニティによる開発が進められています。3scaleを構成する主要モジュールは5つ(APIcast、Porta、Apisonator、Pisoni、Zync)あり、そこで使用されるシステムコンポーネントはすべてコンテナとして動作します。3scaleをインストールできる環境には、Kubernetesをベースとしたオープンソースのコンテナ管理プラットフォームであるOpenShiftがあります。
今回は簡単にインストールできるオールインワン構成のOpenShiftであるMinishiftを使って、3scaleの環境を構築していきます。
Minishiftのインストール
今回使用する環境はMacBook Pro(メモリ16GB)、macOS Sierra(10.12.6)ですが、他の環境の方は適宜読み替えて頂ければと思います。macOSでは、Homebrewを使用してMinishiftを簡単にインストールできます。なお、Minishiftのインストールと設定に関する情報の詳細は、「Overview - Getting Started | Minishift | OKD Latest」にも記載されています。
$ brew cask install minishift
$ brew cask install minishift
 ...
==> Installing Cask minishift
==> Linking Binary 'minishift' to '/usr/local/bin/minishift'.

🍺 minishift was successfully installed!
$ minishift version
minishift v1.32.0+009893b
Minishiftのインストールが完了したら、さっそくMinishiftを起動してみましょう。なお、3scaleをローカルで動かす場合、Minishiftには最低でも6GB程度のメモリと2コア以上のCPUを割り当てた方がよいため、「–memory 6GB –cpus 2」のオプションを付けてMinishiftを起動します。
$ minishift start --memory 6GB --cpus 2
-- Starting profile 'minishift'
-- Check if deprecated options are used ... OK
-- Checking if https://github.com is reachable ... OK
-- Checking if requested OpenShift version 'v3.11.0' is valid ... OK
-- Checking if requested OpenShift version 'v3.11.0' is supported ... OK
-- Checking if requested hypervisor 'xhyve' is supported on this platform ... OK
-- Checking if xhyve driver is installed ...
   Driver is available at /usr/local/bin/docker-machine-driver-xhyve
   Checking for setuid bit ... OK
-- Checking the ISO URL ... OK
-- Downloading OpenShift binary 'oc' version 'v3.11.0'
 53.27 MiB / 53.27 MiB [============================================] 100.00% 0s-- Downloading OpenShift v3.11.0 checksums ... OK
-- Checking if provided oc flags are supported ... OK
-- Starting the OpenShift cluster using 'xhyve' hypervisor ...
-- Minishift VM will be configured with ...
   Memory:    6 GB
   vCPUs :    2
   Disk size: 20 GB

   Downloading ISO 'https://github.com/minishift/minishift-centos-iso/releases/download/v1.15.0/minishift-centos7.iso'
 355.00 MiB / 355.00 MiB [==========================================] 100.00% 0s
-- Starting Minishift VM .......................... OK
-- Checking for IP address ... OK
-- Checking for nameservers ... OK
-- Checking if external host is reachable from the Minishift VM ...
   Pinging 8.8.8.8 ... OK
-- Checking HTTP connectivity from the VM ...
   Retrieving http://minishift.io/index.html ... OK
-- Checking if persistent storage volume is mounted ... OK
-- Checking available disk space ... 1% used OK
-- Writing current configuration for static assignment of IP address ... OK
   Importing 'openshift/origin-control-plane:v3.11.0' . CACHE MISS
   Importing 'openshift/origin-docker-registry:v3.11.0' . CACHE MISS
   Importing 'openshift/origin-haproxy-router:v3.11.0' . CACHE MISS
-- OpenShift cluster will be configured with ...
   Version: v3.11.0
-- Pulling the OpenShift Container Image ................. OK
-- Copying oc binary from the OpenShift container image to VM ... OK
-- Starting OpenShift cluster ...............................................................
Getting a Docker client ...
Checking if image openshift/origin-control-plane:v3.11.0 is available ...
Pulling image openshift/origin-cli:v3.11.0
E0408 01:31:40.268974    4405 helper.go:173] Reading docker config from /home/docker/.docker/config.json failed: open /home/docker/.docker/config.json: no such file or directory, will attempt to pull image docker.io/openshift/origin-cli:v3.11.0 anonymously
Image pull complete
Pulling image openshift/origin-node:v3.11.0
E0408 01:31:44.115175    4405 helper.go:173] Reading docker config from /home/docker/.docker/config.json failed: open /home/docker/.docker/config.json: no such file or directory, will attempt to pull image docker.io/openshift/origin-node:v3.11.0 anonymously
Pulled 5/6 layers, 86% complete
Pulled 6/6 layers, 100% complete
Extracting
Image pull complete
Checking type of volume mount ...
Determining server IP ...
Using public hostname IP 192.168.64.3 as the host IP
Checking if OpenShift is already running ...
Checking for supported Docker version (=>1.22) ...
Checking if insecured registry is configured properly in Docker ...
Checking if required ports are available ...
Checking if OpenShift client is configured properly ...
Checking if image openshift/origin-control-plane:v3.11.0 is available ...
Starting OpenShift using openshift/origin-control-plane:v3.11.0 ...
I0408 01:32:03.616396    4405 config.go:40] Running "create-master-config"
I0408 01:32:06.457951    4405 config.go:46] Running "create-node-config"
I0408 01:32:08.127620    4405 flags.go:30] Running "create-kubelet-flags"
I0408 01:32:08.609311    4405 run_kubelet.go:49] Running "start-kubelet"
I0408 01:32:08.820948    4405 run_self_hosted.go:181] Waiting for the kube-apiserver to be ready ...
I0408 01:33:02.849180    4405 interface.go:26] Installing "kube-proxy" ...
I0408 01:33:02.850063    4405 interface.go:26] Installing "kube-dns" ...
I0408 01:33:02.850093    4405 interface.go:26] Installing "openshift-service-cert-signer-operator" ...
I0408 01:33:02.850120    4405 interface.go:26] Installing "openshift-apiserver" ...
I0408 01:33:02.850184    4405 apply_template.go:81] Installing "kube-proxy"
I0408 01:33:02.850216    4405 apply_template.go:81] Installing "openshift-apiserver"
I0408 01:33:02.850679    4405 apply_template.go:81] Installing "kube-dns"
I0408 01:33:02.852202    4405 apply_template.go:81] Installing "openshift-service-cert-signer-operator"
I0408 01:33:09.993910    4405 interface.go:41] Finished installing "kube-proxy" "kube-dns" "openshift-service-cert-signer-operator" "openshift-apiserver"
I0408 01:35:31.084683    4405 run_self_hosted.go:242] openshift-apiserver available
I0408 01:35:31.085655    4405 interface.go:26] Installing "openshift-controller-manager" ...
I0408 01:35:31.085714    4405 apply_template.go:81] Installing "openshift-controller-manager"
I0408 01:35:35.519024    4405 interface.go:41] Finished installing "openshift-controller-manager"
Adding default OAuthClient redirect URIs ...
Adding sample-templates ...
Adding web-console ...
Adding registry ...
Adding router ...
Adding persistent-volumes ...
Adding centos-imagestreams ...
I0408 01:35:35.607170    4405 interface.go:26] Installing "sample-templates" ...
I0408 01:35:35.607205    4405 interface.go:26] Installing "openshift-web-console-operator" ...
I0408 01:35:35.607233    4405 interface.go:26] Installing "openshift-image-registry" ...
I0408 01:35:35.607259    4405 interface.go:26] Installing "openshift-router" ...
I0408 01:35:35.607284    4405 interface.go:26] Installing "persistent-volumes" ...
I0408 01:35:35.607313    4405 interface.go:26] Installing "centos-imagestreams" ...
I0408 01:35:35.607390    4405 apply_list.go:67] Installing "centos-imagestreams"
I0408 01:35:35.607579    4405 interface.go:26] Installing "sample-templates/mongodb" ...
I0408 01:35:35.607607    4405 interface.go:26] Installing "sample-templates/mariadb" ...
I0408 01:35:35.607633    4405 interface.go:26] Installing "sample-templates/mysql" ...
I0408 01:35:35.607658    4405 interface.go:26] Installing "sample-templates/rails quickstart" ...
I0408 01:35:35.607684    4405 interface.go:26] Installing "sample-templates/sample pipeline" ...
I0408 01:35:35.607710    4405 interface.go:26] Installing "sample-templates/postgresql" ...
I0408 01:35:35.607736    4405 interface.go:26] Installing "sample-templates/cakephp quickstart" ...
I0408 01:35:35.607761    4405 interface.go:26] Installing "sample-templates/dancer quickstart" ...
I0408 01:35:35.607787    4405 interface.go:26] Installing "sample-templates/django quickstart" ...
I0408 01:35:35.607813    4405 interface.go:26] Installing "sample-templates/nodejs quickstart" ...
I0408 01:35:35.607839    4405 interface.go:26] Installing "sample-templates/jenkins pipeline ephemeral" ...
I0408 01:35:35.607998    4405 apply_list.go:67] Installing "sample-templates/jenkins pipeline ephemeral"
I0408 01:35:35.608505    4405 apply_template.go:81] Installing "openshift-web-console-operator"
I0408 01:35:35.608895    4405 apply_list.go:67] Installing "sample-templates/postgresql"
I0408 01:35:35.608905    4405 apply_list.go:67] Installing "sample-templates/sample pipeline"
I0408 01:35:35.609191    4405 apply_list.go:67] Installing "sample-templates/cakephp quickstart"
I0408 01:35:35.609421    4405 apply_list.go:67] Installing "sample-templates/dancer quickstart"
I0408 01:35:35.609780    4405 apply_list.go:67] Installing "sample-templates/django quickstart"
I0408 01:35:35.610015    4405 apply_list.go:67] Installing "sample-templates/nodejs quickstart"
I0408 01:35:35.610360    4405 apply_list.go:67] Installing "sample-templates/mysql"
I0408 01:35:35.610546    4405 apply_list.go:67] Installing "sample-templates/rails quickstart"
I0408 01:35:35.610602    4405 apply_list.go:67] Installing "sample-templates/mongodb"
I0408 01:35:35.610832    4405 apply_list.go:67] Installing "sample-templates/mariadb"
I0408 01:35:58.012747    4405 interface.go:41] Finished installing "sample-templates/mongodb" "sample-templates/mariadb" "sample-templates/mysql" "sample-templates/rails quickstart" "sample-templates/sample pipeline" "sample-templates/postgresql" "sample-templates/cakephp quickstart" "sample-templates/dancer quickstart" "sample-templates/django quickstart" "sample-templates/nodejs quickstart" "sample-templates/jenkins pipeline ephemeral"
I0408 01:36:29.534909    4405 interface.go:41] Finished installing "sample-templates" "openshift-web-console-operator" "openshift-image-registry" "openshift-router" "persistent-volumes" "centos-imagestreams"
Login to server ...
Creating initial project "myproject" ...
Server Information ...
OpenShift server started.

The server is accessible via web console at:
    https://192.168.64.3:8443/console

You are logged in as:
    User: developer
    Password: <any value>

To login as administrator:
    oc login -u system:admin


-- Exporting of OpenShift images is occuring in background process with pid 3258.
上記のようなメッセージが表示されていればOpenShiftは無事に起動しています。ログに表示されているURL(上記であればhttps://192.168.64.3:8443/console)にアクセスしてOpenShiftの管理コンソールにアクセスすることもできますが、ここでは3scaleのインストールを進めましょう。
3scaleのインストール
3scaleをインストールする前の下準備
3scaleの実行環境はOpenShiftのテンプレートとして提供されており、3scaleの環境構築担当者はそのテンプレートを用いて簡単に3scaleの実行環境を構築できるようになっています。3scaleのGitHubにはいくつかのテンプレートが用意されていますが、今回は評価用のテンプレート(amp-eval-tech-preview.yml)を使用しますので、事前にファイルをダウンロードしておきます。
$ git clone https://github.com/3scale/3scale-amp-openshift-templates.git https://github.com/3scale/3scale-amp-openshift-templates.git
$ cd 3scale-amp-openshift-templates/amp/
$ ls
amp-eval-tech-preview.yml   amp.yml
amp-ha-tech-preview.yml     system-oracle
amp-s3.yml
3scaleのOpenShiftテンプレートを使用して3scaleをインストールするには、OpenShiftのCLIツールであるocコマンドを使用します。Minishiftをインストールするとocコマンドも一緒にインストールされますがPATHが通っていないため、以下のコマンドを使用してPATHを通します。
$ minishift oc-env
export PATH="/Users/taku/.minishift/cache/oc/v3.11.0/darwin:$PATH"
# Run this command to configure your shell:
# eval $(minishift oc-env)

$ eval $(minishift oc-env)

$ oc version
oc v3.11.0+0cbc58b
kubernetes v1.11.0+d4cacc0
features: Basic-Auth
ocコマンドの設定が完了したら、まずはadminユーザとしてOpenShiftにログインします。
$ oc login -u system:admin                                   [~]
Logged into "https://192.168.64.3:8443" as "system:admin" using existing credentials.

You have access to the following projects and can switch between them with 'oc project <projectname>':

    default
    kube-dns
    kube-proxy
    kube-public
    kube-system
  * myproject
    openshift
    openshift-apiserver
    openshift-controller-manager
    openshift-core-operators
    openshift-infra
    openshift-node
    openshift-service-cert-signer
    openshift-web-console

Using project "myproject".
デフォルトで複数のOpenShiftプロジェクトが作られていますが、ここでは3scaleインストール用のプロジェクトを作成し、そこに3scaleの実行環境を構築していきましょう。
$ oc new-project 3scale
Now using project "3scale" on server "https://192.168.64.3:8443".
3scaleのコンテナイメージはregistry.redhat.ioにあるものを使用する必要があります。そのレジストリにアクセスするためにRegistry Service Accountを使用しますので、Registry Service Accountsのページでサービスアカウントを作成してください(Red Hatのアカウントがない場合にはRed Hatアカウントも作成してください)。
レジストリサービスのアカウントが用意できたら、以下のコマンドでdocker-registryのシークレットを作成します。なお、your-registry-service-account-usernameとyour-registry-service-account-passwordの値はRegistry Service Accountsのページに表示されているものと置き換えてください。
$ oc create secret docker-registry threescale-registry-auth \
  --docker-server=registry.redhat.io \
  --docker-username="your-registry-service-account-username" \
  --docker-password="your-registry-service-account-password"
Registry Service Accountsの作成については、オンラインマニュアルも参照ください。
以上で準備は完了です。
3scaleのインストール
それでは、いよいよ3scaleをインストールしていきましょう。OpenShiftテンプレートを使用してアプリケーションをOpenShiftにデプロイするには「oc new-app」コマンドを使用します。以下のように引数を指定してoc new-appコマンドを実行すると、3scaleのOpenShiftテンプレートのデプロイが開始されます。
$ oc new-app \
>    --param WILDCARD_DOMAIN="192.168.64.3.nip.io" \
>    --param AMP_RELEASE=2.4.0 \
>    -f amp-eval-tech-preview.yml
--> Deploying template "3scale/3scale-api-management-eval" for "amp-eval-tech-preview.yml" to project 3scale

     3scale API Management
     ---------
     3scale API Management main system (Evaluation)

     Login on https://3scale-admin.192.168.64.3.nip.io as admin/2nnlaew6

     * With parameters:
        * AMP_RELEASE=2.4.0
        * APP_LABEL=3scale-api-management
        * TENANT_NAME=3scale
        * RWX_STORAGE_CLASS=null
        * AMP_BACKEND_IMAGE=registry.access.redhat.com/3scale-amp24/backend
        * AMP_ZYNC_IMAGE=registry.access.redhat.com/3scale-amp24/zync
        * AMP_APICAST_IMAGE=registry.access.redhat.com/3scale-amp24/apicast-gateway
        * AMP_ROUTER_IMAGE=registry.access.redhat.com/3scale-amp22/wildcard-router
        * AMP_SYSTEM_IMAGE=registry.access.redhat.com/3scale-amp24/system
        * POSTGRESQL_IMAGE=registry.access.redhat.com/rhscl/postgresql-95-rhel7:9.5
        * MYSQL_IMAGE=registry.access.redhat.com/rhscl/mysql-57-rhel7:5.7
        * MEMCACHED_IMAGE=registry.access.redhat.com/3scale-amp20/memcached
        * IMAGESTREAM_TAG_IMPORT_INSECURE=false
        * REDIS_IMAGE=registry.access.redhat.com/rhscl/redis-32-rhel7:3.2
        * MySQL User=mysql
        * MySQL Password=8n36wn6d # generated
        * MySQL Database Name=system
        * MySQL Root password.=she4ce04 # generated
        * SYSTEM_BACKEND_USERNAME=3scale_api_user
        * SYSTEM_BACKEND_PASSWORD=ibgvd7do # generated
        * SYSTEM_BACKEND_SHARED_SECRET=bpdfox8f # generated
        * SYSTEM_APP_SECRET_KEY_BASE=b1184ac4b2e0ba2055708dca3e3d34c37c30523550668ae2170dd0046e4b1e4160224b272bbedbdc6e4b7da4a707864e07b0e656b105a7148b3dd4e6a7117584 # generated
        * ADMIN_PASSWORD=2nnlaew6 # generated
        * ADMIN_USERNAME=admin
        * ADMIN_ACCESS_TOKEN=di3i1riwy2usdrvg # generated
        * MASTER_NAME=master
        * MASTER_USER=master
        * MASTER_PASSWORD=7balbbmq # generated
        * MASTER_ACCESS_TOKEN=b12vpaw0 # generated
        * RECAPTCHA_PUBLIC_KEY=
        * RECAPTCHA_PRIVATE_KEY=
        * PostgreSQL Connection Password=KxcgDuRNK3vg4uqU # generated
        * ZYNC_SECRET_KEY_BASE=gCGhfB4vi4a73QAg # generated
        * ZYNC_AUTHENTICATION_TOKEN=ELbAXPr32vlmvupx # generated
        * APICAST_ACCESS_TOKEN=ylhn5hh2 # generated
        * APICAST_MANAGEMENT_API=status
        * APICAST_OPENSSL_VERIFY=false
        * APICAST_RESPONSE_CODES=true
        * APICAST_REGISTRY_URL=http://apicast-staging:8090/policies
        * WILDCARD_DOMAIN=192.168.64.3.nip.io
        * WILDCARD_POLICY=None

--> Creating resources ...
    imagestream.image.openshift.io "amp-backend" created
    imagestream.image.openshift.io "amp-zync" created
    imagestream.image.openshift.io "amp-apicast" created
    imagestream.image.openshift.io "amp-wildcard-router" created
    imagestream.image.openshift.io "amp-system" created
    imagestream.image.openshift.io "postgresql" created
    deploymentconfig.apps.openshift.io "backend-redis" created
    service "backend-redis" created
    configmap "redis-config" created
    persistentvolumeclaim "backend-redis-storage" created
    deploymentconfig.apps.openshift.io "system-redis" created
    persistentvolumeclaim "system-redis-storage" created
    deploymentconfig.apps.openshift.io "backend-cron" created
    deploymentconfig.apps.openshift.io "backend-listener" created
    service "backend-listener" created
    route.route.openshift.io "backend" created
    deploymentconfig.apps.openshift.io "backend-worker" created
    configmap "backend-environment" created
    secret "backend-internal-api" created
    secret "backend-redis" created
    secret "backend-listener" created
    deploymentconfig.apps.openshift.io "system-mysql" created
    configmap "mysql-main-conf" created
    configmap "mysql-extra-conf" created
    persistentvolumeclaim "mysql-storage" created
    deploymentconfig.apps.openshift.io "system-memcache" created
    persistentvolumeclaim "system-storage" created
    service "system-provider" created
    service "system-master" created
    service "system-developer" created
    route.route.openshift.io "system-provider-admin" created
    route.route.openshift.io "system-master" created
    route.route.openshift.io "system-developer" created
    service "system-mysql" created
    service "system-redis" created
    service "system-sphinx" created
    service "system-memcache" created
    configmap "system" created
    configmap "smtp" created
    configmap "system-environment" created
    deploymentconfig.apps.openshift.io "system-app" created
    deploymentconfig.apps.openshift.io "system-sidekiq" created
    deploymentconfig.apps.openshift.io "system-sphinx" created
    secret "system-events-hook" created
    secret "system-redis" created
    secret "system-master-apicast" created
    secret "system-database" created
    secret "system-seed" created
    secret "system-recaptcha" created
    secret "system-app" created
    secret "system-memcache" created
    deploymentconfig.apps.openshift.io "zync" created
    deploymentconfig.apps.openshift.io "zync-database" created
    service "zync" created
    service "zync-database" created
    secret "zync" created
    deploymentconfig.apps.openshift.io "apicast-staging" created
    deploymentconfig.apps.openshift.io "apicast-production" created
    service "apicast-staging" created
    service "apicast-production" created
    route.route.openshift.io "api-apicast-staging" created
    route.route.openshift.io "api-apicast-production" created
    configmap "apicast-environment" created
    secret "apicast-redis" created
    deploymentconfig.apps.openshift.io "apicast-wildcard-router" created
    service "apicast-wildcard-router" created
    route.route.openshift.io "apicast-wildcard-router" created
--> Success
    Access your application via route 'backend-3scale.192.168.64.3.nip.io'
    Access your application via route '3scale-admin.192.168.64.3.nip.io'
    Access your application via route 'master.192.168.64.3.nip.io'
    Access your application via route '3scale.192.168.64.3.nip.io'
    Access your application via route 'api-3scale-apicast-staging.192.168.64.3.nip.io'
    Access your application via route 'api-3scale-apicast-production.192.168.64.3.nip.io'
    Access your application via route 'apicast-wildcard.192.168.64.3.nip.io'
    Run 'oc status' to view your app.
3scaleのコンテナはAPIゲートウェイ(APIcast)、管理ポータル、デベロッパーポータル、データベース、cron、インデックスエンジンなど役割ごとにKubernetesのPodとして個別にデプロイされており、それぞれ必要に応じて柔軟にスケールアウトできるモジュール構成となっています。すべてのPodのデプロイが完了するまで若干時間がかかりますので、すべてのPodが起動するまで少し待ちましょう(3scale 2.4では全部で15のPodがあります)。
OpenShiftの管理コンソールにアクセスして3scaleのプロジェクトを表示すると、そのステータスを確認できます。図1はすべてのPodがデプロイされ、3scaleの実行環境ができた状態を示しています。
- OpenShift管理コンソールURL
- https://$(minishift-ip):8443/console/project/3scale/overview

図1:すべてのPodがデプロイされ、3scaleの実行環境ができた状態
インストールが完了したら、さっそく3scaleが正しく動いているかどうか確認していきましょう。以下のURLにアクセスし、3scaleの管理ログイン画面を表示させます。
- 3scale管理コンソールURL
- https://3scale-admin.$(minishift ip).nip.io/
ログインユーザ名は「admin」、パスワードは3scaleのOpenShiftテンプレートをデプロイした時のログに以下のように出力されています。パスワードは自動生成されるので、ログインする時にはその値を使用してください。
 ...
         * ADMIN\_PASSWORD=2nnlaew6 \# generated
         * ADMIN\_USERNAME=admin
 ...
ログインすると図2のように、3scaleの仕組みを簡単に紹介するWizard画面が表示されます。
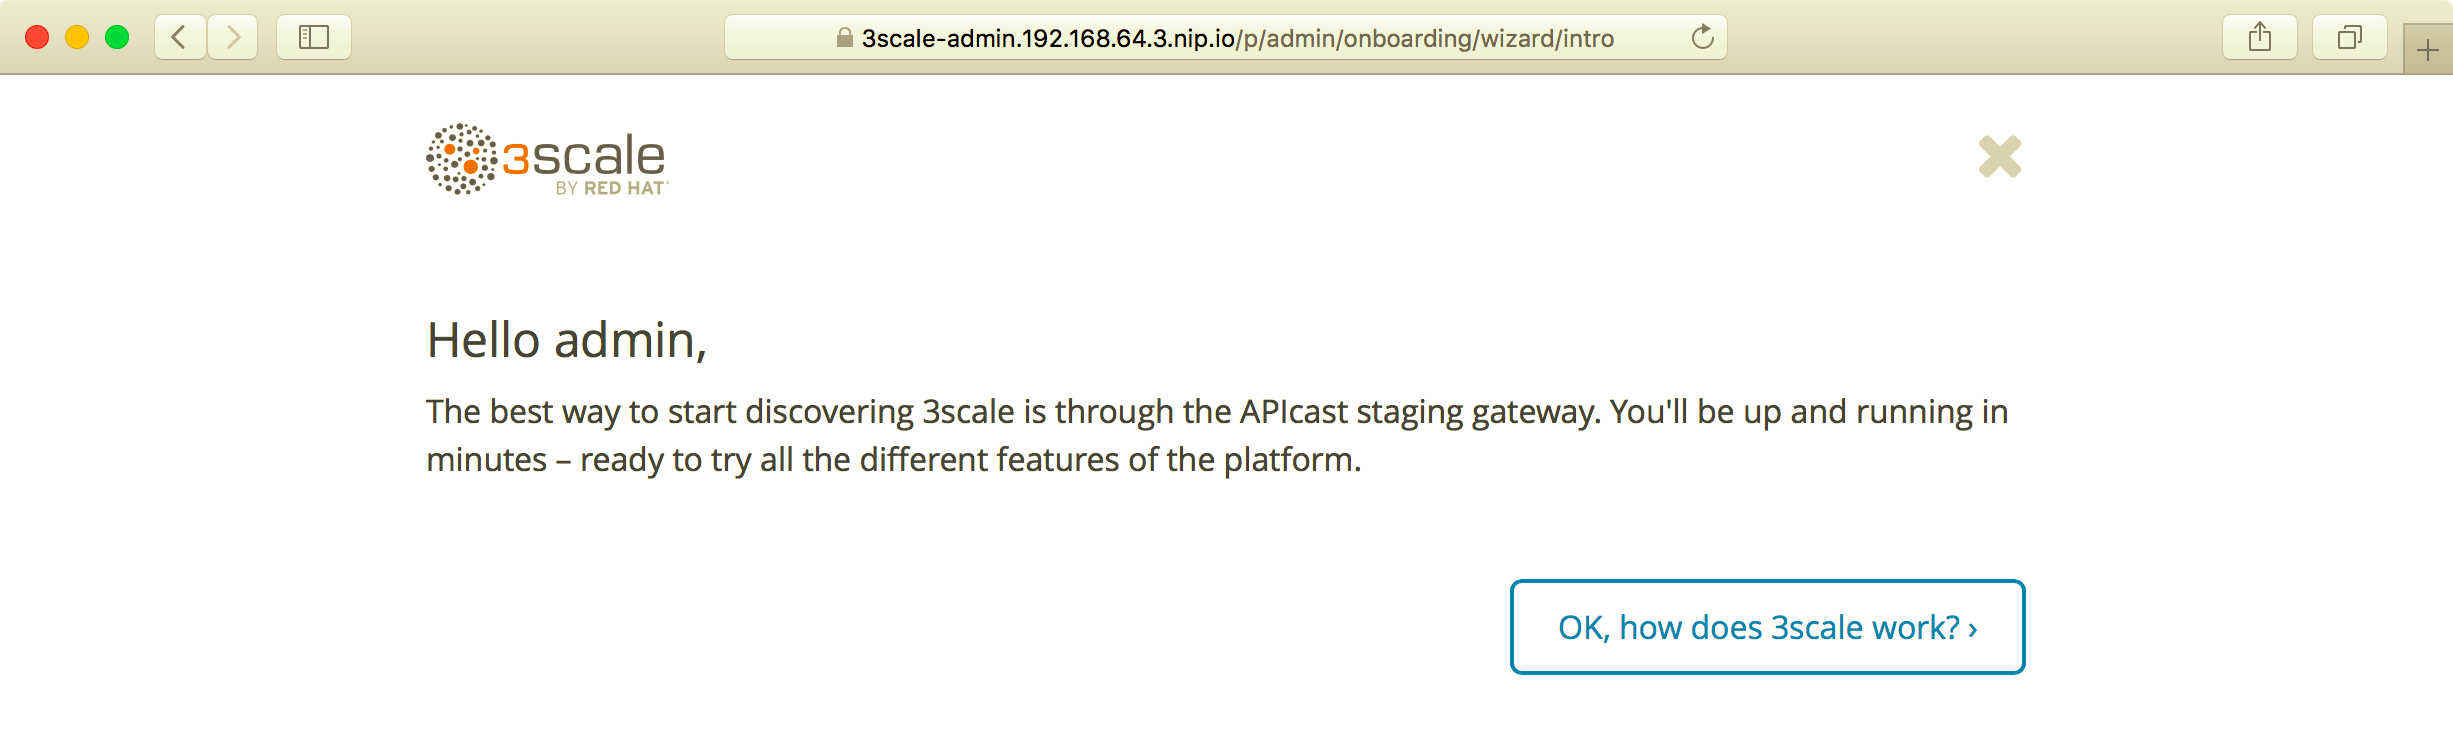
図2:3scaleの仕組みを簡単に紹介するWizard画面
[OK, how does 3scale work?]のボタンをクリックし、まずはWizardに従って3scaleの仕組みを理解していきましょう。基本的な動作としては、APIクライアントが3scaleのAPIゲートウェイに対してリクエストを投げると、3scaleで認証や流量制御が行われ、バックエンドのAPIが呼び出されてレスポンスがAPIクライアントに返されます(図3)。

図3:Wizardに沿って3scaleの仕組みを理解していく
[Got it! Lets add my API]をクリックすると、3scaleをインストールしてすぐに試せるように、サンプルのEcho API(https://echo-api.3scale.net/)を追加できるようになっていますので、Wizardに従ってAPIを追加してみてください(図4)。
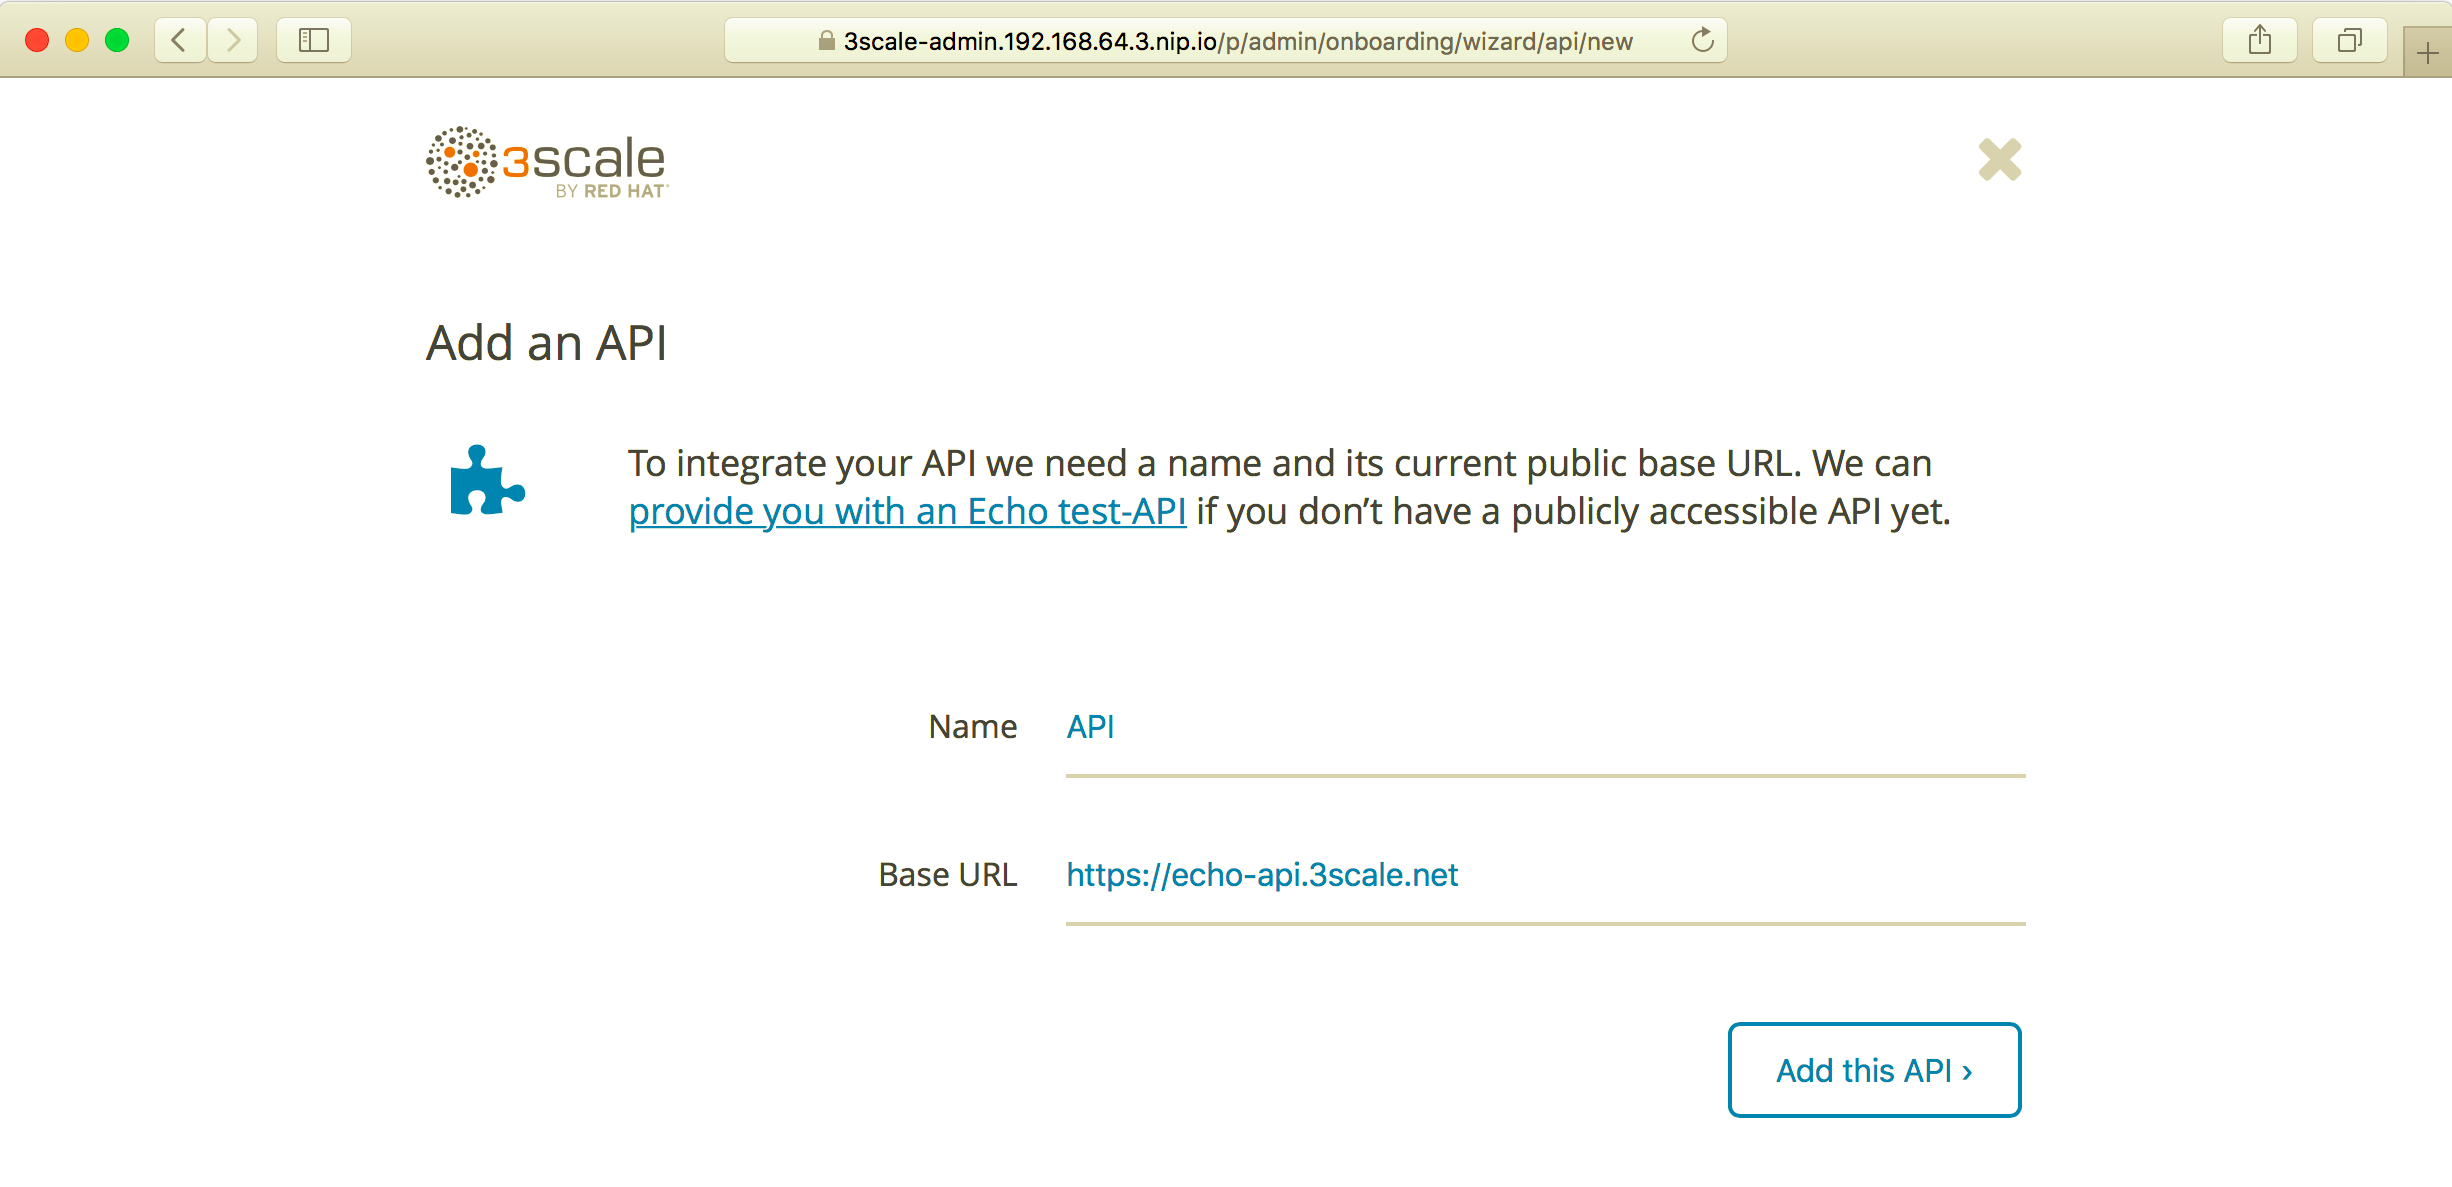
図4:Wizardに従ってサンプルのEcho APIを追加
APIの追加が完了すると図5のように3scaleの管理画面が表示され、Echo APIが追加され、呼び出されていることをグラフで確認できます。
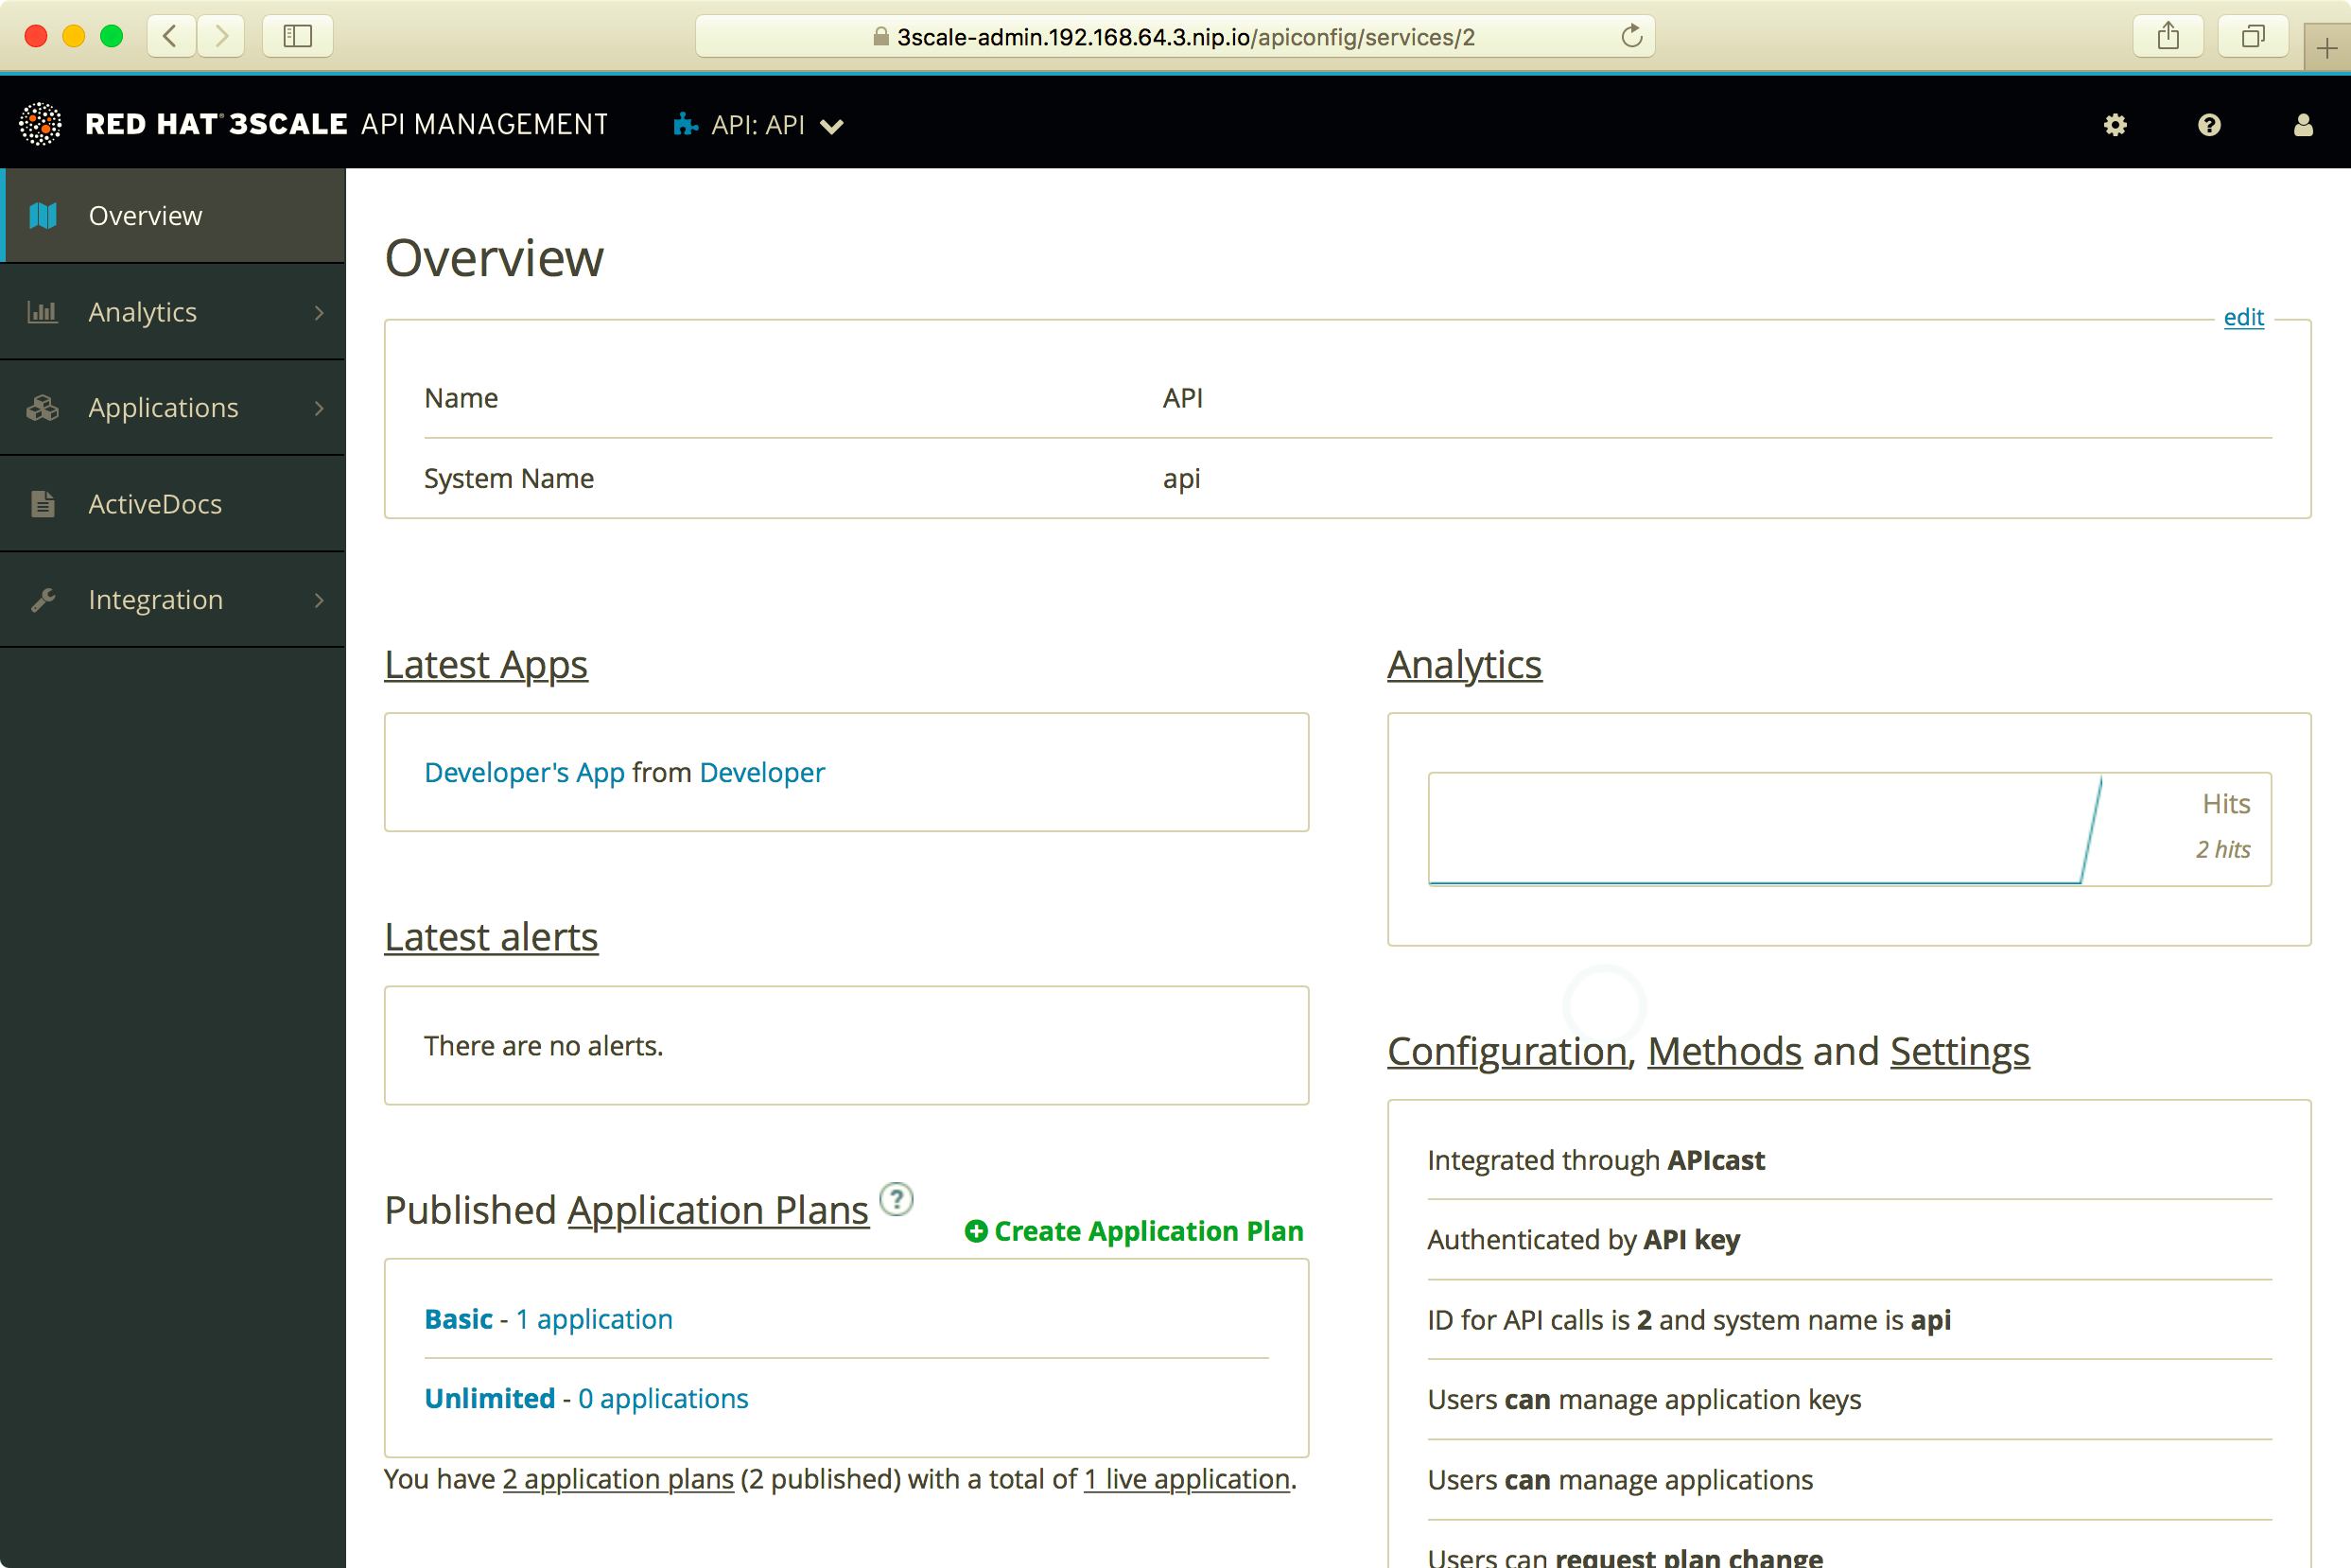
図5:追加したEcho APIが追加され、呼び出されていることが確認できる
以上で3scaleの環境を構築できましたので、APIの管理を行っていくことができます。
おわりに
次回は3scaleのコミッターとしても活躍している日立製作所の田畑さんより、3scaleの基本機能や一般的な使い方を紹介します。
この記事をシェアしてください
バックナンバー
この記事の筆者
筆者の人気記事
Think ITでは、技術情報が詰まったメールマガジン「Think IT Weekly」の配信サービスを提供しています。メルマガ会員登録を済ませれば、メルマガだけでなく、さまざまな限定特典を入手できるようになります。
