仕組みの解説
仕組みの解説
構築ができたので、ODLとOpenStackが連携する仕組みを見ていきましょう。
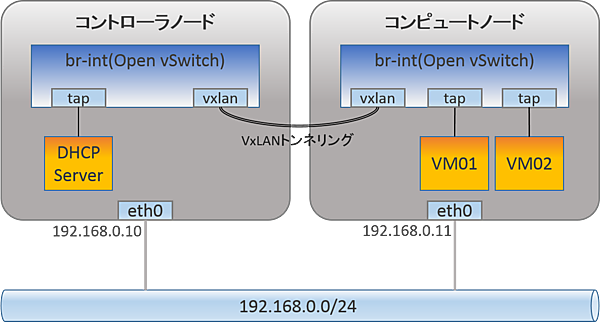
まず、内部のネットワークを説明します。全てのノードにbr-intというOpen vSwitch(以降、OVSと省略)のブリッジが作成されます。ネットワークとサブネットを作成するとコントローラノードのbr-intにDHCPサーバのポートが作成されます。インスタンスを作成するとコンピュートノードのbr-intにTAPデバイスとして接続されます。ノード間はVxLANでトンネリングされているので、インスタンスからのDHCPリクエストはそのトンネルを通ってDHCP Agentに届きます。
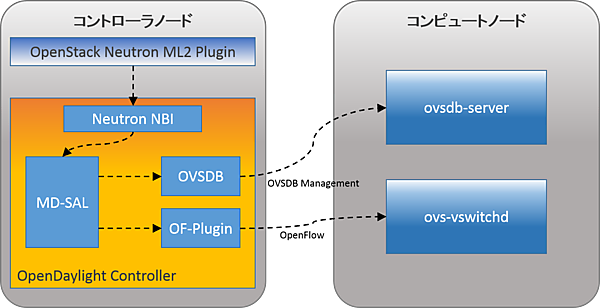
次に、OpenStack NeutronがODLを使ってどのように各ノードのOVSに対してフローを設定するのかを見ていきます。OpenStack Neutronは、ML2プラグインのメカニズムドライバとして用意されているODLのドライバを経由し、ODLに対してポート作成などのリクエストを発行します。ODLはそれらのリクエストをNeutron NBI(North Bound Interface)から受けとってMD-SALに渡します。
MD-SAL(Model-Driven Service Abstraction Layer)とは、North Bound APIとSouth Bound APIの間でやりとりされる様々なデータを統一する抽象化フレームワークです。データ抽象化のモデリング言語としてYANGが採用されています。MD-SALはOVSDBとOF-PluginのSouth Bound APIを使ってコンピュートノードのOVSのフローを制御します。
ではここからは実際にOVSのブリッジやフローがどのような状態になっているのか見ていきましょう。構築直後の状態とネットワークとサブネットを作成した状態、インスタンスを起動した状態で、ブリッジのポートやフローにどのような設定がされているかを見ていきます。
まず、構築直後のOVSのブリッジとポートの状態を確認してみます。ManagerにコントローラノードのIPアドレスが設定されていることからOVSDB-ServerのマネージャーにODLが使われている事がわかります。さらに、br-intブリッジが作成され、ControllerにコントローラノードのIPアドレスが設定されていることから、ODLがOpenFlowコントローラーとして使われている事も確認できます。
[コントローラノード]
~/devstack$ sudo ovs-vsctl show
43cbe79e-8e51-4a5a-8638-03df224ad777
    Manager "tcp:192.168.0.10:6640"  # コントローラノードのIPアドレスが指定される
        is_connected: true
    Bridge br-int  # br-intブリッジが作成される
        Controller "tcp:192.168.0.10:6653"  # コントローラノードのIPアドレスが指定される
            is_connected: true
        fail_mode: secure
        Port br-int
            Interface br-int
                type: internal
   Bridge br-ex
        Port br-ex
            Interface br-ex
                type: internal
    ovs_version: "2.0.2"
[コンピュートノード]
~/devstack$ sudo ovs-vsctl show
00790da7-431d-430c-b638-9114e2f17552
    Manager "tcp:192.168.0.10:6640"  # コントローラノードのIPアドレスが指定される
        is_connected: true
    Bridge br-int  # br-intブリッジが作成される
        Controller "tcp:192.168.0.10:6653"  # コントローラノードのIPアドレスが指定される
            is_connected: true
        fail_mode: secure
        Port br-int
            Interface br-int
                type: internal
    ovs_version: "2.0.2"
この時の各ノードの初期状態のフローを確認してみると、全てのパケットが110番テーブルで破棄されるようになっています。
[コントローラノード]
~/devstack$ sudo ovs-ofctl dump-flows br-int -O OpenFlow13  # フローテーブルの一覧を取得
OFPST_FLOW reply (OF1.3) (xid=0x2):
 cookie=0x0, duration=1735.11s, table=0, n_packets=0, n_bytes=0, dl_type=0x88cc actions=CONTROLLER:65535
 cookie=0x0, duration=1733.976s, table=0, n_packets=2, n_bytes=140, priority=0 actions=goto_table:20
 cookie=0x0, duration=1733.969s, table=20, n_packets=2, n_bytes=140, priority=0 actions=goto_table:30
 cookie=0x0, duration=1733.966s, table=30, n_packets=2, n_bytes=140, priority=0 actions=goto_table:40
 cookie=0x0, duration=1733.961s, table=40, n_packets=2, n_bytes=140, priority=0 actions=goto_table:50
 cookie=0x0, duration=1733.955s, table=50, n_packets=2, n_bytes=140, priority=0 actions=goto_table:60
 cookie=0x0, duration=1733.953s, table=60, n_packets=2, n_bytes=140, priority=0 actions=goto_table:70
 cookie=0x0, duration=1733.949s, table=70, n_packets=2, n_bytes=140, priority=0 actions=goto_table:80
 cookie=0x0, duration=1733.944s, table=80, n_packets=2, n_bytes=140, priority=0 actions=goto_table:90
 cookie=0x0, duration=1733.939s, table=90, n_packets=2, n_bytes=140, priority=0 actions=goto_table:100
 cookie=0x0, duration=1733.935s, table=100, n_packets=2, n_bytes=140, priority=0 actions=goto_table:110
 cookie=0x0, duration=1733.902s, table=110, n_packets=2, n_bytes=140, priority=0 actions=drop
[コンピュートノード]
~/devstack$ sudo ovs-ofctl dump-flows br-int -O OpenFlow13  # フローテーブルの一覧を取得
OFPST_FLOW reply (OF1.3) (xid=0x2):
 cookie=0x0, duration=1242.665s, table=0, n_packets=0, n_bytes=0, dl_type=0x88cc actions=CONTROLLER:65535
 cookie=0x0, duration=1240.786s, table=0, n_packets=4, n_bytes=320, priority=0 actions=goto_table:20
 cookie=0x0, duration=1240.783s, table=20, n_packets=3, n_bytes=230, priority=0 actions=goto_table:30
 cookie=0x0, duration=1240.781s, table=30, n_packets=3, n_bytes=230, priority=0 actions=goto_table:40
 cookie=0x0, duration=1240.781s, table=40, n_packets=3, n_bytes=230, priority=0 actions=goto_table:50
 cookie=0x0, duration=1240.775s, table=50, n_packets=3, n_bytes=230, priority=0 actions=goto_table:60
 cookie=0x0, duration=1240.77s, table=60, n_packets=3, n_bytes=230, priority=0 actions=goto_table:70
 cookie=0x0, duration=1240.764s, table=70, n_packets=3, n_bytes=230, priority=0 actions=goto_table:80
 cookie=0x0, duration=1240.753s, table=80, n_packets=3, n_bytes=230, priority=0 actions=goto_table:90
 cookie=0x0, duration=1240.743s, table=90, n_packets=3, n_bytes=230, priority=0 actions=goto_table:100
 cookie=0x0, duration=1240.737s, table=100, n_packets=3, n_bytes=230, priority=0 actions=goto_table:110
 cookie=0x0, duration=1240.73s, table=110, n_packets=3, n_bytes=230, priority=0 actions=drop
次に、ネットワークとサブネットが作成された状態のブリッジとポートの状態を見てみます。各ノードのbr-intに、ノード間接続のためのVxLANのポートが追加されているのが確認できます。さらに、コントローラノードのbr-intにtapから始まる名前のデバイスが追加されていると思います。これはDHCPサーバのポートです。
[コントローラノード]
~/devstack$ sudo ovs-vsctl show
43cbe79e-8e51-4a5a-8638-03df224ad777
   Manager "tcp:192.168.0.10:6640"
        is_connected: true
   Bridge br-int
       Controller "tcp:192.168.0.10:6653"
            is_connected: true
        fail_mode: secure
        Port "vxlan-192.168.0.11"  # コンピュートノードとのトンネリング用ポート
            Interface "vxlan-192.168.0.11"
                type: vxlan  # トンネリングのタイプはVxLAN
                options: {key=flow, local_ip="192.168.0.10", remote_ip="192.168.0.11"}
        Port br-int
            Interface br-int
                type: internal
        Port "tap178a8b99-70"  # DHCPサーバのポート
            Interface "tap178a8b99-70"
                type: internal
   Bridge br-ex
        Port br-ex
            Interface br-ex
                type: internal
    ovs_version: "2.0.2"
[コンピュートノード]
~/devstack$ sudo ovs-vsctl show
00790da7-431d-430c-b638-9114e2f17552
   Manager "tcp:192.168.0.10:6640"
        is_connected: true
    Bridge br-int
        Controller "tcp:192.168.0.10:6653"
            is_connected: true
        fail_mode: secure
        Port br-int
            Interface br-int
                type: internal
        Port "vxlan-192.168.0.10"  # コントローラノードとのトンネリング用ポート
            Interface "vxlan-192.168.0.10"
                type: vxlan  # トンネリングのタイプはVxLAN
                options: {key=flow, local_ip="192.168.0.11", remote_ip="192.168.0.10"}
    ovs_version: "2.0.2"
tapから始まるデバイス名はNeutronのポートIDの先頭11桁と対応しているので、neutronコマンドを使ってDHCPのポートが追加されたことが確認できます。
~/devstack$ neutron port-list
+--------------------------------------+------+-------------------+-----------------------------------------------------------------------------------+
| id                                   | name | mac_address       | fixed_ips                                                                         |
+--------------------------------------+------+-------------------+-----------------------------------------------------------------------------------+
| 178a8b99-700f-4d2f-be35-f34d420f66a3 |      | fa:16:3e:ef:85:07 | {"subnet_id": "8d373fbd-6134-47d1-aff6-86ee1ae7c8d1", "ip_address": "10.11.12.2"} |
+--------------------------------------+------+-------------------+-----------------------------------------------------------------------------------+
~/devstack$ neutron port-show 178a8b99-700f-4d2f-be35-f34d420f66a3
+-----------------------+--------------------------------------------------------------------------------------------------------+
| Field                 | Value                                                                                                  |
+-----------------------+--------------------------------------------------------------------------------------------------------+
| admin_state_up        | True                                                                                                   |
| allowed_address_pairs |                                                                                                        |
| binding:vnic_type     | normal                                                                                                 |
| device_id             | dhcpd3377d3c-a0d1-5d71-9947-f17125c357bb-f8209267-5cf1-4073-9af5-bbbf7fe500cd                          |
| device_owner          | network:dhcp                                                                                           |  # DHCP
| dns_assignment        | {"hostname": "host-10-11-12-2", "ip_address": "10.11.12.2", "fqdn": "host-10-11-12-2.openstacklocal."} |
| dns_name              |                                                                                                        |
| extra_dhcp_opts       |                                                                                                        |
| fixed_ips             | {"subnet_id": "8d373fbd-6134-47d1-aff6-86ee1ae7c8d1", "ip_address": "10.11.12.2"}                      |
| id                    | 178a8b99-700f-4d2f-be35-f34d420f66a3                                                                   |
| mac_address           | fa:16:3e:ef:85:07                                                                                      |
| name                  |                                                                                                        |
| network_id            | f8209267-5cf1-4073-9af5-bbbf7fe500cd                                                                   |
| port_security_enabled | False                                                                                                  |
| security_groups       |                                                                                                        |
| status                | ACTIVE                                                                                                 |
| tenant_id             | 7305d84b42cb470c9b3bbb96e711cc96                                                                       |
+-----------------------+--------------------------------------------------------------------------------------------------------+
デバイス名とOpenflowポート番号の対応は以下の様に取得できます。DHCPサーバのポート(tap178a8b99-70)はbr-intのOpenFlowポート1番であることがわかります。
[コントローラノード]
~/devstack$ sudo ovs-vsctl --columns=name,ofport list Interface
name                : "tap178a8b99-70"  # デバイス名(DHCPサーバ)
ofport              : 1                 # br-intのOpenFlowポート番号

name                : br-ex
ofport              : 65534

name                : "vxlan-192.168.0.11"
ofport              : 2

name                : br-int
ofport              : 65534
[コンピュートノード]
~/devstack$ sudo ovs-vsctl --columns=name,ofport list Interface
name                : "vxlan-192.168.0.10"
ofport              : 1

name                : br-int
ofport              : 65534
この状態のフローを見てみると、ノード間通信とDHCPに関するフローが登録されていることがわかります。
[コントローラノード]
~/devstack$ sudo ovs-ofctl dump-flows br-int -O openflow13
OFPST_FLOW reply (OF1.3) (xid=0x2):
 cookie=0x0, duration=10069.488s, table=0, n_packets=0, n_bytes=0, tun_id=0x435,in_port=2 actions=load:0x2->NXM_NX_REG0[],goto_table:20
 cookie=0x0, duration=10069.761s, table=0, n_packets=5, n_bytes=390, in_port=1,dl_src=fa:16:3e:ef:85:07 actions=set_field:0x435->tun_id,load:0x1->NXM_NX_REG0[],goto_table:20
 cookie=0x0, duration=10069.737s, table=0, n_packets=0, n_bytes=0, priority=8192,in_port=1 actions=drop
 cookie=0x0, duration=12211.097s, table=0, n_packets=2015, n_bytes=227695, dl_type=0x88cc actions=CONTROLLER:65535
 cookie=0x0, duration=12209.963s, table=0, n_packets=6, n_bytes=488, priority=0 actions=goto_table:20
 cookie=0x0, duration=12209.956s, table=20, n_packets=11, n_bytes=878, priority=0 actions=goto_table:30
 cookie=0x0, duration=12209.953s, table=30, n_packets=11, n_bytes=878, priority=0 actions=goto_table:40
 cookie=0x0, duration=10070.279s, table=40, n_packets=0, n_bytes=0, priority=61012,udp,tp_src=68,tp_dst=67 actions=goto_table:50
 cookie=0x0, duration=12209.948s, table=40, n_packets=11, n_bytes=878, priority=0 actions=goto_table:50
 cookie=0x0, duration=12209.942s, table=50, n_packets=11, n_bytes=878, priority=0 actions=goto_table:60
 cookie=0x0, duration=12209.94s, table=60, n_packets=11, n_bytes=878, priority=0 actions=goto_table:70
 cookie=0x0, duration=12209.936s, table=70, n_packets=11, n_bytes=878, priority=0 actions=goto_table:80
 cookie=0x0, duration=12209.931s, table=80, n_packets=11, n_bytes=878, priority=0 actions=goto_table:90
 cookie=0x0, duration=12209.926s, table=90, n_packets=11, n_bytes=878, priority=0 actions=goto_table:100
 cookie=0x0, duration=12209.922s, table=100, n_packets=11, n_bytes=878, priority=0 actions=goto_table:110
 cookie=0x0, duration=10069.5s, table=110, n_packets=0, n_bytes=0, priority=8192,tun_id=0x435 actions=drop
 cookie=0x0, duration=10069.718s, table=110, n_packets=0, n_bytes=0, tun_id=0x435,dl_dst=fa:16:3e:ef:85:07 actions=output:1
 cookie=0x0, duration=10069.508s, table=110, n_packets=5, n_bytes=390, priority=16383,reg0=0x1,tun_id=0x435,dl_dst=01:00:00:00:00:00/01:00:00:00:00:00 actions=output:1,output:2
 cookie=0x0, duration=10069.506s, table=110, n_packets=0, n_bytes=0, priority=16384,reg0=0x2,tun_id=0x435,dl_dst=01:00:00:00:00:00/01:00:00:00:00:00 actions=output:1
 cookie=0x0, duration=12209.889s, table=110, n_packets=6, n_bytes=488, priority=0 actions=drop
[コンピュートノード]
~/devstack$ sudo ovs-ofctl dump-flows br-int -O OpenFlow13
OFPST_FLOW reply (OF1.3) (xid=0x2):
 cookie=0x0, duration=12869.133s, table=0, n_packets=2254, n_bytes=254702, dl_type=0x88cc actions=CONTROLLER:65535
 cookie=0x0, duration=12867.254s, table=0, n_packets=9, n_bytes=710, priority=0 actions=goto_table:20
 cookie=0x0, duration=12867.251s, table=20, n_packets=8, n_bytes=620, priority=0 actions=goto_table:30
 cookie=0x0, duration=12867.249s, table=30, n_packets=8, n_bytes=620, priority=0 actions=goto_table:40
 cookie=0x0, duration=12867.249s, table=40, n_packets=8, n_bytes=620, priority=0 actions=goto_table:50
 cookie=0x0, duration=12867.243s, table=50, n_packets=8, n_bytes=620, priority=0 actions=goto_table:60
 cookie=0x0, duration=12867.238s, table=60, n_packets=8, n_bytes=620, priority=0 actions=goto_table:70
 cookie=0x0, duration=12867.232s, table=70, n_packets=8, n_bytes=620, priority=0 actions=goto_table:80
 cookie=0x0, duration=12867.221s, table=80, n_packets=8, n_bytes=620, priority=0 actions=goto_table:90
 cookie=0x0, duration=12867.211s, table=90, n_packets=8, n_bytes=620, priority=0 actions=goto_table:100
 cookie=0x0, duration=12867.205s, table=100, n_packets=8, n_bytes=620, priority=0 actions=goto_table:110
 cookie=0x0, duration=11271.53s, table=110, n_packets=0, n_bytes=0, tun_id=0x435,dl_dst=fa:16:3e:ef:85:07 actions=output:1
 cookie=0x0, duration=12867.198s, table=110, n_packets=8, n_bytes=620, priority=0 actions=drop
最後にインスタンスを起動した時の状態を確認します。インスタンスを起動するとコンピュートノードのbr-intにインスタンスのポート(tap7adff632-cc、tap2756a09c-12)が接続されます。
[コンピュートノード]
~/devstack$ sudo ovs-vsctl show
00790da7-431d-430c-b638-9114e2f17552
    Manager "tcp:192.168.0.10:6640"
        is_connected: true
    Bridge br-int
        Controller "tcp:192.168.0.10:6653"
            is_connected: true
        fail_mode: secure
        Port "tap7adff632-cc" # インスタンスのポート
            Interface "tap7adff632-cc"
        Port br-int
            Interface br-int
                type: internal
        Port "vxlan-192.168.0.10"
            Interface "vxlan-192.168.0.10"
                type: vxlan
                options: {key=flow, local_ip="192.168.0.11", remote_ip="192.168.0.10"}
        Port "tap2756a09c-12" # インスタンスのポート
            Interface "tap2756a09c-12"
    ovs_version: "2.0.2"
2台のインスタンスのそれぞれのXML設定ファイルを見てみると、br-intのポート名(tap7adff632-ccとtap2756a09c-12)とインスタンスのデバイス名が対応していることが分かります。
[コンピュートノード]
~/devstack$ virsh list
 Id    Name                           State
----------------------------------------------------
 2     instance-00000001              running
 3     instance-00000002              running
~/devstack$ virsh dumpxml instance-00000001
<domain type='kvm' id='2'>
  <name>instance-00000001</name>
  <uuid>7d82ceb1-1fae-4b3c-b294-03ba5362200b</uuid>
  :
 <devices>
  :
   <interface type='bridge'>
      <mac address='fa:16:3e:9e:f5:70'/>
      <source bridge='br-int'/>
      <virtualport type='openvswitch'>
        <parameters interfaceid='7adff632-ccf9-4d43-8f5d-7db454313f44'/>
      </virtualport>
      <target dev='tap7adff632-cc'/>
      <model type='virtio'/>
  :
~/devstack$ virsh dumpxml instance-00000002
<domain type='kvm' id='3'>
  <name>instance-00000002</name>
  <uuid>e6151ecd-41e1-4730-bcfa-7cbc68a86830</uuid>
  :
 <devices>
  :
   <interface type='bridge'>
      <mac address='fa:16:3e:53:88:56'/>
      <source bridge='br-int'/>
      <virtualport type='openvswitch'>
        <parameters interfaceid='2756a09c-125a-4fe8-9a26-2bde05857062'/>
      </virtualport>
      <target dev='tap2756a09c-12'/>
      <model type='virtio'/>
  :
OpenFlowのポート番号を調べて、インスタンスに対して設定されたフローを確認します。詳しいフローの説明は省略しますが、インスタンスを作成すると各ノードにインスタンスの通信に関するフローが設定されることが分かると思います。
[コントローラノード]
~/devstack$ sudo ovs-ofctl dump-flows br-int -O openflow13
OFPST_FLOW reply (OF1.3) (xid=0x2):
 cookie=0x0, duration=17198.417s, table=0, n_packets=60, n_bytes=5204, tun_id=0x435,in_port=2 actions=load:0x2->NXM_NX_REG0[],goto_table:20
  :
 cookie=0x0, duration=2970.026s, table=110, n_packets=15, n_bytes=1801, tun_id=0x435,dl_dst=fa:16:3e:53:88:56 actions=output:2
 cookie=0x0, duration=2979.034s, table=110, n_packets=15, n_bytes=1801, tun_id=0x435,dl_dst=fa:16:3e:9e:f5:70 actions=output:2
 cookie=0x0, duration=17198.647s, table=110, n_packets=24, n_bytes=2084, tun_id=0x435,dl_dst=fa:16:3e:ef:85:07 actions=output:1
  :
[コンピュートノード]
~/devstack$ sudo ovs-vsctl --columns=name,ofport list Interface
name                : "tap2756a09c-12"  # vm02
ofport              : 3

name                : br-int
ofport              : 65534

name                : "vxlan-192.168.11.43"
ofport              : 1

name                : "tap7adff632-cc"  # vm01
ofport              : 2

~/devstack$ sudo ovs-ofctl dump-flows br-int -O OpenFlow13
OFPST_FLOW reply (OF1.3) (xid=0x2):
 cookie=0x0, duration=3110.533s, table=0, n_packets=30, n_bytes=3602, tun_id=0x435,in_port=1 actions=load:0x2->NXM_NX_REG0[],goto_table:20
 cookie=0x0, duration=3110.564s, table=0, n_packets=30, n_bytes=2602, in_port=2,dl_src=fa:16:3e:9e:f5:70 actions=set_field:0x435->tun_id,load:0x1->NXM_NX_REG0[],goto_table:20
 cookie=0x0, duration=3101.583s, table=0, n_packets=30, n_bytes=2602, in_port=3,dl_src=fa:16:3e:53:88:56 actions=set_field:0x435->tun_id,load:0x1->NXM_NX_REG0[],goto_table:20
 cookie=0x0, duration=3101.577s, table=0, n_packets=0, n_bytes=0, priority=8192,in_port=3 actions=drop
 cookie=0x0, duration=3110.559s, table=0, n_packets=0, n_bytes=0, priority=8192,in_port=2 actions=drop
 cookie=0x0, duration=18927.461s, table=0, n_packets=3466, n_bytes=391658, dl_type=0x88cc actions=CONTROLLER:65535
 cookie=0x0, duration=18925.582s, table=0, n_packets=9, n_bytes=710, priority=0 actions=goto_table:20
 cookie=0x0, duration=18925.579s, table=20, n_packets=98, n_bytes=9426, priority=0 actions=goto_table:30
 cookie=0x0, duration=18925.577s, table=30, n_packets=98, n_bytes=9426, priority=0 actions=goto_table:40
 cookie=0x0, duration=3110.566s, table=40, n_packets=13, n_bytes=1672, priority=61007,ip,dl_src=fa:16:3e:9e:f5:70 actions=goto_table:50
 cookie=0x0, duration=3101.594s, table=40, n_packets=13, n_bytes=1672, priority=61007,ip,dl_src=fa:16:3e:53:88:56 actions=goto_table:50
 cookie=0x0, duration=3110.595s, table=40, n_packets=0, n_bytes=0, priority=36001,ip,in_port=2,dl_src=fa:16:3e:9e:f5:70,nw_src=10.11.12.3 actions=goto_table:50
 cookie=0x0, duration=3101.61s, table=40, n_packets=0, n_bytes=0, priority=36001,ip,in_port=3,dl_src=fa:16:3e:53:88:56,nw_src=10.11.12.4 actions=goto_table:50
 cookie=0x0, duration=18925.577s, table=40, n_packets=72, n_bytes=6082, priority=0 actions=goto_table:50
 cookie=0x0, duration=3110.62s, table=40, n_packets=0, n_bytes=0, priority=61011,udp,in_port=2,tp_src=67,tp_dst=68 actions=drop
 cookie=0x0, duration=3101.619s, table=40, n_packets=0, n_bytes=0, priority=61011,udp,in_port=3,tp_src=67,tp_dst=68 actions=drop
 cookie=0x0, duration=18925.571s, table=50, n_packets=98, n_bytes=9426, priority=0 actions=goto_table:60
 cookie=0x0, duration=18925.566s, table=60, n_packets=98, n_bytes=9426, priority=0 actions=goto_table:70
 cookie=0x0, duration=18925.56s, table=70, n_packets=98, n_bytes=9426, priority=0 actions=goto_table:80
 cookie=0x0, duration=18925.549s, table=80, n_packets=98, n_bytes=9426, priority=0 actions=goto_table:90
 cookie=0x0, duration=3101.6s, table=90, n_packets=13, n_bytes=1717, priority=61007,ip,dl_dst=fa:16:3e:53:88:56 actions=goto_table:100
 cookie=0x0, duration=3110.595s, table=90, n_packets=13, n_bytes=1717, priority=61007,ip,dl_dst=fa:16:3e:9e:f5:70 actions=goto_table:100
 cookie=0x0, duration=18925.539s, table=90, n_packets=72, n_bytes=5992, priority=0 actions=goto_table:100
 cookie=0x0, duration=3110.679s, table=90, n_packets=0, n_bytes=0, priority=61006,udp,dl_src=fa:16:3e:ef:85:07,tp_src=67,tp_dst=68 actions=goto_table:100
 cookie=0x0, duration=18925.533s, table=100, n_packets=98, n_bytes=9426, priority=0 actions=goto_table:110
 cookie=0x0, duration=3110.537s, table=110, n_packets=0, n_bytes=0, priority=8192,tun_id=0x435 actions=drop
 cookie=0x0, duration=3101.572s, table=110, n_packets=15, n_bytes=1801, tun_id=0x435,dl_dst=fa:16:3e:53:88:56 actions=output:3
 cookie=0x0, duration=3110.557s, table=110, n_packets=15, n_bytes=1801, tun_id=0x435,dl_dst=fa:16:3e:9e:f5:70 actions=output:2
 cookie=0x0, duration=17329.858s, table=110, n_packets=24, n_bytes=2084, tun_id=0x435,dl_dst=fa:16:3e:ef:85:07 actions=output:1
 cookie=0x0, duration=3110.545s, table=110, n_packets=36, n_bytes=3120, priority=16383,reg0=0x1,tun_id=0x435,dl_dst=01:00:00:00:00:00/01:00:00:00:00:00 actions=output:2,output:1,output:3
 cookie=0x0, duration=3110.549s, table=110, n_packets=0, n_bytes=0, priority=16384,reg0=0x2,tun_id=0x435,dl_dst=01:00:00:00:00:00/01:00:00:00:00:00 actions=output:2,output:3
 cookie=0x0, duration=18925.526s, table=110, n_packets=8, n_bytes=620, priority=0 actions=drop
ODLとOpenStackの連携の仕組みに関する説明は以上です。
SSHでインスタンスに接続したい
以降の説明は構築やデバッグのためのノウハウを紹介します。
ホストマシンからインスタンスにSSHで接続したい場合、外部ネットワークを作ってインスタンスにFloating IPを割り振る必要があります。先ほど作成したインスタンス「vm01」にFloating IPを割り振ってSSHで接続してみます。Cirrosイメージのユーザ名とパスワードはそれぞれ「cirros」と「cubswin:)」となっています。
~/devstack$ source openrc admin admin
~/devstack$ neutron net-create ext-net --router:external       # 外部ネットワークを作成する
~/devstack$ neutron subnet-create ext-net 172.16.1.0/24        # サブネットを作成する
~/devstack$ sudo ip addr add 172.16.1.1/24 dev br-ex           # br-exへIPアドレスを割り当てる
~/devstack$ source openrc demo demo
~/devstack$ neutron router-create router1                      # 仮想ルータを作成する
~/devstack$ neutron router-interface-add router1 net01-subnet  # 仮想ルータへnet01-subnetのインターフェースを追加する
~/devstack$ neutron router-gateway-set router1 ext-net         # 仮想ルータへゲートウェイを設定する
~/devstack$ neutron floatingip-create ext-net                  # フローティングIPを作成する
Created a new floatingip:
+---------------------+--------------------------------------+
| Field               | Value                                |
+---------------------+--------------------------------------+
| fixed_ip_address    |                                      |
| floating_ip_address | 172.16.1.4                           |
| floating_network_id | 196a6d94-a43b-4d77-bd99-2fa0e8ab311b |
| id                  | ac605256-6aae-4391-a52c-05dc5aac1a8b |
| port_id             |                                      |
| router_id           |                                      |
| status              | DOWN                                 |
| tenant_id           | 7305d84b42cb470c9b3bbb96e711cc96     |
+---------------------+--------------------------------------+
~/devstack$ neutron port-list
+--------------------------------------+------+-------------------+-----------------------------------------------------------------------------------+
| id                                   | name | mac_address       | fixed_ips                                                                         |
+--------------------------------------+------+-------------------+-----------------------------------------------------------------------------------+
| 178a8b99-700f-4d2f-be35-f34d420f66a3 |      | fa:16:3e:ef:85:07 | {"subnet_id": "8d373fbd-6134-47d1-aff6-86ee1ae7c8d1", "ip_address": "10.11.12.2"} |
| 2756a09c-125a-4fe8-9a26-2bde05857062 |      | fa:16:3e:53:88:56 | {"subnet_id": "8d373fbd-6134-47d1-aff6-86ee1ae7c8d1", "ip_address": "10.11.12.4"} |
| 7adff632-ccf9-4d43-8f5d-7db454313f44 |      | fa:16:3e:9e:f5:70 | {"subnet_id": "8d373fbd-6134-47d1-aff6-86ee1ae7c8d1", "ip_address": "10.11.12.3"} |
| f72c630e-7389-4b91-bbda-5c27e768ad7b |      | fa:16:3e:bb:4f:57 | {"subnet_id": "8d373fbd-6134-47d1-aff6-86ee1ae7c8d1", "ip_address": "10.11.12.1"} |
+--------------------------------------+------+-------------------+-----------------------------------------------------------------------------------+
~/devstack$ neutron floatingip-associate ac605256-6aae-4391-a52c-05dc5aac1a8b 7adff632-ccf9-4d43-8f5d-7db454313f44  # vm01のポートへフローティングIPを割り当てる
~/devstack$ ssh cirros@172.16.1.4
The authenticity of host '172.16.1.4 (172.16.1.4)' can't be established.
RSA key fingerprint is ef:bc:ba:b7:21:ca:3b:45:80:1c:12:e3:c6:8c:96:5e.
Are you sure you want to continue connecting (yes/no)? yes
Warning: Permanently added '172.16.1.4' (RSA) to the list of known hosts.
cirros@172.16.1.4's password:  # パスワード:cubswin:) を入力する(表示はされない)
$ hostname
vm01
ログの出力先
ODLのkarafログはコントローラノードの/opt/stack/logs/screen-karaf.txtに出力されます。OpenStackの各コンポーネントのログも/opt/stack/logs/ディレクトリに出力されるので必要であれば参照して下さい。
(おまけ) シングルノードでの構築
今回はコントローラノードとコンピュートノードの2台の仮想マシンを使ってマルチノードで構築しましたが、シングルノードで構築してみたいという方は以下のURLのlocal.confを使って挑戦してみてください。
今回はOpenDaylightとOpenStackを連携させるために、もっとも簡単なDevStackを使った構築を行いました。次回は手作業でOpenDaylightをインストールしOpenStackと連携させる手順をご紹介します。
- この記事のキーワード
バックナンバー
この記事の筆者

筆者の人気記事
Think ITでは、技術情報が詰まったメールマガジン「Think IT Weekly」の配信サービスを提供しています。メルマガ会員登録を済ませれば、メルマガだけでなく、さまざまな限定特典を入手できるようになります。
