ImageShowPage.xamlの編集とコントロールの追加
ImageShowPage.xamlの編集とコントロールの追加
x:NameがPageTitleという名前のTextBlockのTextプロパティを削除しておきます。ここには、プログラムから選択されたタイトルが表示されます。
ツールボックスからImageとTextBlockコントロールを1個ずつ配置します。ImageコントロールのWidthに320、Heightに240と指定します。TextBlockコントロールのTextWrappingプロパティにWrapを指定し、文字の回り込みを可能としておきます。文字サイズのFontSizeには24、文字色のForegroundにはGoldと指定しておきます。
書き出されるXAMLコードをリスト3のように編集します。
リスト3 編集されたXAMLコード(ImageShowPage.xaml)
(1)手動でtoolkitという名前空間を追加します。<phone:PhoneApplicationPage>要素内にxmlns:toolkit=”と入力すると、値の一覧が表示されます(図2参照)。その名から、「Microsoft.Phone.Controls(Microsoft.Phone.Controls.Toolkit)を選択します。
(2)「第3回:ページ遷移時にTransition効果を適用する」で解説したPage Transitionのコードを記述しています。TurnstileTransition効果を持たせています。Transition効果を有効にするには、第3回の解説を参考にApp.xaml.vb内を書き換えてください。ページが表示された時、画面がターンして表示されます。
(3)<Image>と<TextBlock>要素が配置され、プロパティが設定されています。
<phone:PhoneApplicationPage
  x:Class="WP7_ContextMenu.ImageShowPage"
  xmlns="http://schemas.microsoft.com/winfx/2006/xaml/presentation"
  xmlns:x="http://schemas.microsoft.com/winfx/2006/xaml"
  xmlns:phone="clr-namespace:Microsoft.Phone.Controls;assembly=Microsoft.Phone"
  xmlns:shell="clr-namespace:Microsoft.Phone.Shell;assembly=Microsoft.Phone"
  xmlns:d="http://schemas.microsoft.com/expression/blend/2008"
  xmlns:mc="http://schemas.openxmlformats.org/markup-compatibility/2006"
  xmlns:toolkit="clr-namespace:Microsoft.Phone.Controls;assembly=Microsoft.Phone.Controls.Toolkit" ■(1)
  FontFamily="{StaticResource PhoneFontFamilyNormal}"
  FontSize="{StaticResource PhoneFontSizeNormal}"
  Foreground="{StaticResource PhoneForegroundBrush}"
  SupportedOrientations="Portrait" Orientation="Portrait"
  mc:Ignorable="d" d:DesignHeight="768" d:DesignWidth="480"
  shell:SystemTray.IsVisible="True">

  <toolkit:TransitionService.NavigationInTransition> ■(2)
    <toolkit:NavigationInTransition>
      <toolkit:NavigationInTransition.Backward>
        <toolkit:TurnstileTransition Mode="BackwardIn"/>
      </toolkit:NavigationInTransition.Backward>
      <toolkit:NavigationInTransition.Forward>
        <toolkit:TurnstileTransition Mode="ForwardIn"/>
      </toolkit:NavigationInTransition.Forward>
    </toolkit:NavigationInTransition>
  </toolkit:TransitionService.NavigationInTransition>
  <toolkit:TransitionService.NavigationOutTransition>
    <toolkit:NavigationOutTransition>
      <toolkit:NavigationOutTransition.Backward>
        <toolkit:TurnstileTransition Mode="BackwardOut"/>
      </toolkit:NavigationOutTransition.Backward>
      <toolkit:NavigationOutTransition.Forward>
        <toolkit:TurnstileTransition Mode="ForwardOut"/>
      </toolkit:NavigationOutTransition.Forward>
    </toolkit:NavigationOutTransition>
  </toolkit:TransitionService.NavigationOutTransition>

  <!--LayoutRoot is the root grid where all page content is placed-->
  <Grid x:Name="LayoutRoot" Background="Transparent">
    <Grid.RowDefinitions>
      <RowDefinition Height="Auto"/>
      <RowDefinition Height="*"/>
    </Grid.RowDefinitions>

    <!--TitlePanel contains the name of the application and page title-->
    <StackPanel x:Name="TitlePanel" Grid.Row="0" Margin="12,17,0,28">
      <TextBlock x:Name="ApplicationTitle" Text="MY APPLICATION" Style="{StaticResource PhoneTextNormalStyle}"/>
      <TextBlock x:Name="PageTitle"  Margin="9,-7,0,0" Style="{StaticResource PhoneTextTitle1Style}"/>
    </StackPanel>

    <!--ContentPanel - place additional content here-->
    <Grid x:Name="ContentPanel" Grid.Row="1" Margin="12,0,12,0">
      <Image Height="240" HorizontalAlignment="Left" Margin="68,63,0,0" Name="Image1" Stretch="Fill" VerticalAlignment="Top" Width="320" /> ■(3)
      <TextBlock Height="346" HorizontalAlignment="Left" Margin="26,327,0,0" Name="TextBlock1" Text="TextBlock" VerticalAlignment="Top" Width="407" TextWrapping="Wrap" FontSize="24" Foreground="Gold" /> ■(3)
    </Grid>
  </Grid>
~コード略~
</phone:PhoneApplicationPage>
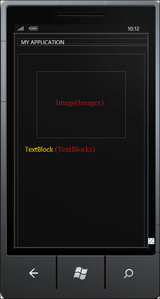
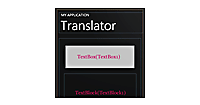
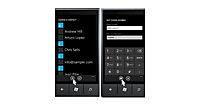
リスト3を設定すると図4のように表示されます。
| 図4:ImageShowPage.xaml内にImageとTextBlockコントロールを配置した(クリックで拡大) |
クラスファイルの作成
XML文書ファイル(photo_etc.xml)ファイルを読み込み、XElementを返すクラスを作成します。VS2010のメニューから「プロジェクト(P)/クラスの追加(C)」と選択しても、表示される「新しい項目の追加」テンプレート内には、クラスと名の付くテンプレートは見当たりません。ここでは「コードファイル」を選択します。「名前(N)」にはReadXml.vbと指定し、[追加(A)]ボタンをクリックします。この現象は、Windows Phone Developer Tools 7.1 Betaで発生する現象です。
今回のサンプルは、Windows Phone Developer Tools 7.1 Betaで作成していますが、現在リリースされている、Windows Phone SDK 7.1 Beta2では、VS2010メニューから「クラスの追加(C)」を選択すると、クラスのテンプレートがきちんと表示されます。下記URIよりダウンロードの上、インストールしてください。
→参照:Windows Phone SDK 7.1 Beta2
インストール方法は、この連載の第1回と同じですので、そちらを参考にしてください。
表示されるコード画面内に、リスト4のコードを記述します。
リスト4(ReadXml.vb)
ReadXmlというクラスを定義します。ReadXmlは「コードファイル」に付けた名称と同じです。
このReadXmlクラス内に、XElement型のXmlLoad関数を作成します。
XElement.LoadメソッドでXML文書ファイル(photo_etc.xml)を読み込み、読み込んだXElement型のxmldocを戻り値とします。
Option Strict On
Imports System.Xml.Linq

Public Class ReadXml
  Function XmlLoad() As XElement
    Dim xmldoc As XElement = XElement.Load("photo_etc.xml")
    Return xmldoc
  End Function
End Class
次に、ソリューションエクスプローラー内のMainPage.xamlを展開し、表示されるMainPage.xaml.vbをダブルクリックしてリスト5のロジックコードを記述します。
ロジックコードを記述する
リスト5(MainPage.xaml.vb)
Option Strict On
Imports System.Xml.Linq

Partial Public Class MainPage
  Inherits PhoneApplicationPage

  ' Constructor
  Public Sub New()
    InitializeComponent()
  End Sub
ページが読み込まれた時の処理
ReadXmlクラスの新しいインスタンスmyReadXmlオブジェクトを生成します。
MenuItem型のリストであるmenuItemList変数を宣言します。
ReadXmlクラスのインスタンスmyReadXmlでXmlLoad関数を呼び出します。Descendantsメソッドで取得した<情報>要素のコレクションに対して、各要素を変数 result に格納しながら以下の処理を行います。
新しいMenuItemのインスタンスmyMenuItemオブジェクト変数を宣言します。MenuItemクラスはContextMenu内の選択可能な項目を表します。
myMenuItemオブジェクトのHeaderプロパティに<画像名>要素の属性”タイトル”の値を指定します。Marginプロパティには5を指定して余白を設けます。Backgroundプロパティで背景色にCyanを指定します。Widthに200を指定します。これらのプロパティの設定されたmenuItemListオブジェクトをContextMenuのItemsSourceプロパティに指定します。
AddHandlerメソッドで、myMenuItemオブジェクトがClickされた時のイベントハンドラを追加します。Clickされた時のイベントハンドラ内では以下の処理を行います。
MenuItemの値を保持している、mySenderオブジェクトをDirectCastでMenuItemにキャストし、MenuItem型の変数selectTitleに格納します。
NavigationService.NavigateメソッドでImageShowPage.xamlに遷移します。その際、引数として、ImageNameをキーワードにMeuItemのHeaderプロパティの値を文字列に変換して渡します。
  Private Sub MainPage_Loaded(sender As Object, e As System.Windows.RoutedEventArgs) Handles MyBase.Loaded
    Dim myReadXml As New ReadXml
    Dim menuItemList As New List(Of MenuItem)

    For Each result In From c In myReadXml.XmlLoad.Descendants("情報") Select c
      Dim myMenuItem As New MenuItem
      With myMenuItem
        .Header = result.Element("画像名").Attribute("タイトル").Value
        .Margin = New Thickness(5)
        .Background = New SolidColorBrush(Colors.Cyan)
        .Width = 200
      End With
      menuItemList.Add(myMenuItem)

      AddHandler myMenuItem.Click, Sub(mySender As Object, myArgs As EventArgs)
                                     Dim selectTitle As MenuItem = DirectCast(mySender, MenuItem)
                                     NavigationService.Navigate(New Uri("/ImageShowPage.xaml?ImageName=" & selectTitle.Header.ToString, UriKind.Relative))
                                 End Sub
    Next
    ContextMenu1.ItemsSource = menuItemList
  End Sub
[画像名]ボタンがクリック(ホールド)された時の処理。
ContextMenuを展開します。
  Private Sub Button1_Click(sender As Object, e As System.Windows.RoutedEventArgs) Handles Button1.Click
    ContextMenu1.IsOpen = True
  End Sub
End Class
ソリューションエクスプローラー内のImageShowPage.xamlを展開し、表示されるImageShowPage.xaml.vbをダブルクリックしてリスト6のロジックコードを記述します。
リスト6(ImageShowPage.xaml.vb)
Option Strict On
Imports System.Windows.Media.Imaging
Partial Public Class ImageShowPage
  Inherits PhoneApplicationPage

  Public Sub New()
    InitializeComponent()
  End Sub
画面の遷移で移動した時に最初に呼ばれるイベント
新しいReadXmlクラスのインスタンスmyReadXmlオブジェクトを生成します。
MainPage.xamlから渡された文字データを受け取ります。文字データはNavigationContextのQueryStringにDictionary として提供されます。
送信時のキーワード(この場合ImageName)を基に渡された文字列情報を、myParam(“ImageName”)として取得します。myParam(“ImageName”)には<画像名>要素の属性”タイトル”の値が入っています。
x:NameがPageTitleというTextBlockのTextプロパティにmyParam(“ImageName”)を指定します。「タイトル」が表示されます。
ImageのSourceプロパティに、画像の所在”Image/”を連結したmyParam("ImageName")に拡張子として、“.jpg”を連結して指定します。
ReadXmlクラスのインスタンスmyReadXmlでXmlLoad関数を呼び出します。Descendantsメソッドで取得した<情報>要素の子要素<画像名>の属性”タイトル”の値が、myParam("ImageName")に等しいコレクションに対して、各要素を変数 result に格納しながら、TextBlockのTextプロパティに<説明>要素の値を指定していきます。
  Protected Overrides Sub OnNavigatedTo(e As System.Windows.Navigation.NavigationEventArgs)
    Dim myReadXml As New ReadXml
    Dim myParam As IDictionary(Of String, String) = Me.NavigationContext.QueryString
    PageTitle.Text = myParam("ImageName")
    Image1.Source = New BitmapImage(New Uri("Image/" & myParam("ImageName") & ".jpg", UriKind.Relative))

    For Each result In From c In myReadXml.XmlLoad.Descendants("情報") Where c.Element("画像名").Attribute("タイトル").Value.Equals(myParam("ImageName")) Select c
      TextBlock1.Text = result.Element("説明").Value
    Next
    MyBase.OnNavigatedTo(e)
  End Sub
End Class
- この記事のキーワード


