Terraformを用いたインフラのプロビジョニングの流れ
Terraformを用いたインフラのプロビジョニングの流れ
Terraformを用いてインフラをプロビジョニングする際は、大よそ以下のような流れに従います。
- Write: プロビジョニングしたいインフラリソースを宣言的に定義する
- Plan: Terraformがインフラに構築、変更する実行計画をプレビューする
- Apply: 実際にインフラへ構築、変更を適用する
getting-started-terraform-overview
実際にコードを書いてクラウドリソースをプロビジョニングしてみよう
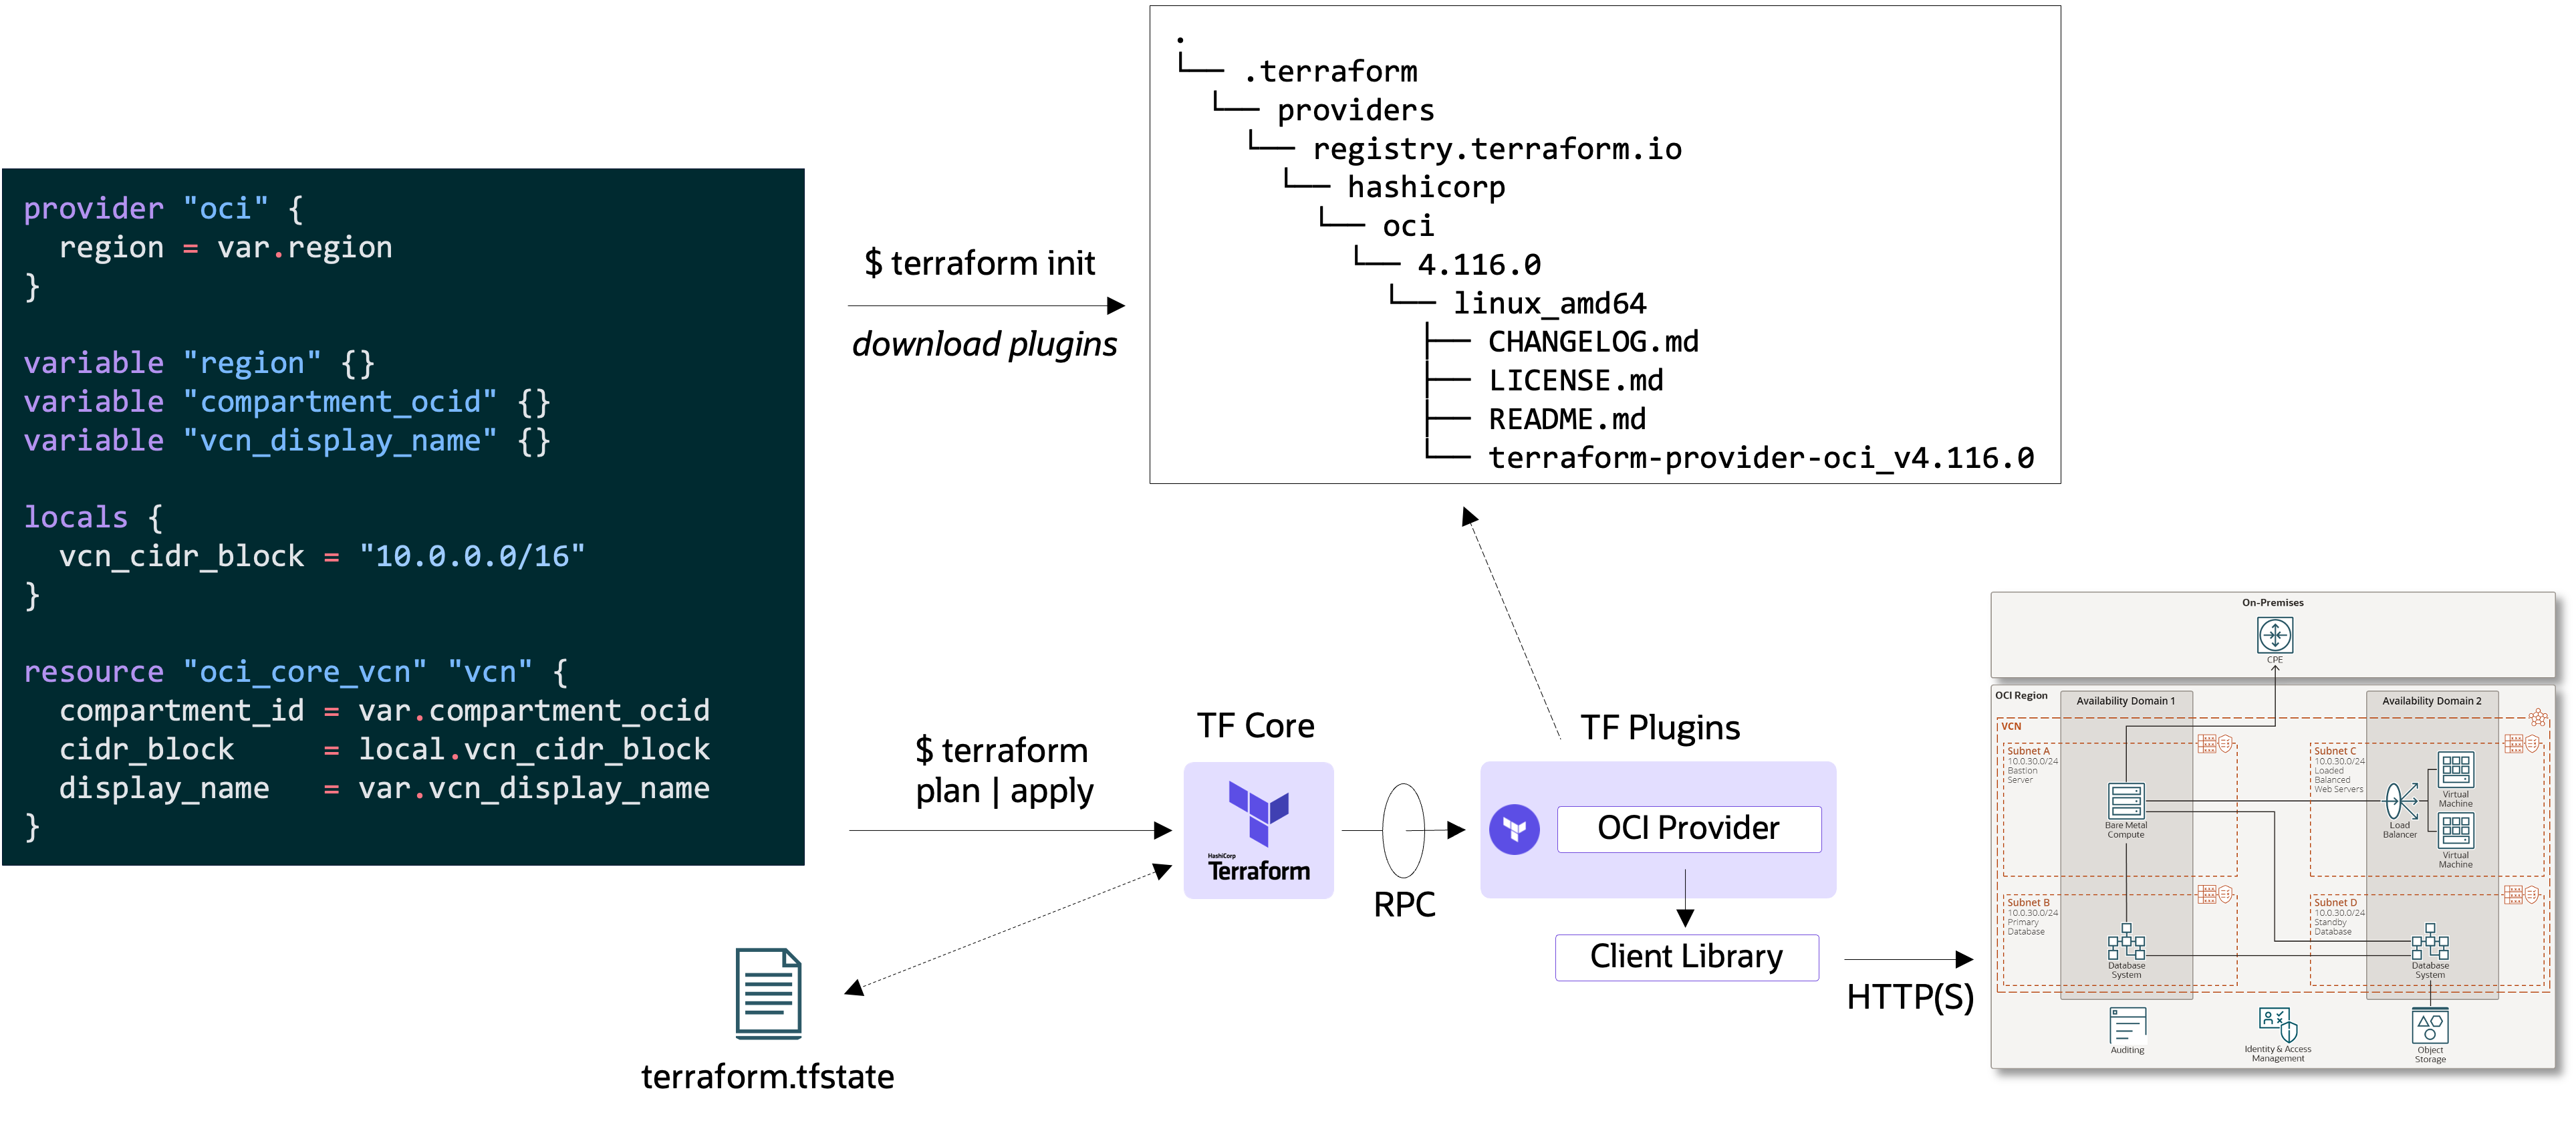
ここからは、実際にTerraformのコードを書いて、クラウドリソースをプロビジョニングしてみたいと思います。依存するリソースが少なく簡単に実施できるため、今回はOCI - Object Storageを例に実施します。
- まずは、以下のようにCloud Service Provider(OCI)にAPIリクエストを送るために必要なプラグインを指定します。
provider "oci" { region = var.region } - プロバイダー定義に必要な変数を
variables.tfに定義します。variable "region" { } - プロバイダーの初期化処理(ライブラリのインストール等)を実行します。
$ terraform init Initializing the backend... Initializing provider plugins... - Finding latest version of hashicorp/oci... - Installing hashicorp/oci v5.21.0... - Installed hashicorp/oci v5.21.0 (signed by HashiCorp) Terraform has created a lock file .terraform.lock.hcl to record the provider selections it made above. Include this file in your version control repository so that Terraform can guarantee to make the same selections by default when you run "terraform init" in the future. ╷ │ Warning: Additional provider information from registry │ │ The remote registry returned warnings for registry.terraform.io/hashicorp/oci: │ - For users on Terraform 0.13 or greater, this provider has moved to oracle/oci. Please │ update your source in required_providers. ╵ Terraform has been successfully initialized! You may now begin working with Terraform. Try running "terraform plan" to see any changes that are required for your infrastructure. All Terraform commands should now work. If you ever set or change modules or backend configuration for Terraform, rerun this command to reinitialize your working directory. If you forget, other commands will detect it and remind you to do so if necessary. - 初期化処理の実行後、
.terraform以下にプロバイダーのライブラリがインストールされていることを確認できます。$ tree .terraform .terraform └── providers └── registry.terraform.io └── hashicorp └── oci └── 5.21.0 └── linux_amd64 ├── CHANGELOG.md ├── LICENSE.txt ├── README.md └── terraform-provider-oci_v5.21.0 6 directories, 4 files - プロビジョニングしたいリソースを宣言的に定義します。実装時は、各プロバイダーからドキュメントが提供されているため(例:oci-objectstorage-bucket)、そちらを参考にすると良いでしょう。
今回は、以下のように作成に最低限必要なパラメータのみ指定して定義します。
resource "oci_objectstorage_bucket" "objectstorage_bucket" { compartment_id = var.compartment_ocid name = var.objectstorage_bucketname namespace = var.objectstorage_namespace } - リソース定義に必要な変数を
variables.tfに追記します。# ... variable "compartment_ocid" { } variable "objectstorage_namespace" { } variable "objectstorage_bucketname" { } - プロビジョニングされるリソースをプレビューします(※出力は一部をマスクしています)。
このとき、プロバイダー定義に必要な変数やリソース定義に必要な変数を入力する方法は、以下の通り複数存在します。$ terraform plan var.objectstorage_bucketname Enter a value: tf-bucket var.objectstorage_namespace Enter a value: xxxxxxxxx var.region Enter a value: ap-tokyo-1 Terraform used the selected providers to generate the following execution plan. Resource actions are indicated with the following symbols: + create Terraform will perform the following actions: # oci_objectstorage_bucket.objectstorage_bucket will be created + resource "oci_objectstorage_bucket" "objectstorage_bucket" { + access_type = "NoPublicAccess" + approximate_count = (known after apply) + approximate_size = (known after apply) + auto_tiering = (known after apply) + bucket_id = (known after apply) + compartment_id = "ocid1.compartment.oc1..." + created_by = (known after apply) + defined_tags = (known after apply) + etag = (known after apply) + freeform_tags = (known after apply) + id = (known after apply) + is_read_only = (known after apply) + kms_key_id = (known after apply) + name = "tf-bucket" + namespace = "xxxxxxxxx" + object_events_enabled = (known after apply) + object_lifecycle_policy_etag = (known after apply) + replication_enabled = (known after apply) + storage_tier = (known after apply) + time_created = (known after apply) + versioning = (known after apply) } Plan: 1 to add, 0 to change, 0 to destroy. ─────────────────────────────────── Note: You didn't use the -out option to save this plan, so Terraform can't guarantee to take exactly these actions if you run "terraform apply" now.- variables.tfのdefault属性にデフォルト値を記載する
- 環境変数(
TF_VAR_xxx)から渡す - terraform.tfvars(.json)ファイルから渡す
- \*.auto.tfvars(.json)ファイルから渡す
- CLIの実行時オプションとして渡す(
-var="xxx=yyy", or-var-file="xxx.tfvars") - 実行時に対話形式で指定する
上記の方法は、上から順に評価されがちとなることも重要なポイントです。
- 実際にリソースをプロビジョニングしてみます(※出力は一部をマスクしています)。
$ terraform apply var.objectstorage_bucketname Enter a value: tf-bucket var.objectstorage_namespace Enter a value: xxxxxxxxx var.region Enter a value: ap-tokyo-1 Terraform used the selected providers to generate the following execution plan. Resource actions are indicated with the following symbols: + create Terraform will perform the following actions: # oci_objectstorage_bucket.objectstorage_bucket will be created + resource "oci_objectstorage_bucket" "objectstorage_bucket" { + access_type = "NoPublicAccess" + approximate_count = (known after apply) + approximate_size = (known after apply) + auto_tiering = (known after apply) + bucket_id = (known after apply) + compartment_id = "ocid1.compartment.oc1..." + created_by = (known after apply) + defined_tags = (known after apply) + etag = (known after apply) + freeform_tags = (known after apply) + id = (known after apply) + is_read_only = (known after apply) + kms_key_id = (known after apply) + name = "tf-bucket" + namespace = "xxxxxxxxx" + object_events_enabled = (known after apply) + object_lifecycle_policy_etag = (known after apply) + replication_enabled = (known after apply) + storage_tier = (known after apply) + time_created = (known after apply) + versioning = (known after apply) } Plan: 1 to add, 0 to change, 0 to destroy. Do you want to perform these actions? Terraform will perform the actions described above. Only 'yes' will be accepted to approve. Enter a value: yes oci_objectstorage_bucket.objectstorage_bucket: Creating... oci_objectstorage_bucket.objectstorage_bucket: Creation complete after 0s [id=n/xxxxxxxxx/b/tf-bucket] Apply complete! Resources: 1 added, 0 changed, 0 destroyed. - リソースが作成されたことを確認してみましょう(※実行結果は一部をマスクしています)。
ここで、$ terraform show # oci_objectstorage_bucket.objectstorage_bucket: resource "oci_objectstorage_bucket" "objectstorage_bucket" { access_type = "NoPublicAccess" approximate_count = "0" approximate_size = "0" auto_tiering = "Disabled" bucket_id = "ocid1.bucket.oc1.ap-tokyo-1.." compartment_id = "ocid1.compartment.oc1..." created_by = "ocid1.user.oc1..." defined_tags = {} etag = "1beab656-e165-4b6c-9d96-6485b9a3cd1a" freeform_tags = {} id = "n/xxxxxxxxx/b/tf-bucket" is_read_only = false name = "tf-bucket" namespace = "xxxxxxxxx" object_events_enabled = false replication_enabled = false storage_tier = "Standard" time_created = "2023-11-27 05:54:16.216 +0000 UTC" versioning = "Disabled" }terraform applyを実行したディレクトリにterraform.tfstateというファイルが作成されていることを確認できます。terraform.tfstateはTerraformが最後にapplyした状態を記録したもので、Terraformのコードと現実世界のマッピングを示します。中身を確認してみるとJSON形式になっており、oci_objectstorage_bucket.objectstorage_bucketは現実世界(ここではOCI)の"bucket_id": "ocid1.bucket.oc1.ap-tokyo-1.."に相当することが分かります。ステートは現実世界とのマッピングだけでなくメタデータの管理やステート内の全リソースの属性値のキャッシュを保存しており、Terraformのパフォーマンス改善として活用されます。{ "version": 4, "terraform_version": "1.6.4", "serial": 6, "lineage": "a582cac0-08c9-a069-256f-a827102a9a87", "outputs": {}, "resources": [ { "mode": "managed", "type": "oci_objectstorage_bucket", "name": "objectstorage_bucket", "provider": "provider[\"registry.terraform.io/oracle/oci\"]", "instances": [ { "schema_version": 0, "attributes": { "access_type": "NoPublicAccess", "approximate_count": "0", "approximate_size": "0", "auto_tiering": "Disabled", "bucket_id": "ocid1.bucket.oc1.ap-tokyo-1..", "compartment_id": "ocid1.compartment.oc1...", "created_by": "ocid1.user.oc1...", "defined_tags": {}, "etag": "d12b0e2a-bfe6-4f80-ae2c-c9a7c788966d", "freeform_tags": {}, "id": "n/xxxxxxxxx/b/tf-bucket", "is_read_only": false, "kms_key_id": null, "metadata": null, "name": "tf-bucket", "namespace": "xxxxxxxxx", "object_events_enabled": false, "object_lifecycle_policy_etag": null, "replication_enabled": false, "retention_rules": [], "storage_tier": "Standard", "time_created": "2023-11-30 05:04:23.523 +0000 UTC", "timeouts": null, "versioning": "Disabled" }, "sensitive_attributes": [], "private": "eyJlMmJmYjczMC1lY2FhLTExZTYtOGY4OC0zNDM2M2JjN2M0YzAiOnsiY3JlYX RlIjoxMjAwMDAwMDAwMDAwLCJkZWxldGUiOjEyMDAwMDAwMDAwMDAsInVwZGF0ZSI6MTIw MDAwMDAwMDAwMH19" } ] } ], "check_results": null } - 再度、同じ入力変数を与えて同一リソースを作成してみます。
対話形式で変数の入力が求められるので、先ほどと同じ値を入力します(※一部マスクしています)。$ terraform apply -auto-approve
再度、var.objectstorage_bucketname Enter a value: tf-bucket var.objectstorage_namespace Enter a value: xxxxxxxxx var.region Enter a value: ap-tokyo-1 oci_objectstorage_bucket.objectstorage_bucket: Refreshing state... [id=n/xxxxxxxxx/b/tf-bucket] No changes. Your infrastructure matches the configuration. Terraform has compared your real infrastructure against your configuration and found no differences, so no changes are needed. Apply complete! Resources: 0 added, 0 changed, 0 destroyed.tf-bucketという名前のバケットを作成しようとしましたが、既に存在するため作成されませんでした。簡易的ですが、Terraformによって冪等性が保たれることを確認できました。 また、Terraform Coreに含まれているリソースやデータソース等から依存関係グラフを作成する機能を試してみましょう。以下のように実行します。terraform graph | dot -Tpng > tf-storage-graph.png図を見てみると、以下のようなことがわかります。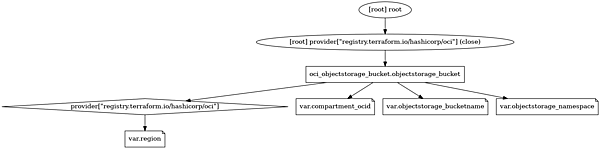
terraform-graph
-
provider["registry.terraform.io/hashicorp/oci"]はvar.regionに依存している -
oci_object_storage.objectstorage_bucketはprovider["registry.terraform.io/hashicorp/oci"]、var.compartment_ocid、var.objectstorage_bucketname、var.objectstorage_namespaceに依存している
-
- 最後に、作成されたObject Storage - Bucketを削除します(※実行結果は一部をマスクしています)。
$ terraform apply -destroy

var.objectstorage_bucketname
  Enter a value: tf-bucket

var.objectstorage_namespace
  Enter a value: xxxxxxxxx

var.region
  Enter a value: ap-tokyo-1

oci_objectstorage_bucket.objectstorage_bucket: Refreshing state... [id=n/xxxxxxxxx/b/tf-bucket]

Terraform used the selected providers to generate the following execution plan. Resource actions are indicated with the following symbols:
  - destroy

Terraform will perform the following actions:

  # oci_objectstorage_bucket.objectstorage_bucket will be destroyed
  - resource "oci_objectstorage_bucket" "objectstorage_bucket" {
      - access_type           = "NoPublicAccess" -> null
      - approximate_count     = "0" -> null
      - approximate_size      = "0" -> null
      - auto_tiering          = "Disabled" -> null
      - bucket_id             = "ocid1.bucket.oc1.ap-tokyo-1..." -> null
      - compartment_id        = "ocid1.compartment.oc1..." -> null
      - created_by            = "ocid1.user.oc1..." -> null
      - defined_tags          = {} -> null
      - etag                  = "1beab656-e165-4b6c-9d96-6485b9a3cd1a" -> null
      - freeform_tags         = {} -> null
      - id                    = "n/xxxxxxxxx/b/tf-bucket" -> null
      - is_read_only          = false -> null
      - metadata              = {} -> null
      - name                  = "tf-bucket" -> null
      - namespace             = "xxxxxxxxx" -> null
      - object_events_enabled = false -> null
      - replication_enabled   = false -> null
      - storage_tier          = "Standard" -> null
      - time_created          = "2023-11-27 05:54:16.216 +0000 UTC" -> null
      - versioning            = "Disabled" -> null
    }

Plan: 0 to add, 0 to change, 1 to destroy.

Do you really want to destroy all resources?
  Terraform will destroy all your managed infrastructure, as shown above.
  There is no undo. Only 'yes' will be accepted to confirm.

  Enter a value: yes

oci_objectstorage_bucket.objectstorage_bucket: Destroying... [id=n/xxxxxxxxx/b/tf-bucket]
oci_objectstorage_bucket.objectstorage_bucket: Destruction complete after 2s

Apply complete! Resources: 0 added, 0 changed, 1 destroyed.

なお、Terraformにはサブコマンドにdestroyが存在しますが、ドキュメント上でもv1.xで改善の予定があり、互換性が約束されたものではありません。そのため、特に自動化の一部として使用している場合にはapply -destroyを使用することが望ましいでしょう。
- この記事のキーワード
関連記事
Iacツール「Terraform」の基本的な使い方
2024年4月19日 6:30
Iacツールの「Terraform」でAWSインフラをコード化して再現可能な環境を構築してみよう
11月4日 6:30
PulumiでAWSリソースをデプロイしよう
2023年3月15日 6:30
「Pulumi Stack」とは ー Pulumiによるマルチステージ環境の構築方法
2023年4月20日 6:30
Policy as Codeでインフラのコンプライアンスを自動実現! 「Pulumi CrossGuard」を活用してみよう
2023年7月4日 6:30
Oracle Cloud Hangout Cafe Season5 #3「Kubernetes のセキュリティ」(2022年3月9日開催)
2023年4月18日 6:30
バックナンバー
この記事の筆者

筆者の人気記事
Think ITでは、技術情報が詰まったメールマガジン「Think IT Weekly」の配信サービスを提供しています。メルマガ会員登録を済ませれば、メルマガだけでなく、さまざまな限定特典を入手できるようになります。
