位置に画像付きピンを表示する
位置に画像付きピンを表示する
次に紹介するのは、場所の一覧から選択した位置に、画像や動画付きのピンを表示するサンプルです。
まずは、実装する機能の動作を、下記に解説しておきます。
このサンプルは、エミュレーターで動作します。実機が必須というサンプルではありませんが、基本的には実機で動作確認を行っています。
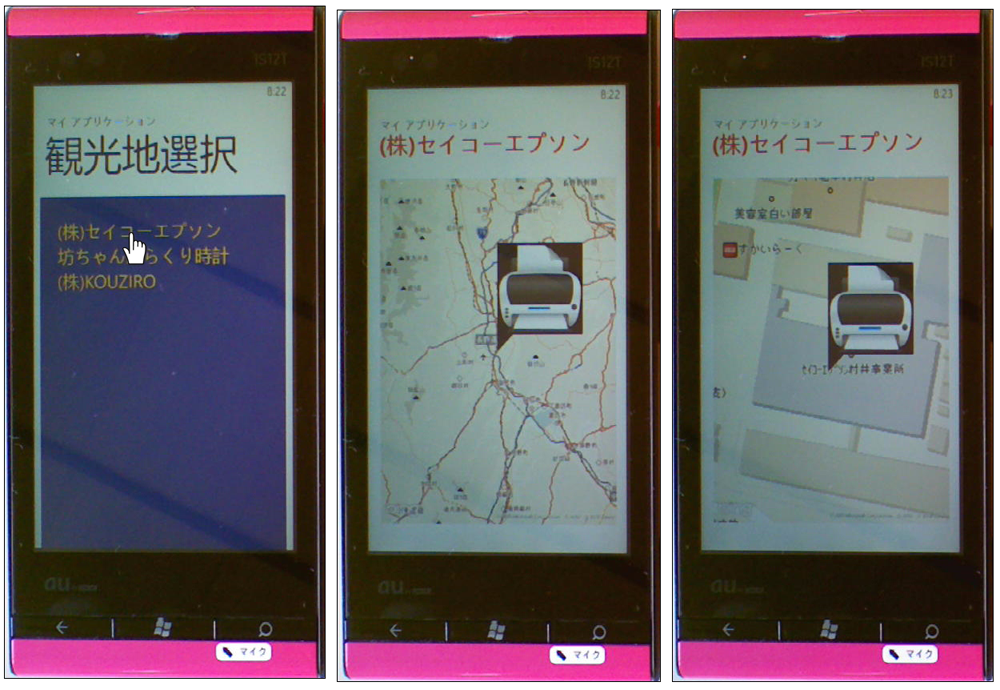
実機にプログラムをデプロイすると、場所の一覧が表示されます。任意の場所を選択するとBing Maps上の指定した場所に、画像や動画付きのピンが立ちます(図4)。
|
|
| 図4:任意の場所に画像付きピンが表示されている(クリックで拡大) |
サンプル一式は、会員限定特典としてダウンロードできます。記事末尾をご確認ください。
実機(IS12T)で動かした動画はこちらです。
プロジェクトの作成
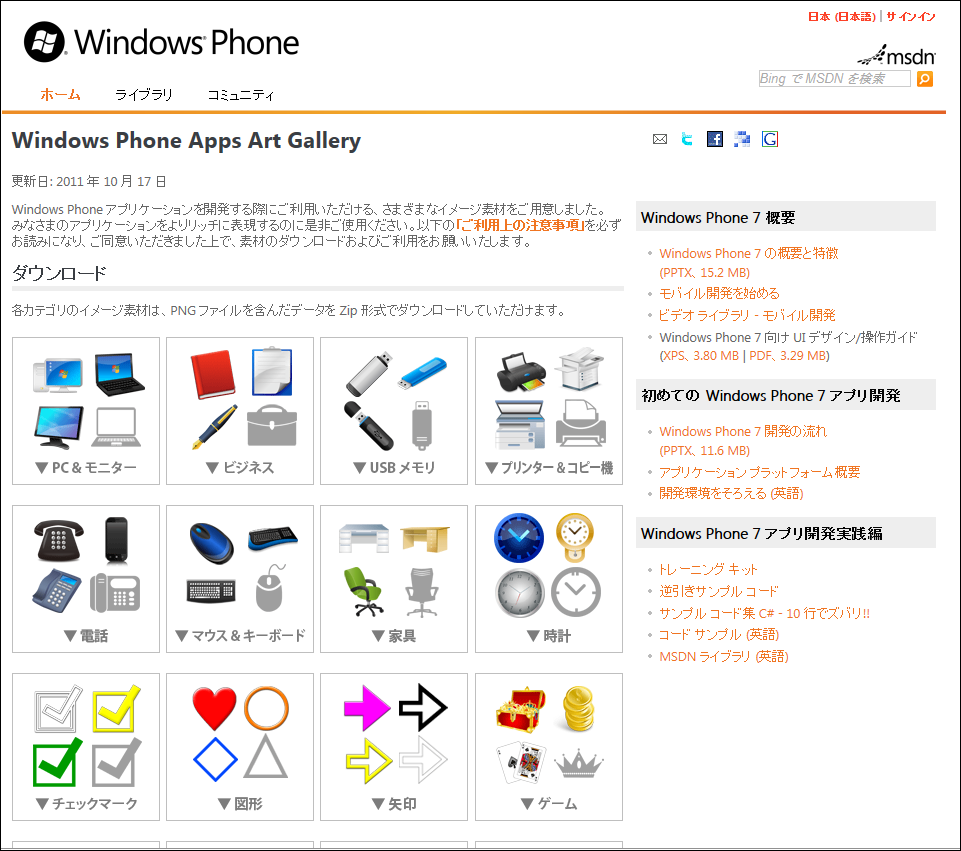
VS 2010のメニューから[ファイル(F)/新規作成(N)/プロジェクト(P)]を選択します。次に、「Windows Phone アプリケーション」を選択して、「名前(N)」に任意のプロジェクト名を指定します。ここでは「WP71_BingMapImage」という名前を付けています。Windows Phoneのバージョンは7.1を選択します。ソリューションエクスプローラー内にImageというフォルダを作成して、PNGファイルとWMVの動画ファイルを追加しています。今回使用するPNG画像は、Microsoftから提供されているPNG画像を使用させてもらっています。下記のURLよりダウンロードできます(図5)。
→参照:Windows Phone Apps Art Gallery
※「ご利用上の注意」を読んだ上でご使用ください。
またリスト3の緯度、経度を記録したXML文書ファイル(SightseeingSpot.xml)も追加しています。
XML to LINQを使用するため、VS2010メニューの「プロジェクト(P)/参照の追加(R)」から、System.Xml.Linqを追加しておいてください。
ダウンロードされたサンプルファイルには、PNG画像や動画ファイル、XML文書は追加済です。
|
|
| 図5:Microsoftの「Windows Phone Apps Art Gallery 」(クリックで拡大) |
リスト3 XML文書ファイル(SightSeeningSpot.xml)
<?xml version="1.0"?>
<名所>
  <場所 title="(株)セイコーエプソン" 緯度="36.175402999999996" 経度="137.96195900000003" 画像="Printer.png"/>
  <場所 title="坊ちゃんからくり時計" 緯度="33.85152322243219" 経度="132.785100888889" 画像="dougo320.wmv"/>
  <場所 title="(株)KOUZIRO" 緯度="34.015422" 経度="132.076351" 画像="PC.png"/>
</名所>
MainPage.xamlの編集とコントロールの追加
x:NameがPageTitleというTextBlockのTextプロパティに、最初は「観光地選択」と指定しておきます。場所が選択されると、ここには、選択された場所名が表示されます。
ツールボックスからListBoxコントロールを1個配置します。x:NameがContentPanelという
|
|
| 図6:ListBoxコントロールを配置し、ContentPanelという |

書き出されるXAMLコードをリスト4のように編集します。
リスト4 編集されたXAMLコード(MainPage.xaml)
(1)Page Transitionを使用するため、toolkitという名前空間を定義しておきます。Page Transitionを使用するための名前空間の設定等については、「Windows Phone Tips第2弾」の「第6回:入力された住所の位置をBing Mapsに表示する」を参考にしてください。
  (2)TurnstileTransitionm(画面が右から左に回転するトランジッション)のコードを記述しています。Page Transtionの詳細については、「これから始めるWindows Phone 7 プログラミング(基本編)」の「第3回:ページ遷移時にTransition効果を適用する」を参照してください。App.xaml.vb内の
RootFrame = New PhoneApplicationFrame()
の部分を、
RootFrame = New TransitionFrame
と書き換えていることを忘れないようにしてください。
(3)<phone:PhoneApplicationPage.Resources>プロパティ要素内に<DataTemplate>要素を配置し、ListBoxTemplateというキーのテンプレートを定義します。<StackPanel>要素を配置して、その中に<TextBlock>要素を配置します。Textプロパティに「title」をバインドします。ここで指定する名称はVBコード内のクラスで定義するプロパティ名です。
(4)(3)で定義したテンプレートをItemTemplateに指定し参照します。
<phone:PhoneApplicationPage
  x:Class="WP71_BinMapImage.MainPage"
  xmlns="http://schemas.microsoft.com/winfx/2006/xaml/presentation"
  xmlns:x="http://schemas.microsoft.com/winfx/2006/xaml"
  xmlns:phone="clr-namespace:Microsoft.Phone.Controls;assembly=Microsoft.Phone"
  xmlns:shell="clr-namespace:Microsoft.Phone.Shell;assembly=Microsoft.Phone"
  xmlns:d="http://schemas.microsoft.com/expression/blend/2008"
  xmlns:mc="http://schemas.openxmlformats.org/markup-compatibility/2006"
  xmlns:toolkit="clr-namespace:Microsoft.Phone.Controls;assembly=Microsoft.Phone.Controls.Toolkit" ■(1)
  mc:Ignorable="d" d:DesignWidth="480" d:DesignHeight="768"
  FontFamily="{StaticResource PhoneFontFamilyNormal}"
  FontSize="{StaticResource PhoneFontSizeNormal}"
  Foreground="{StaticResource PhoneForegroundBrush}"
  SupportedOrientations="Portrait" Orientation="Portrait"
  shell:SystemTray.IsVisible="True" Language="ja-JP">

  <toolkit:TransitionService.NavigationInTransition> ■(2)
    <toolkit:NavigationInTransition>
      <toolkit:NavigationInTransition.Backward>
        <toolkit:TurnstileTransition Mode="BackwardIn"/>
      </toolkit:NavigationInTransition.Backward>
      <toolkit:NavigationInTransition.Forward>
        <toolkit:TurnstileTransition Mode="ForwardIn"/>
      </toolkit:NavigationInTransition.Forward>
    </toolkit:NavigationInTransition>
  </toolkit:TransitionService.NavigationInTransition>
  <toolkit:TransitionService.NavigationOutTransition>
    <toolkit:NavigationOutTransition>
      <toolkit:NavigationOutTransition.Backward>
        <toolkit:TurnstileTransition Mode="BackwardOut"/>
      </toolkit:NavigationOutTransition.Backward>
      <toolkit:NavigationOutTransition.Forward>
        <toolkit:TurnstileTransition Mode="ForwardOut"/>
      </toolkit:NavigationOutTransition.Forward>
    </toolkit:NavigationOutTransition>
  </toolkit:TransitionService.NavigationOutTransition> ■(2)

  <phone:PhoneApplicationPage.Resources> ■(3)
    <DataTemplate x:Key="ListBoxTemplate"> ■(3)
      <StackPanel> ■(3)
        <TextBlock Text="{Binding title}"/> ■(3)
      </StackPanel>
    </DataTemplate>
  </phone:PhoneApplicationPage.Resources>
    <!--LayoutRoot は、すべてのページ コンテンツが配置されるルート グリッドです-->
  <Grid x:Name="LayoutRoot" Background="Transparent">
    <Grid.RowDefinitions>
      <RowDefinition Height="Auto"/>
      <RowDefinition Height="*"/>
    </Grid.RowDefinitions>

    <!--TitlePanel は、アプリケーション名とページ タイトルを格納します-->
    <StackPanel x:Name="TitlePanel" Grid.Row="0" Margin="12,17,0,28">
      <TextBlock x:Name="ApplicationTitle" Text="マイ アプリケーション" Style="{StaticResource PhoneTextNormalStyle}"/>
      <TextBlock x:Name="PageTitle" Text="観光地選択" Margin="9,-7,0,0" Style="{StaticResource PhoneTextTitle1Style}"/>
    </StackPanel>

    <!--ContentPanel - 追加コンテンツをここに入力します-->
    <Grid x:Name="ContentPanel" Grid.Row="1" Margin="12,0,12,0" Background="Navy" >
      <ListBox Height="480" HorizontalAlignment="Left" Margin="33,37,0,0" Name="ListBox1" VerticalAlignment="Top" Width="397"
        Foreground="Gold" FontSize="32" ItemTemplate="{StaticResource ListBoxTemplate}"/> ■(4)
    </Grid>
  </Grid>

  <!--ApplicationBar の使用法を示すサンプル コード-->
  ~コード略~
</phone:PhoneApplicationPage>
Windows Phone 縦向きのページ(BingMapPage.xaml)の追加
VS2010メニューの「プロジェクト(P)/新しい項目の追加(W)」と選択して、「Windows Phone 縦向きのページ」を選択し、「名前(N)」にBingMapPage.xamlと指定して、[追加(A)]ボタンをクリックします。このページには、選択した場所が表示されます。
表示されるエミュレーターデザイン画面上の、PageTitleというx:Nameを持つTextBlockを削除します。ツールボックスからMapコントロールを1個配置します。書き出されるXAMLコードをリスト5のように編集します。
リスト5 編集されたXAMLコード(BingMapPage.xaml)
(1)Bing Maps Account Centerより取得したApplicationIDを指定します。ApplicationIDを指定していないと、実行時にMap上にエラーが表示されます。
Bing Maps Account Centerより取得したApplicationIDを取得する方法については、「Windows Phone Tips集第2弾」の「第6回:入力された住所の位置をBing Mapsに表示する」を参考にしてください。
<phone:PhoneApplicationPage
  x:Class="WP71_BinMapImage.BinMapPage"
  xmlns="http://schemas.microsoft.com/winfx/2006/xaml/presentation"
  xmlns:x="http://schemas.microsoft.com/winfx/2006/xaml"
  xmlns:phone="clr-namespace:Microsoft.Phone.Controls;assembly=Microsoft.Phone"
  xmlns:shell="clr-namespace:Microsoft.Phone.Shell;assembly=Microsoft.Phone"
  xmlns:d="http://schemas.microsoft.com/expression/blend/2008"
  xmlns:mc="http://schemas.openxmlformats.org/markup-compatibility/2006"
  FontFamily="{StaticResource PhoneFontFamilyNormal}"
  FontSize="{StaticResource PhoneFontSizeNormal}"
  Foreground="{StaticResource PhoneForegroundBrush}"
  SupportedOrientations="Portrait" Orientation="Portrait"
  mc:Ignorable="d" d:DesignHeight="768" d:DesignWidth="480"
  shell:SystemTray.IsVisible="True" xmlns:my="clr-namespace:Microsoft.Phone.Controls.Maps;assembly=Microsoft.Phone.Controls.Maps">

  <!--LayoutRoot は、すべてのページ コンテンツが配置されるルート グリッドです-->
  <Grid x:Name="LayoutRoot" Background="Transparent">
    <Grid.RowDefinitions>
      <RowDefinition Height="Auto"/>
      <RowDefinition Height="*"/>
    </Grid.RowDefinitions>

    <!--TitlePanel は、アプリケーション名とページ タイトルを格納します-->
    <StackPanel x:Name="TitlePanel" Grid.Row="0" Margin="12,17,0,28">
      <TextBlock x:Name="ApplicationTitle" Text="マイ アプリケーション" Style="{StaticResource PhoneTextNormalStyle}"/>
      <TextBlock x:Name="PageTitle" Margin="9,-7,0,0" FontSize="40" FontWeight="Bold" Foreground="Red"/>
    </StackPanel>

    <!--ContentPanel - 追加コンテンツをここに入力します-->
    <Grid x:Name="ContentPanel" Grid.Row="1" Margin="12,0,12,0">
      <my:Map Height="595" HorizontalAlignment="Left" Margin="12,6,0,0" Name="Map1" VerticalAlignment="Top" Width="438">
        <my:Map.CredentialsProvider>
          <my:ApplicationIdCredentialsProvider ApplicationId=" Bing Maps Account Centerより取得したApplicationID " /> ■(1)
        </my:Map.CredentialsProvider>
      </my:Map>
    </Grid>
  </Grid>
  <!--ApplicationBar の使用法を示すサンプル コード-->
  ~コード略~
</phone:PhoneApplicationPage>
次に、MainPage.xamlを展開して表示される、MainPage.xaml.vbをダブルクリックしてリスト6のコードを記述します。
ロジックコードを記述する
リスト6 (MainPage.xaml.vb)
Option Strict On
Imports System.Xml.Linq

SightSeeningInfoクラス内に、文字列型の「title、緯度、経度、画像」プロパティを定義しておきます。
Public Class SightSeeningInfo
  Property title As String
  Property 緯度 As String
  Property 経度 As String
  Property 画像 As String
End Class
Partial Public Class MainPage
  Inherits PhoneApplicationPage

  ' コンストラクター
  Public Sub New()
    InitializeComponent()
  End Sub
ページが読み込まれた時の処理
XElement.LoadメソッドでXML文書ファイル(SightseeingSpot.xml)を読み込みます。
SightSeeningInfoクラス型の新しいリストである、mySightSeeningInfoオブジェクトを作成します。
Descendants メソッドで、子孫要素であるすべての <場所> 要素のコレクションに対して、各要素を変数 result に格納しながら、SightSeeningInfoクラスの各プロパティに、読み込んだXML要素の値を指定し、リストであるmySightSeeningInfoオブジェクトに、Addメソッドで追加していきます。ListBoxのItemsSourceプロパティにmySightSeeningInfoオブジェクトを追加します。SightSeeningInfoクラスの各プロパティには、読み込んだXMLの全要素の値を指定していますが、ListBoxTemplate内では、TextBlock要素のTextプロパティにtitleしかバインドしていませんので、ListBoxコントロール内には、場所名(title)だけの一覧が表示されます。
  Private Sub MainPage_Loaded(sender As Object, e As System.Windows.RoutedEventArgs) Handles MyBase.Loaded
    Dim xmldoc As XElement = XElement.Load("SightseeingSpot.xml")
    Dim mySightSeeningInfo As New List(Of SightSeeningInfo)

    For Each result In From c In xmldoc.Descendants("場所") Select c
      With mySightSeeningInfo
         .Add(New SightSeeningInfo With {.title = result.Attribute("title").Value,
                                         .緯度 = result.Attribute("緯度").Value,
                                         .経度 = result.Attribute("経度").Value,
                                         .画像 = result.Attribute("画像").Value})
      End With
    Next
    ListBox1.ItemsSource = mySightSeeningInfo
  End Sub
ListBoxより任意の項目が選択された時の処理
ListBoxより選択された項目を、SightSeeingInfoクラスにキャストし、その各プロパティの値を、各変数に格納します。値の格納された各変数を引数に、BingMapPageに遷移します。
  Private Sub ListBox1_SelectionChanged(sender As Object, e As System.Windows.Controls.SelectionChangedEventArgs) Handles ListBox1.SelectionChanged

    Try
      Dim myTitle As String = DirectCast(ListBox1.SelectedItem, SightSeeningInfo).title
      Dim myLatitude As String = DirectCast(ListBox1.SelectedItem, SightSeeningInfo).緯度
      Dim myLongitude As String = DirectCast(ListBox1.SelectedItem, SightSeeningInfo).経度
      Dim myImage As String = DirectCast(ListBox1.SelectedItem, SightSeeningInfo).画像

      NavigationService.Navigate(New Uri(String.Format("/BingMapPage.xaml?title={0}&latitude={1}&longitude={2}&image={3}", myTitle, myLatitude, myLongitude, myImage), UriKind.Relative))

    Catch
      Exit Sub
    End Try
  End Sub
End Class
BingMapPage.xamlを展開して表示される、BingMapPage.xaml.vbをダブルクリックしてリスト7のコードを記述します。
ロジックコードを記述する
リスト7 (BingMapPage.xaml.vb)
Option Strict On
Imports System.Windows.Media.Imaging

位置情報に関するクラスの含まれる、System.Device.Location名前空間をインポートします。
Imports System.Device.Location

Windows Phoneのための、Bing Maps Silverlight Controlのパブリッククラスを含む、Microsoft.Phone.Controls.Maps名前空間をインポートします。
Imports Microsoft.Phone.Controls.Maps

Partial Public Class BinMapPage
  Inherits PhoneApplicationPage

  Public Sub New()
    InitializeComponent()
  End Sub
ページがアクティブになった時の処理
Mainpage.xamlから渡された文字データを受け取ります。文字データはNavigationContextのQueryStringにDictionary として提供されます。各変数に受け取ったデータを格納します。
PageTitleという名前のTextBlockに選択された場所名(myParam(“title”))を表示します。
地図を移動させるには、MapのCenterプロパティに、ダブル型の緯度と経度(引数で渡した値)で初期化されたGeoCoordinateを指定します。緯度は、myParam("latitude")で取得し、経度はmyParam("longitude")で取得します。これらの値を格納した、myLatitude、myLongitudeの値をDouble型に変換して指定します。ZoomLevelプロパティに10を指定します。ZoomLevelプロパティを指定しないと地図が表示されませんので、注意してください。
PushPinクラスの新しいインスタンスmyPinオブジェクトを生成します。Locationプロパティに、緯度と経度で初期化されたGeoCoordinateを指定します。
もし、myParam(“image”)で取得した値(変数myImageに格納)に、.wmvという文字列が含まれている(動画ファイルであった)場合は、新しいMediaElementのインスタンスmyMediaElementオブジェクトを作成します。Widthを指定し、SourceプロパティにImageフォルダ内の変数myImageに格納されている動画ファイルを指定します。Playメソッドで動画を再生します。myPinオブジェクトのContentプロパティにmyMediaElementオブジェクトを追加し、AddメソッドでMapに追加します。これで、ピンの中に動画が表示されます。
ファイルが動画でなかった場合は、新しいImageのインスタンス_imageを作成します。Widthを指定し、SourceプロパティにImageフォルダ内の、変数myImageに格納されている画像ファイルを指定します。myPinオブジェクトのContentプロパティに_imageオブジェクトを追加し、AddメソッドでMapに追加します。これで、ピンの中に画像が表示されます。
  Protected Overrides Sub OnNavigatedTo(e As System.Windows.Navigation.NavigationEventArgs)
    Dim myParam As IDictionary(Of String, String) = NavigationContext.QueryString
    Dim myTitle As String = myParam("title")
    PageTitle.Text = myTitle
    Dim myLatitude As String = myParam("latitude")
    Dim myLongitude As String = myParam("longitude")
    Dim myImage As String = myParam("image")

    With Map1
      .Center = New GeoCoordinate(CDbl(myLatitude), CDbl(myLongitude))
      .ZoomLevel = 10
    End With

    Dim myPin As New Pushpin
    myPin.Location = New GeoCoordinate(CDbl(myLatitude), CDbl(myLongitude))
    If myImage.Contains(".wmv") Then
      Dim myMediaElement As New MediaElement
      myMediaElement.Width = 150
      myMediaElement.Source = New Uri("Image/" & myImage, UriKind.Relative)
      myMediaElement.Play()
      myPin.Content = myMediaElement
      Map1.Children.Add(myPin)
    Else
      Dim _image As New Image
      With _image
        .Width = 150
        .Source = New BitmapImage(New Uri("Image/" & myImage, UriKind.Relative))
        myPin.Content = _image
        Map1.Children.Add(myPin)
      End With
    End If

    MyBase.OnNavigatedTo(e)
  End Sub
End Class
バックナンバー
この記事の筆者

筆者の人気記事
Think ITでは、技術情報が詰まったメールマガジン「Think IT Weekly」の配信サービスを提供しています。メルマガ会員登録を済ませれば、メルマガだけでなく、さまざまな限定特典を入手できるようになります。
