Hyperledger FabricのPermissionedとExecute-Orderer-Validateアーキテクチャ
2020年8月6日 6:30
はじめに
前回はHyperledger Fabricの2つの特徴を紹介しました。1つはPermissionedであること、もう1つはExecute-Order-Validateアーキテクチャであることでした。今回はHyperledger Fabricを動かしながら、これらの詳細を解説していきます。
Hyperledger Fabric Samples
Hyperledger Fabricでは、Hyperledger Fabricの操作や機能の確認、アプリケーション構築を学ぶためにサンプル(fabric-samples)が用意されているので、これを利用します。サンプルを動かすためにはdockerとdocker-compose、golangが必要です。
なお、サンプルを動かすために必要なバイナリやdockerコンテナ、サンプルのソースコードを取得するために、簡単なスクリプトが用意されています(https://hyperledger-fabric.readthedocs.io/en/master/install.html)。
$ curl -sSL https://bit.ly/2ysbOFE | bash -sfabric-samplesのtest-networkディレクトリに移動してnetwork.shスクリプを実行します。このスクリプトは証明書を生成し、docker-composeで3つのコンテナを起動します。
$ cd fabric-samples/test-network/
$ ls
README.md  addOrg3  configtx  docker  network.sh  organizations  scripts  system-genesis-block
$ ./network.sh up
Starting nodes with CLI timeout of '5' tries and CLI delay of '3' seconds and using database 'leveldb' with crypto from 'cryptogen'

LOCAL_VERSION=2.2.0
DOCKER_IMAGE_VERSION=2.2.0
/home/ubuntu/fabric-samples/test-network/../bin/cryptogen
(中略)
CONTAINER ID        IMAGE                               COMMAND             CREATED             STATUS                  PORTS                              NAMES
2ee6d87fb94d        hyperledger/fabric-orderer:latest   "orderer"           2 seconds ago       Up Less than a second   0.0.0.0:7050->7050/tcp             orderer.example.com
d17e7e35e5e8        hyperledger/fabric-peer:latest      "peer node start"   2 seconds ago       Up 1 second             0.0.0.0:7051->7051/tcp             peer0.org1.example.com
544d6a99f3cf        hyperledger/fabric-peer:latest      "peer node start"   2 seconds ago       Up Less than a second   7051/tcp, 0.0.0.0:9051->9051/tcp   peer0.org2.example.com
コンテナを起動すると、下図のような構成になっています。
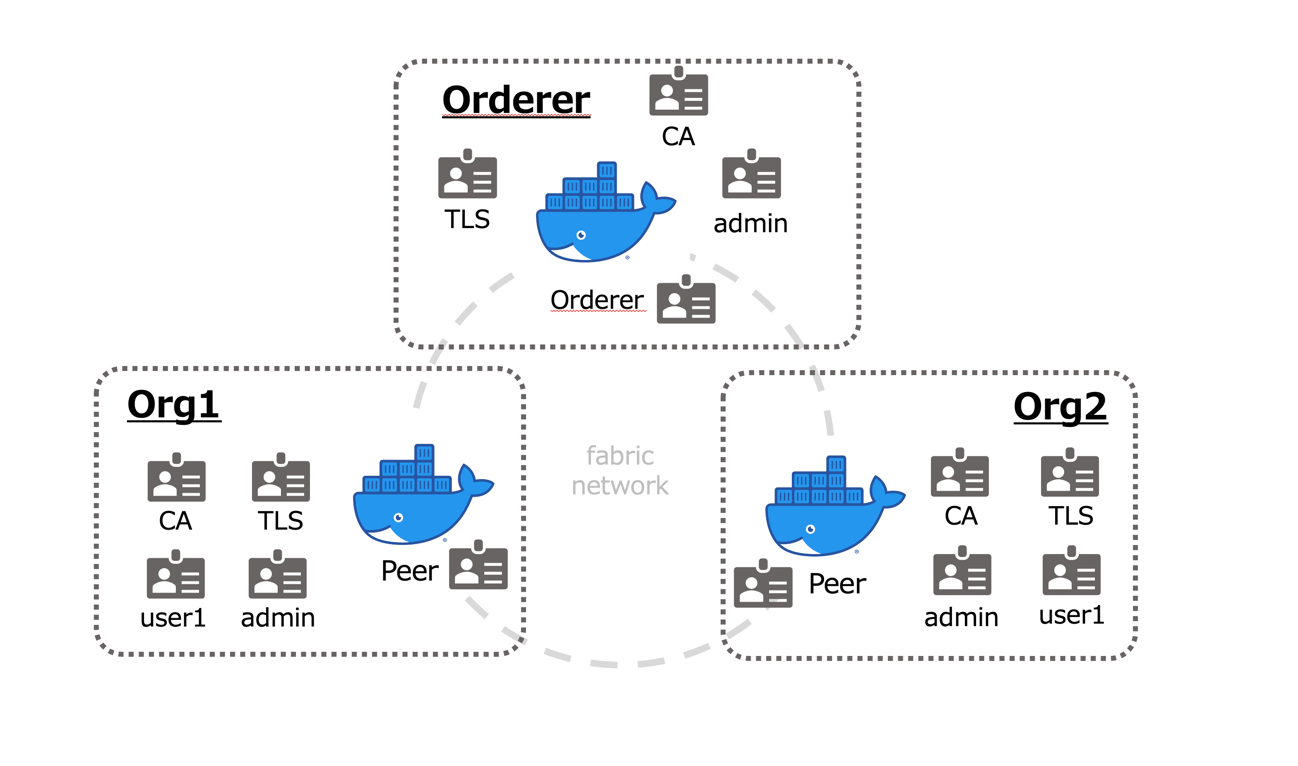
このfabric networkにはOrderer、Org1、Org2の3つの組織があり、ordererコンテナと2つのpeerコンテナの計3つのコンテナが動いています。また、それぞれの組織にはCA(認証局)やtls、adminの証明書、org1とorg2にはuser1の証明書が生成されています。
各組織の証明書はorganizationsディレクトリに生成されます。例えば、ordererの証明書はorganizations/ordererOrganizations/example.comに入っています。同様にorg1とorg2の証明書もorganizations/peerOrganizations/org1.example.comやorganizations/peerOrganizations/org2.example.comに入っています。
Permissionedを実現するGenesis block
ブロックチェーンの最初のブロックのことを「genesis block」と呼びます。最初のブロックなので中は空であったり、bitcoinではTimes誌の見出しが書かれていたりします。
Hyperledger FabricはPermissionedを実現するためgenesis blockに参加組織のリストや証明書、channelに関する設定情報を入れています。
Channelでは、fabric networkの中にいくつか小さいグループを作り、そのグループ間でデータを共有することができます。例えば、3つの組織でfabric networkを作るとしたとき、下図のようにchannelを作ることができます。Channel Aには組織1と組織2、Channel Bには組織2と組織3のようにプライベート空間を作り、その中で情報共有することが可能です。
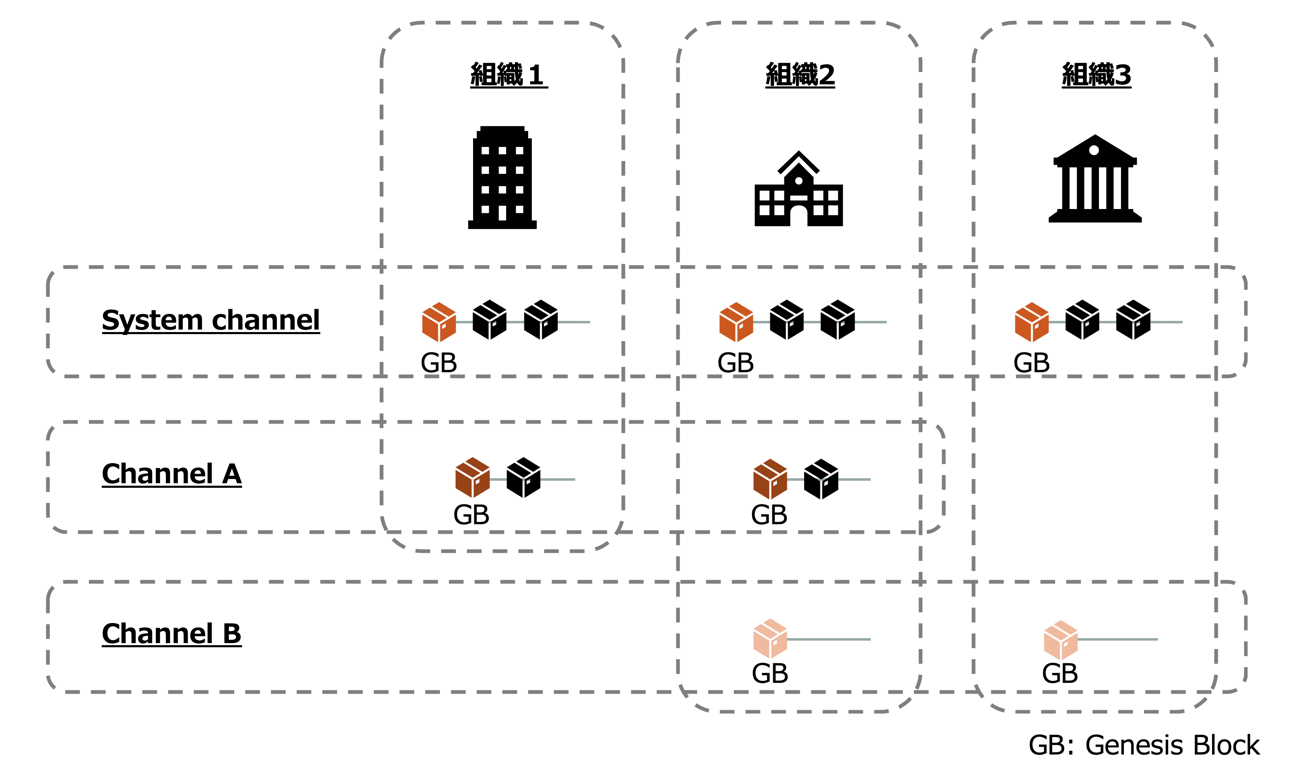
Fabric networkにはorderer system channelという特別なchannelが存在します。これはchannel(application channelとも呼ぶ)の作成を許可された組織のリストを含みます。
それでは、System channelの中身がどのようになっているのか確認してみましょう。Genesis blockはsystem-genesis-blockディレクトリに生成されています。
$ ls system-genesis-block/
genesis.block
Genesis blockの中身を確認してみます。
$ strings system-genesis-block/genesis.block
system-channel*@c401aa2f9da7e46d564f6cba344873d303f129ea244f83882beb8d63b19afdc1
Orderer
OrdererOrg
OrdererMSP
-----BEGIN CERTIFICATE-----
MIICPTCCAeOgAwIBAgIQDYCeY66vNwmM+gSw/PcAITAKBggqhkjOPQQDAjBpMQsw
CQYDVQQGEwJVUzETMBEGA1UECBMKQ2FsaWZvcm5pYTEWMBQGA1UEBxMNU2FuIEZy
YW5jaXNjbzEUMBIGA1UEChMLZXhhbXBsZS5jb20xFzAVBgNVBAMTDmNhLmV4YW1w
bGUuY29tMB4XDTIwMDcxMzA5MjAwMFoXDTMwMDcxMTA5MjAwMFowaTELMAkGA1UE
BhMCVVMxEzARBgNVBAgTCkNhbGlmb3JuaWExFjAUBgNVBAcTDVNhbiBGcmFuY2lz
Y28xFDASBgNVBAoTC2V4YW1wbGUuY29tMRcwFQYDVQQDEw5jYS5leGFtcGxlLmNv
bTBZMBMGByqGSM49AgEGCCqGSM49AwEHA0IABCMkk/PHfD5eV2urk2OxiSFz1JDt
0lM9wDommSrErcCQkFSmCidbXY2IdLvuDGkHLbVeVC4fPEUvpXhRorcPtNWjbTBr
MA4GA1UdDwEB/wQEAwIBpjAdBgNVHSUEFjAUBggrBgEFBQcDAgYIKwYBBQUHAwEw
DwYDVR0TAQH/BAUwAwEB/zApBgNVHQ4EIgQgWR5x7Dsmmi2/Ynz2q0M4wykJ+Sgh
EDj23VitESDz160wCgYIKoZIzj0EAwIDSAAwRQIgR1cPAvybKwtZBI7qOsnQtEiU
qiMb7bP2DMgaz8IthOkCIQCXYmyuGbLJAew4KW2/3s9R4rq4C7/VIerNVcgMovg8
NQ==
-----END CERTIFICATE-----
(中略)
Endpoints
orderer.example.com:7050
(中略)

ConsensusType
etcdraft
(中略)
6~19行目にはorderer組織のCAの証明書、23行目にはordererのエンドポイント、27行目にはconsensus typeなどの設定があります。CAの証明書自体はorganizations/ordererOrganizations/example.com/ca/ca.example.com-cert.pemにあります。中身を確認するとgenesis blockにある証明書と同じことが分かります。
$ cat organizations/ordererOrganizations/example.com/ca/ca.example.com-cert.pem
-----BEGIN CERTIFICATE-----
MIICPTCCAeOgAwIBAgIQDYCeY66vNwmM+gSw/PcAITAKBggqhkjOPQQDAjBpMQsw
CQYDVQQGEwJVUzETMBEGA1UECBMKQ2FsaWZvcm5pYTEWMBQGA1UEBxMNU2FuIEZy
YW5jaXNjbzEUMBIGA1UEChMLZXhhbXBsZS5jb20xFzAVBgNVBAMTDmNhLmV4YW1w
bGUuY29tMB4XDTIwMDcxMzA5MjAwMFoXDTMwMDcxMTA5MjAwMFowaTELMAkGA1UE
BhMCVVMxEzARBgNVBAgTCkNhbGlmb3JuaWExFjAUBgNVBAcTDVNhbiBGcmFuY2lz
Y28xFDASBgNVBAoTC2V4YW1wbGUuY29tMRcwFQYDVQQDEw5jYS5leGFtcGxlLmNv
bTBZMBMGByqGSM49AgEGCCqGSM49AwEHA0IABCMkk/PHfD5eV2urk2OxiSFz1JDt
0lM9wDommSrErcCQkFSmCidbXY2IdLvuDGkHLbVeVC4fPEUvpXhRorcPtNWjbTBr
MA4GA1UdDwEB/wQEAwIBpjAdBgNVHSUEFjAUBggrBgEFBQcDAgYIKwYBBQUHAwEw
DwYDVR0TAQH/BAUwAwEB/zApBgNVHQ4EIgQgWR5x7Dsmmi2/Ynz2q0M4wykJ+Sgh
EDj23VitESDz160wCgYIKoZIzj0EAwIDSAAwRQIgR1cPAvybKwtZBI7qOsnQtEiU
qiMb7bP2DMgaz8IthOkCIQCXYmyuGbLJAew4KW2/3s9R4rq4C7/VIerNVcgMovg8
NQ==
同様にorg1, org2のCAの証明書も入っていることが確認できると思います。また、それ以外にも様々な証明書が入っています。これらの証明書は細かな制御を行うためのものです。
Hyperledger Fabricにはfabric networkを細かく制御するポリシーを設定できます。ポリシーの設定はgenesis blockの生成に必要な設定ファイルのconfigtx/configtx.yamlにあります。このファイルの中盤にポリシーの設定が記載されています。
$ cat configtx/configtx.yaml
(中略)
  - &Org1
(中略)
      # Policies defines the set of policies at this level of the config tree
      # For organization policies, their canonical path is usually
      #   /Channel/<Application|Orderer>/<OrgName>/<PolicyName>
      Policies:
          Readers:
              Type: Signature
              Rule: "OR('Org1MSP.admin', 'Org1MSP.peer', 'Org1MSP.client')"
          Writers:
              Type: Signature
              Rule: "OR('Org1MSP.admin', 'Org1MSP.client')"
          Admins:
              Type: Signature
              Rule: "OR('Org1MSP.admin')"
          Endorsement:
              Type: Signature
              Rule: "OR('Org1MSP.peer')"
(中略)
例えば、上記の例ではブロックのデータを読むにはOrg1のadminやpeer, clientのOU属性を持つ証明書が必要です。管理者権限が必要な操作はOrg1のadminのOU属性を持つ証明書(下記12行目のOU)、エンドースメント(後述)はOrg1のpeerのOU属性を持つも証明書が必要など、細かく設定ができます。
$ openssl x509 -noout -text -in organizations/peerOrganizations/org1.example.com/users/Admin@org1.example.com/msp/signcerts/Admin@org1.example.com-cert.pem
Certificate:
  Data:
      Version: 3 (0x2)
      Serial Number:
          8c:2e:1f:39:fd:2b:c2:1f:a0:49:16:39:52:00:a9:8b
      Signature Algorithm: ecdsa-with-SHA256
      Issuer: C = US, ST = California, L = San Francisco, O = org1.example.com, CN = ca.org1.example.com
      Validity
          Not Before: Jul 21 01:30:00 2020 GMT
          Not After : Jul 19 01:30:00 2030 GMT
      Subject: C = US, ST = California, L = San Francisco, OU = admin, CN = Admin@org1.example.com
      Subject Public Key Info:
          Public Key Algorithm: id-ecPublicKey
              Public-Key: (256 bit)
              pub:
                  04:9d:cd:74:38:63:b2:c7:6b:77:21:f3:b1:7c:99:
                  a9:34:73:87:bb:dc:5d:d1:f0:e5:08:90:f4:c5:c1:
(中略)
このポリシーを実現するため、genesis blockにはCA以外のadminやpeer, clientの証明書が含まれています。このように、genesis blockは設定や含まれている証明書のリストをもとに許可された組織がchannelを作成できるようにすることで、Hyperledger Fabricの特徴であるPermissionedを実現しています。
Hyperledger Fabric CA
先ほど「CAの証明書がgenesis blockに入っている」と説明しましたが、network.shの最小構成ではCAを起動していません。./network.shの起動ログを見ると次のようになっています。
$ ./network.sh up
Starting nodes with CLI timeout of '5' tries and CLI delay of '3' seconds and using database 'leveldb' with crypto from 'cryptogen'

LOCAL_VERSION=2.2.0
DOCKER_IMAGE_VERSION=2.2.0
/home/ubuntu/fabric-samples/test-network/../bin/cryptogen

##########################################################
##### Generate certificates using cryptogen tool #########
##########################################################

##########################################################
############ Create Org1 Identities ######################
##########################################################
+ cryptogen generate --config=./organizations/cryptogen/crypto-config-org1.yaml --output=organizations
org1.example.com
+ res=0
+ set +x
##########################################################
############ Create Org2 Identities ######################
##########################################################
+ cryptogen generate --config=./organizations/cryptogen/crypto-config-org2.yaml --output=organizations
org2.example.com
+ res=0
+ set +x
##########################################################
############ Create Orderer Org Identities ###############
##########################################################
+ cryptogen generate --config=./organizations/cryptogen/crypto-config-orderer.yaml --output=organizations
+ res=0
+ set +x
(中略)
15行目でcryptgenという証明書を生成するツールを用いて証明書を生成しています。デモやPoCレベルではCAの運用はそこまで必要ありませんが、本来は各組織にCAを構築し、組織間で証明書をやりとりしてgenesis blockを生成します。CAがいなければ、新たなユーザーーの追加や証明書の失効を行うことはできません。
./network.shではCAを起動した場合もサポートしています。実際に確認してみましょう。まずは残った環境を削除します。
$ ./network.sh down次に引数として-caを加え、CAを利用した環境を作成します。
$ ./network.sh up -ca
Starting nodes with CLI timeout of '5' tries and CLI delay of '3' seconds and using database 'leveldb' with crypto from 'Certificate Authorities'

LOCAL_VERSION=2.2.0
DOCKER_IMAGE_VERSION=2.2.0
CA_LOCAL_VERSION=1.4.7
CA_DOCKER_IMAGE_VERSION=1.4.7
##########################################################
##### Generate certificates using Fabric CA's ############
##########################################################
Creating network "net_test" with the default driver
Creating ca_org1    ... done
Creating ca_org2    ... done
Creating ca_orderer ... done
##########################################################
############ Create Org1 Identities ######################
##########################################################
(中略)
Register peer0

+ fabric-ca-client register --caname ca-org1 --id.name peer0 --id.secret peer0pw --id.type peer --tls.certfiles /home/ubuntu/fabric-samples/test-network/organizations/fabric-ca/org1/tls-cert.pem
2020/07/13 14:17:07 [INFO] Configuration file location: /home/ubuntu/fabric-samples/test-network/organizations/peerOrganizations/org1.example.com/fabric-ca-client-config.yaml
2020/07/13 14:17:07 [INFO] TLS Enabled
2020/07/13 14:17:07 [INFO] TLS Enabled
Password: peer0pw
+ set +x

Register user

+ fabric-ca-client register --caname ca-org1 --id.name user1 --id.secret user1pw --id.type client --tls.certfiles /home/ubuntu/fabric-samples/test-network/organizations/fabric-ca/org1/tls-cert.pem
2020/07/13 14:17:07 [INFO] Configuration file location: /home/ubuntu/fabric-samples/test-network/organizations/peerOrganizations/org1.example.com/fabric-ca-client-config.yaml
2020/07/13 14:17:07 [INFO] TLS Enabled
2020/07/13 14:17:07 [INFO] TLS Enabled
Password: user1pw
+ set +x
(中略)
#########  Generating Orderer Genesis block ##############
+ configtxgen -profile TwoOrgsOrdererGenesis -channelID system-channel -outputBlock ./system-genesis-block/genesis.block
最初の方で各組織のCAコンテンを3つ(ca_org1、ca_org2、ca_orderer)起動しています。その後“Register peer0”や“Register user”が表示され、fabric-ca-clientコマンドが実行されています。fabric-ca-clientはCAを操作するツールで、CAにユーザーや証明書の登録を行います。これらの操作をpeerやuser、admin、ordererなどで行い、証明書を用いてgenesis blockを生成するツールのconfigtxgenを実行し、genesis blockを生成します。
Execute-Order-Validateアーキテクチャ
一般的なブロックチェーンは、トランザクションを発行する場合、最初にコンセンサスプロトコルを用いてトランザクションの順序を決めます。その後、その順序に従ってスマートコントラクトを実行し台帳を更新します。この方式はシーケンシャルにトランザクションを実行するためスループットが制限されます。
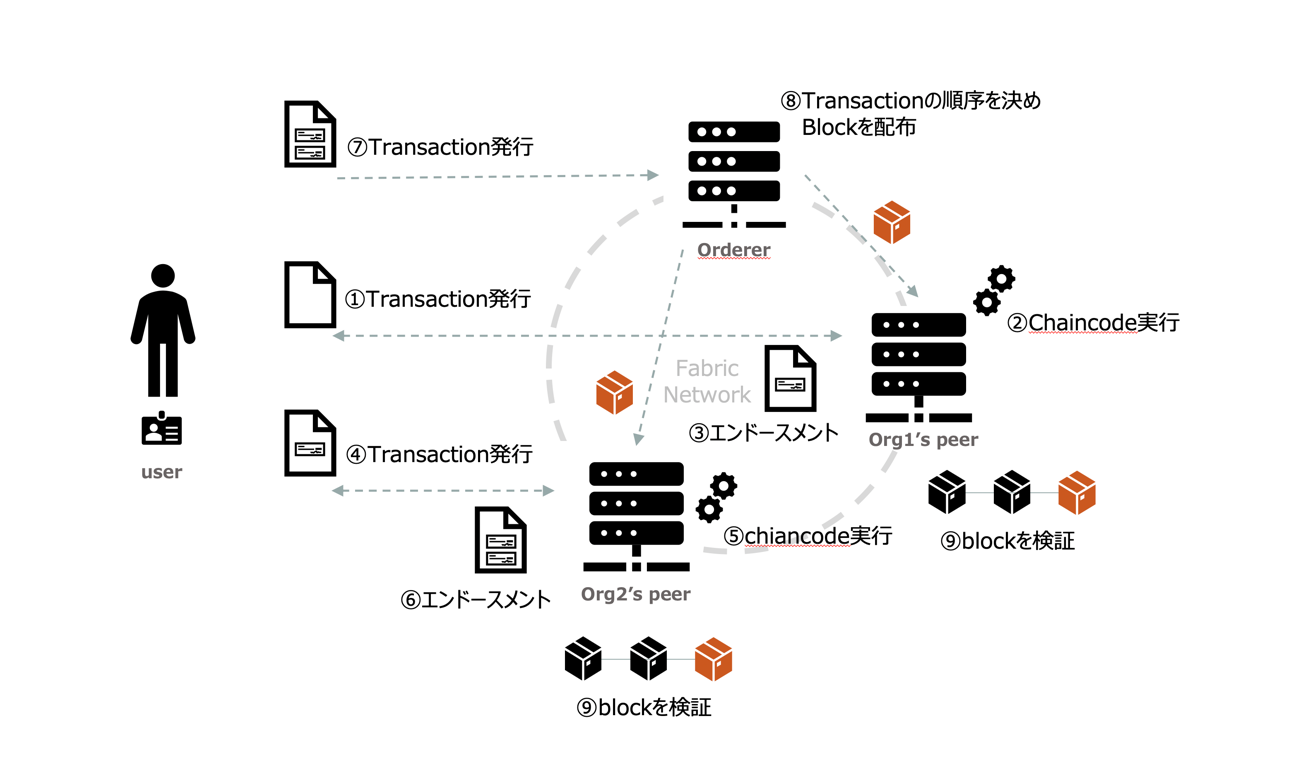
Hyperledger Fabricでは、この制限を回避するため、以下のように動作するExecute-Order-Validateアーキテクチャを採用しています。
- Peerでchaincodeを実行してエンドースメント をもらうExecuteフェーズ
- Ordererにトランザクションを発行して順序を決めるOrdererフェーズ
- Peerでトランザクションがポリシーを満たすかどうかを検証するValidateフェーズ
これらがどのような処理を行っているのか、実際にトランザクションを発行して確認したいと思います。
エンドースメントポリシー
Hyperledger Fabricでトランザクションを有効にするには、各組織が持つ分散台帳の値を用いてchaincodeを実行し、分散環境でも実行結果に対して同一であることを保証する必要があります。
Hyperledger Fabricでは複数の組織でchaincodeを実行し、その実行結果に裏書き(署名)をします。そして、必要な数の署名が集まれば「その時点で」実行結果が正しいことが保証されます。その必要な数を定義したのがエンドースメントポリシーです。
例えば、3つの組織A、B、Cがあるとして「過半数のエンドースメントが必要」と定義すれば、組織AとB、組織AとC、組織BとCのエンドースメントの3つのパターンのいずれかを満たせば、そのトランザクションは有効とみなされます。エンドースメントが1つの組織だけでは、そのトランザクションは有効とみなされません。
Fabric-samplesを動かして、エンドースメントポリシーの動きを理解していただきたいと思います。すでにordererやpeerが動いているので、channelを作成するところから始めます。
$ ./network.sh createChannel
Creating channel 'mychannel'.
If network is not up, starting nodes with CLI timeout of '5' tries and CLI delay of '3' seconds and using database 'leveldb

### Generating channel create transaction 'mychannel.tx' ###
(中略)
========= Channel successfully joined ===========
次に、fabcarという自動車の所有者を管理するchiancodeをデプロイします。Chaincodeに関しては次回で詳しく説明したいと思います。
$ ./network.sh deployCC
deploying chaincode on channel 'mychannel'

Vendoring Go dependencies
(中略)
===================== Querying on peer0.org1 on channel 'mychannel'... =====================
Attempting to Query peer0.org1, Retry after 3 seconds.
++ peer chaincode query -C mychannel -n fabcar -c '{"Args":["queryAllCars"]}'
++ res=0
++ set +x

[{"Key":"CAR0","Record":{"make":"Toyota","model":"Prius","colour":"blue","owner":"Tomoko"}},{"Key":"CAR1","Record":{"make":"Ford","model":"Mustang","colour":"red","owner":"Brad"}},{"Key":"CAR2","Record":{"make":"Hyundai","model":"Tucson","colour":"green","owner":"Jin Soo"}},{"Key":"CAR3","Record":{"make":"Volkswagen","model":"Passat","colour":"yellow","owner":"Max"}},{"Key":"CAR4","Record":{"make":"Tesla","model":"S","colour":"black","owner":"Adriana"}},{"Key":"CAR5","Record":{"make":"Peugeot","model":"205","colour":"purple","owner":"Michel"}},{"Key":"CAR6","Record":{"make":"Chery","model":"S22L","colour":"white","owner":"Aarav"}},{"Key":"CAR7","Record":{"make":"Fiat","model":"Punto","colour":"violet","owner":"Pari"}},{"Key":"CAR8","Record":{"make":"Tata","model":"Nano","colour":"indigo","owner":"Valeria"}},{"Key":"CAR9","Record":{"make":"Holden","model":"Barina","colour":"brown","owner":"Shotaro"}}]
===================== Query successful on peer0.org1 on channel 'mychannel' =====================
このサンプルでは、chiancodeをデプロイすると初期化関数を呼ぶ処理まで実行されるため、10人の自動車の所有者が登録され表示されます。次に、今curlコマンドを用いて冒頭で用意したpeerコマンドからfabric networkを操作するために環境変数を設定します。
$ export PATH=${PWD}/../bin:$PATH
$ export FABRIC_CFG_PATH=$PWD/../config/
$ export CORE_PEER_TLS_ENABLED=true
$ export CORE_PEER_LOCALMSPID="Org1MSP"
$ export CORE_PEER_TLS_ROOTCERT_FILE=${PWD}/organizations/peerOrganizations/org1.example.com/peers/peer0.org1.example.com/tls/ca.crt
$ export CORE_PEER_MSPCONFIGPATH=${PWD}/organizations/peerOrganizations/org1.example.com/users/Admin@org1.example.com/msp
$ export CORE_PEER_ADDRESS=localhost:7051
Peerコマンドを実行してchaincodeを呼び出してみます。まずはorg1のpeer0がどのchannelに所属しているか調べます。
$ peer channel list
2020-07-14 12:53:57.043 UTC [channelCmd] InitCmdFactory -> INFO 001 Endorser and orderer connections initialized
Channels peers has joined:
mychannel
このように、org1のpeer0はmychannelに属していることが分かります。次に、このchannelが持つブロックの数を調べてみます。
$ peer channel getinfo -c mychannel
2020-07-14 12:53:58.577 UTC [channelCmd] InitCmdFactory -> INFO 001 Endorser and orderer connections initialized
Blockchain info: {"height":7,"currentBlockHash":"fuSrTtSPB8RuvMQNpMR85VaRWvDSxDFfZ/jpN2T68kQ=","previousBlockHash":"hCXf7YiFGcRzAaE4eReIF0inDjiVSB/z+gcj3iRvpiY="}
ブロックの高さは7つあります。genesis block、異なる組織がお互いに認識できるようにするための情報が入っているブロック2つ(org1とorg2の分)、chaincodeの定義に対する承認ブロック2つ(org1とorg2の分)、chaincodeを定義したブロック、そして最初のinvoke(chaincodeで定義された関数を呼び出すコマンド)を実行した結果のブロックの計7つです。
次に、CAR9のレコードの車の所有者を“Shotaro”から“Dave”に変更するトランザクションを投げてみます。
$ peer chaincode invoke -o localhost:7050 --ordererTLSHostnameOverride orderer.example.com --tls --cafile ${PWD}/organizations/ordererOrganizations/example.com/orderers/orderer.example.com/msp/tlscacerts/tlsca.example.com-cert.pem -C mychannel -n fabcar --peerAddresses localhost:7051 --tlsRootCertFiles ${PWD}/organizations/peerOrganizations/org1.example.com/peers/peer0.org1.example.com/tls/ca.crt --peerAddresses localhost:9051 --tlsRootCertFiles ${PWD}/organizations/peerOrganizations/org2.example.com/peers/peer0.org2.example.com/tls/ca.crt -c '{"function":"changeCarOwner","Args":["CAR9","Dave"]}'
2020-07-14 13:49:49.414 UTC [chaincodeCmd] chaincodeInvokeOrQuery -> INFO 001 Chaincode invoke successful. result: status:200
変更されたquery(chaincodeで定義された値を取得する関数を呼び出すコマンド)を実行して確認します。
$ peer chaincode query -C mychannel -n fabcar -c '{"Args":["queryAllCars"]}'
[{"Key":"CAR0","Record":{"make":"Toyota","model":"Prius","colour":"blue","owner":"Tomoko"}},{"Key":"CAR1","Record":{"make":"Ford","model":"Mustang","colour":"red","owner":"Brad"}},{"Key":"CAR2","Record":{"make":"Hyundai","model":"Tucson","colour":"green","owner":"Jin Soo"}},{"Key":"CAR3","Record":{"make":"Volkswagen","model":"Passat","colour":"yellow","owner":"Max"}},{"Key":"CAR4","Record":{"make":"Tesla","model":"S","colour":"black","owner":"Adriana"}},{"Key":"CAR5","Record":{"make":"Peugeot","model":"205","colour":"purple","owner":"Michel"}},{"Key":"CAR6","Record":{"make":"Chery","model":"S22L","colour":"white","owner":"Aarav"}},{"Key":"CAR7","Record":{"make":"Fiat","model":"Punto","colour":"violet","owner":"Pari"}},{"Key":"CAR8","Record":{"make":"Tata","model":"Nano","colour":"indigo","owner":"Valeria"}},{"Key":"CAR9","Record":{"make":"Holden","model":"Barina","colour":"brown","owner":"Dave"}}]
CAR9のレコードのownerがshotaroからDaveに変更されていることが分かります。そしてブロックが1つ積まれています。
$ peer channel getinfo -c mychannel
2020-07-14 13:50:16.910 UTC [channelCmd] InitCmdFactory -> INFO 001 Endorser and orderer connections initialized
Blockchain info: {"height":8,"currentBlockHash":"Gyo8UEDLosIyz0byrtz1Y5HyFVXaqpJlhw5h8bQnwRc=","previousBlockHash":"bQHdt4mlbEAaCxUU0j0VzmaWE7/p+1WrkKmbWQ3Vm4g="}
先ほど実行したpeer chaincode invokeコマンドにはpeerAddressの引数が2つあります。このコマンドは、引数に指定されたorg1のpeer(localhost:7051)とorg2のpeer(localhost:9051)にトランザクションを投げてエンドースメントを取得します。その後、ordererにトランザクションを投げています。これは、エンドースメントポリシーに何も指定しないとデフォルトポリシーである「過半数以上」となるため、2組織の過半数である2つのエンドースメントポリシーが必要になります。
試しにpeerAddressの引数を1つ(localhost:7051)だけにして、名前を“Shotaro”に戻してみます。
$ peer chaincode invoke -o localhost:7050 --ordererTLSHostnameOverride orderer.example.com --tls --cafile ${PWD}/organizations/ordererOrganizations/example.com/orderers/orderer.example.com/msp/tlscacerts/tlsca.example.com-cert.pem -C mychannel -n fabcar -peerAddresses localhost:7051 --tlsRootCertFiles ${PWD}/organizations/peerOrganizations/org1.example.com/peers/peer0.org1.example.com/tls/ca.crt -c '{"function":"changeCarOwner","Args":["CAR9","Shotaro"]}'
2020-07-14 13:56:11.789 UTC [chaincodeCmd] chaincodeInvokeOrQuery -> INFO 001 Chaincode invoke successful. result: status:200
結果は“status:200”が返ってきているので、org1のpeerに対するトランザクションは成功し、1つのエンドースメントを得てからordererにトランザクションを投げています。しかし、値を確認するとCAR9のレコードのownerは変わっていません。
$ peer chaincode query -C mychannel -n fabcar -c '{"Args":["queryAllCars"]}'
[{"Key":"CAR0","Record":{"make":"Toyota","model":"Prius","colour":"blue","owner":"Tomoko"}},{"Key":"CAR1","Record":{"make":"Ford","model":"Mustang","colour":"red","owner":"Brad"}},{"Key":"CAR2","Record":{"make":"Hyundai","model":"Tucson","colour":"green","owner":"Jin Soo"}},{"Key":"CAR3","Record":{"make":"Volkswagen","model":"Passat","colour":"yellow","owner":"Max"}},{"Key":"CAR4","Record":{"make":"Tesla","model":"S","colour":"black","owner":"Adriana"}},{"Key":"CAR5","Record":{"make":"Peugeot","model":"205","colour":"purple","owner":"Michel"}},{"Key":"CAR6","Record":{"make":"Chery","model":"S22L","colour":"white","owner":"Aarav"}},{"Key":"CAR7","Record":{"make":"Fiat","model":"Punto","colour":"violet","owner":"Pari"}},{"Key":"CAR8","Record":{"make":"Tata","model":"Nano","colour":"indigo","owner":"Valeria"}},{"Key":"CAR9","Record":{"make":"Holden","model":"Barina","colour":"brown","owner":"Dave"}}]
Peerのログを調べてみます。
$ docker logs peer0.org1.example.com
(中略)
2020-07-14 13:56:13.796 UTC [gossip.privdata] StoreBlock -> INFO 080 [mychannel] Received block [8] from buffer
2020-07-14 13:56:13.797 UTC [vscc] Validate -> ERRO 081 VSCC error: stateBasedValidator.Validate failed, err validation of endorsement policy for chaincode fabcar in tx 8:0 failed: implicit policy evaluation failed - 1 sub-policies were satisfied, but this policy requires 2 of the 'Endorsement' sub-policies to be satisfied
2020-07-14 13:56:13.797 UTC [committer.txvalidator] validateTx -> ERRO 082 Dispatch for transaction txId = 210bc6e65ab2327f4e3fb43f7f1caede6a18b4a3e6cf161bfe15778a4dc06fc1 returned error: validation of endorsement policy for chaincode fabcar in tx 8:0 failed: implicit policy evaluation failed - 1 sub-policies were satisfied, but this policy requires 2 of the 'Endorsement' sub-policies to be satisfied
2020-07-14 13:56:13.797 UTC [committer.txvalidator] Validate -> INFO 083 [mychannel] Validated block [8] in 0ms
2020-07-14 13:56:13.797 UTC [validation] preprocessProtoBlock -> WARN 084 Channel [mychannel]: Block [8] Transaction index [0] TxId [210bc6e65ab2327f4e3fb43f7f1caede6a18b4a3e6cf161bfe15778a4dc06fc1] marked as invalid by committer. Reason code [ENDORSEMENT_POLICY_FAILURE]
4行目のErrorを見ると、ポリシーは2つのエンドースメントを要求しているのに「1つのエンドースメントしかない」と書かれています。このようにエンドースメントポリシーが足りないとエラーとなります。
しかし、ブロックの高さを調べてみると1つ増えています。
$ peer channel getinfo -c mychannel
2020-07-14 13:59:49.405 UTC [channelCmd] InitCmdFactory -> INFO 001 Endorser and orderer connections initialized
Blockchain info: {"height":9,"currentBlockHash":"uyw+NsBJq+327SGQDxbvJJrgt6cqO8bow6WxsuTAGHo=","previousBlockHash":"Gyo8UEDLosIyz0byrtz1Y5HyFVXaqpJlhw5h8bQnwRc="}
これは、Execute-Order-Validateアーキテクチャの最後のvalidationフェーズにおいて、エンドースメントポリシーを満たしてないトランザクションであるため、ブロックチェーンにブロックは積まれるが、トランザクションの変更は値に反映されていないことを示しています(次回でchiancodeとともにデータの取り扱いに関して解説します)。
おわりに
今回はHyperledger Fabricの特徴であるPermissionedとExecute-Orderer-Validateアーキテクチャを解説しました。トランザクションフローは長く複雑な動作になっていますが、Execute-Orderer-Validateアーキテクチャを理解すれば、なぜこのようなフローになっているのか分かるようになると思います。
次回は、実際にchaincodeとデータの取り扱いについて、サンプルを動かしながら解説したいと思います。
- この記事のキーワード
この記事をシェアしてください
バックナンバー
この記事の筆者
筆者の人気記事
Fabric SDK(Software Development Kit)を用いてNode.jsからchaincodeを呼び出す
2021年1月26日 7:36
Hyperledger Fabricのアーキテクチャとchaincodeのデプロイ
2020年10月2日 6:30
fabric-samplesのfabcarを用いてchaincodeの中身を記述する
2020年11月17日 9:12
Hyperledger FabricのPermissionedとExecute-Orderer-Validateアーキテクチャ
2020年8月6日 6:30
Hyperledger Fabricに関連する2つのプロジェクトとHyperledger Fabricに関するリソース
2021年3月24日 7:04
エンタープライズグレードのブロックチェーンを発展させる「Hyperledger」とは
2020年6月17日 6:30
Think ITでは、技術情報が詰まったメールマガジン「Think IT Weekly」の配信サービスを提供しています。メルマガ会員登録を済ませれば、メルマガだけでなく、さまざまな限定特典を入手できるようになります。
