オブジェクト指向で作った15パズルの完成
連載5回目となる今回は、これまで作成してきた15パズルを完成させます。
2020年12月24日 5:50
ゲームの初めにタイルをランダムに配置するメソッドを作る
前回の記事では、15パズルのプログラムの基本的な機能を完成させたところまで進みました。今回はその続きです。まずはゲーム開始時にタイルをランダムに配置するメソッドを作りましょう(プログラムを実行して、初めからタイルの位置が並んでいてはパズルになりませんからね)。メソッド名はgameInitialize()とします。また、このメソッドではランダム値を使いたいので、Randomクラスのインスタンスを作成するコードをForm1クラスに記述します。gameInitialize()メソッドもForm1クラスに次のように記述します。
リスト1:RandomクラスのインスタンスとgameInitalize()メソッド
Random myRandom = new System.Random();
private void gameInitialize()
{

}
gameInitialize()メソッドの中身を作りましょう。ボタンの位置を交換するメソッドはカスタムボタンのMove()メソッドでした。()内の引数に、位置を交換したい相手のカスタムボタンオブジェクトを与えるものでした。たとえば12番のボタンを15番のボタンと位置交換するコードは、myCustomButton[12].Move(myCustomButton[15])のようにすればよいのでした。ランダムな数字を得るには、ランダムクラスのNext()メソッドを使います。たとえばmyRandomオブジェクトで0以上15未満のランダムな値を得るには、myRandom.Next(0, 15)とします。
ランダムにタイルの位置を交換するには、カスタムボタン配列の添え字の番号をランダムにすればよいので、gameInitialize()メソッドのコードは次のようになります。ランダムに位置を交換した後、移動可能を判定するsetMovable();メソッドも実行しています。
リスト2:gameInitialize()メソッドの内容
private void gameInitialize()
{
    for (int i = 0; i < 30; i++)
    {
        myCustomButton[myRandom.Next(0, 15)].Move(myCustomButton[15]);
        setMovable();
    }
}
gameInitialize()メソッドができたら、このメソッドがフォームの起動時に実行されるように、Form1_Load()メソッドにgameInitialize();を記述します。ここまでできたら、Visual Studioで緑の三角「開始」ボタンをクリックするか、「デバッグ」メニューの「デバッグの開始」でビルドしてプログラムを実行します。実行するとボタンのいくつかがランダムに位置交換されてゲーム開始となります。
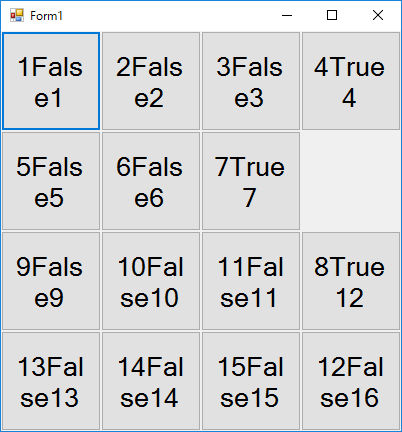
ランダムに位置を交換するコードはfor文で繰り返す構造になっています。ここではデバッグをしやすくするために、繰り返す回数を30回と少なめにしています。この回数では、次の実行結果のように、全体のタイルの位置が大きく変わることなく、右下の空欄に近いところのタイル数個の位置が変わるだけになります。デバッグが終わればfor文の繰り返し回数を増やすことにします。実行したらタイルをクリックしてパズルを完成させてみましょう。
プログラム開始時にgameInitialize()メソッドを実行してパズルを始める
ここまでのコードは次のようになります。
リスト3:ここまでのコード全体(expand sourceをクリックで表示)
using System;
using System.Collections.Generic;
using System.ComponentModel;
using System.Data;
using System.Drawing;
using System.Linq;
using System.Text;
using System.Threading.Tasks;
using System.Windows.Forms;

namespace _15puzzle_objective_Text
{
    public partial class Form1 : Form
    {
        CustomButton[] myCustomButton;
        Random myRandom = new System.Random();

        public Form1()
        {
            InitializeComponent();
        }

        private void Form1_Load(object sender, EventArgs e)
        {
            this.ClientSize = new Size(400, 400);
            myCustomButton = new CustomButton[16];

            for (int i = 0; i < 16; i++)
            {
                myCustomButton[i] = new CustomButton();
                myCustomButton[i].Click += myCustomButton_Click;
                this.Controls.Add(myCustomButton[i]);
                myCustomButton[i].Initialize(i);
            }

            myCustomButton[15].Visible = false;

            setMovable();

            gameInitialize();
        }
        private void myCustomButton_Click(object sender, EventArgs e)
        {
            ((CustomButton)sender).Move(myCustomButton[15]);

            setMovable();
        }

        private void setMovable()
        {
            foreach (CustomButton allCustomButton in myCustomButton)
            {
                if ((allCustomButton.Top == myCustomButton[15].Top & Math.Abs(allCustomButton.Left - myCustomButton[15].Left) == 100 | (allCustomButton.Left == myCustomButton[15].Left & Math.Abs(allCustomButton.Top - myCustomButton[15].Top) == 100)))
                {
                    allCustomButton.isMovable = true;
                }
                else
                {
                    allCustomButton.isMovable = false;
                }

                allCustomButton.Text = allCustomButton.Name + allCustomButton.isMovable + allCustomButton.Position;//テスト用のコード
            }
        }
        private void gameInitialize()
        {
            for (int i = 0; i < 30; i++)
            {
                myCustomButton[myRandom.Next(0, 15)].Move(myCustomButton[15]);
                setMovable();
            }
        }
    }
    class CustomButton : Button
    {
        public string Position;
        public bool isMovable;

        public CustomButton()
        {
            this.Width = 100;
            this.Height = 100;
            this.Font = new Font("Arial", 20);
            this.isMovable = false;
        }
        public void Initialize(int i)
        {
            this.Name = (i + 1).ToString();
            this.Position = (i + 1).ToString();
            this.Text = (i + 1).ToString();

            this.Top = (i / 4) * 100;
            this.Left = (i % 4) * 100;
            this.Text = this.Name + this.isMovable + this.Position;//テスト用のコード
        }

        public void Move(CustomButton cb)
        {
            if (this.isMovable == true)
            {
                int tempTop;
                int tempLeft;
                string tempPosition;
                tempTop = this.Top;
                tempLeft = this.Left;
                tempPosition = this.Position;
                this.Top = cb.Top;
                this.Left = cb.Left;
                this.Position = cb.Position;
                cb.Top = tempTop;
                cb.Left = tempLeft;
                cb.Position = tempPosition;
            }
        }
    }
}
パズルの完成をチェックするcheckComplete()メソッドを作る
次にパズルの完成を判定させましょう。パズルの完成は、カスタムボタンクラスに定義したPositionフィールドの値で判定します。パズルの完成は、1番のタイルのPositionが「1」に、2番のタイルのPositionが「2」に、というように、すべてのボタンの番号とPositionフィールドの値が一致したときと判定できます。カスタムボタンは配列なので、foreach文で一括処理をすることができます。これがオブジェクト指向プログラミングの便利なところですね。
次のforeachステートメントは、myCustomButton配列のすべての要素に対して、CustomButtonクラスのallCustomButtonという名前で処理をするコードです。
リスト4:foreachステートメントですべてのボタンに対して処理を行う
foreach (CustomButton allCustomButton in myCustomButton)
{

}
すべてのボタンの番号とPositionフィールドの値が一致すればパズル完成です。メソッドの名前はcheckComplete()とします。次のコードではローカル変数int complete = 0;を定義し、foreach文で値が一致するタイルの位置を数えます。Completeの値が16になれば全部のタイルが正しい位置にあると判定できるので、メッセージボックスで「Complete!」を表示します。
リスト5:checkComplete()メソッド
private void checkComplete()
{
    int complete = 0;

    foreach (CustomButton allCustomButton in myCustomButton)
    {
        if (Convert.ToInt16(allCustomButton.Name) == Convert.ToInt16(allCustomButton.Position))
        {
            complete += 1;
        }
    }

    if (complete == 16)
    {
        MessageBox.Show("Complete!");
    }
}
最後に、ボタンをクリックするたびにパズル完成を判定するため、myCustomButton_Click()メソッドにこのcheckComplete();を記述します。これで15パズルゲームは完成です。Visual Studioで緑の三角「開始」ボタンをクリックするか、「デバッグ」メニューの「デバッグの開始」でビルドしてプログラムを実行します。タイルをクリックで移動し、パズルを完成させてください。ここまでのコードは次のようになります。
リスト6:ここまでのコード全体(expand sourceをクリックで表示)
using System;
using System.Collections.Generic;
using System.ComponentModel;
using System.Data;
using System.Drawing;
using System.Linq;
using System.Text;
using System.Threading.Tasks;
using System.Windows.Forms;

namespace _15puzzle_objective_Text
{
    public partial class Form1 : Form
    {
        CustomButton[] myCustomButton;
        Random myRandom = new System.Random();

        public Form1()
        {
            InitializeComponent();
        }

        private void Form1_Load(object sender, EventArgs e)
        {
            this.ClientSize = new Size(400, 400);
            myCustomButton = new CustomButton[16];

            for (int i = 0; i < 16; i++)
            {
                myCustomButton[i] = new CustomButton();
                myCustomButton[i].Click += myCustomButton_Click;
                this.Controls.Add(myCustomButton[i]);
                myCustomButton[i].Initialize(i);
            }

            myCustomButton[15].Visible = false;

            setMovable();

            gameInitialize();
        }

        private void myCustomButton_Click(object sender, EventArgs e)
        {
            ((CustomButton)sender).Move(myCustomButton[15]);

            setMovable();

            checkComplete();
        }

        private void setMovable()
        {
            foreach (CustomButton allCustomButton in myCustomButton)
            {
                if ((allCustomButton.Top == myCustomButton[15].Top & Math.Abs(allCustomButton.Left - myCustomButton[15].Left) == 100 | (allCustomButton.Left == myCustomButton[15].Left & Math.Abs(allCustomButton.Top - myCustomButton[15].Top) == 100)))
                {
                    allCustomButton.isMovable = true;
                }
                else
                {
                    allCustomButton.isMovable = false;
                }

                allCustomButton.Text = allCustomButton.Name + allCustomButton.isMovable + allCustomButton.Position;//テスト用のコード
            }
        }

        private void gameInitialize()
        {
            for (int i = 0; i < 30; i++)
            {
                myCustomButton[myRandom.Next(0, 15)].Move(myCustomButton[15]);
                setMovable();
            }
        }

        private void checkComplete()
        {
            int complete = 0;

            foreach (CustomButton allCustomButton in myCustomButton)
            {
                if (Convert.ToInt16(allCustomButton.Name) == Convert.ToInt16(allCustomButton.Position))
                {
                    complete += 1;
                }
            }

            if (complete == 16)
            {
                MessageBox.Show("Complete!");
            }
        }
    }

    class CustomButton : Button
    {
        public string Position;
        public bool isMovable;

        public CustomButton()
        {
            this.Width = 100;
            this.Height = 100;
            this.Font = new Font("Arial", 20);
            this.isMovable = false;
        }

        public void Initialize(int i)
        {
            this.Name = (i + 1).ToString();
            this.Position = (i + 1).ToString();
            this.Text = (i + 1).ToString();

            this.Top = (i / 4) * 100;
            this.Left = (i % 4) * 100;
            this.Text = this.Name + this.isMovable + this.Position;//テスト用のコード
        }

        public void Move(CustomButton cb)
        {
            if (this.isMovable == true)
            {
                int tempTop;
                int tempLeft;
                string tempPosition;
                tempTop = this.Top;
                tempLeft = this.Left;
                tempPosition = this.Position;
                this.Top = cb.Top;
                this.Left = cb.Left;
                this.Position = cb.Position;
                cb.Top = tempTop;
                cb.Left = tempLeft;
                cb.Position = tempPosition;
            }
        }
    }
}
コードを整理してパズルを完成させる
最後にデバッグ用のコードの前に「//」をつけて、次のようにコメントアウトします。もちろん、最終的にデバッグの必要がなくなれば行を消してもかまいません。
リスト7:デバッグ用コードをコメントアウト
(setMovable()メソッドにあるテスト用のコード)

//allCustomButton.Text = allCustomButton.Name + allCustomButton.isMovable + allCustomButton.Position;//テスト用のコード

(Initialize()メソッドにあるテスト用のコード)
//this.Text = this.Name + this.isMovable + this.Position;//テスト用のコード
また、開始時に位置をランダムに交換する回数をfor文で決めていますが、この数を増やしましょう。次のコードでは、デバッグ時に30回だったgameInitialize()のfor文を3000回に増やしています。
リスト8:開始時のボタン交換回数を増やす
for (int i = 0; i < 3000; i++)
{
(略)
}
最後にボタンの数字を少し大きく表示するように変えましょう。ボタンのフォントはCustomButtonクラスのthis.Font = new Font("Arial", 20);で定義しています。このコードを次のように変えて、フォントサイズを40にします。
リスト9:ボタンのフォントを大きく
this.Font = new Font("Arial", 40);
Visual Studioで緑の三角「開始」ボタンをクリックするか、「デバッグ」メニューの「デバッグの開始」でビルドしてプログラムを実行します。タイルをクリックで移動し、パズルを完成させてください。完成すると「Complete!」のメッセージボックスが出て完了です。次の画面は完成した15パズルを実行したところです。

完成版の15パズルを実行したところ
ここまでのコードは次のようになります。
リスト10:完成版のコード全体(expand sourceをクリックで表示)
using System;
using System.Collections.Generic;
using System.ComponentModel;
using System.Data;
using System.Drawing;
using System.Linq;
using System.Text;
using System.Threading.Tasks;
using System.Windows.Forms;

namespace _15puzzle_objective_Text
{
    public partial class Form1 : Form
    {
        CustomButton[] myCustomButton;
        Random myRandom = new System.Random();

        public Form1()
        {
            InitializeComponent();
        }

        private void Form1_Load(object sender, EventArgs e)
        {
            this.ClientSize = new Size(400, 400);
            myCustomButton = new CustomButton[16];

            for (int i = 0; i < 16; i++)
            {
                myCustomButton[i] = new CustomButton();
                myCustomButton[i].Click += myCustomButton_Click;
                this.Controls.Add(myCustomButton[i]);
                myCustomButton[i].Initialize(i);
            }

            myCustomButton[15].Visible = false;

            setMovable();

            gameInitialize();
        }

        private void myCustomButton_Click(object sender, EventArgs e)
        {
            ((CustomButton)sender).Move(myCustomButton[15]);

            setMovable();

            checkComplete();
        }

        private void setMovable()
        {
            foreach (CustomButton allCustomButton in myCustomButton)
            {
                if ((allCustomButton.Top == myCustomButton[15].Top & Math.Abs(allCustomButton.Left - myCustomButton[15].Left) == 100 | (allCustomButton.Left == myCustomButton[15].Left & Math.Abs(allCustomButton.Top - myCustomButton[15].Top) == 100)))
                {
                    allCustomButton.isMovable = true;
                }
                else
                {
                    allCustomButton.isMovable = false;
                }

                //allCustomButton.Text = allCustomButton.Name + allCustomButton.isMovable + allCustomButton.Position;//テスト用のコード
            }
        }

        private void gameInitialize()
        {
            for (int i = 0; i < 3000; i++)
            {
                myCustomButton[myRandom.Next(0, 15)].Move(myCustomButton[15]);
                setMovable();
            }
        }

        private void checkComplete()
        {
            int complete = 0;

            foreach (CustomButton allCustomButton in myCustomButton)
            {
                if (Convert.ToInt16(allCustomButton.Name) == Convert.ToInt16(allCustomButton.Position))
                {
                    complete += 1;
                }
            }

            if (complete == 16)
            {
                MessageBox.Show("Complete!");
            }
        }
    }

    class CustomButton : Button
    {
        public string Position;
        public bool isMovable;

        public CustomButton()
        {
            this.Width = 100;
            this.Height = 100;
            this.Font = new Font("Arial", 40);
            this.isMovable = false;
        }

        public void Initialize(int i)
        {
            this.Name = (i + 1).ToString();
            this.Position = (i + 1).ToString();
            this.Text = (i + 1).ToString();

            this.Top = (i / 4) * 100;
            this.Left = (i % 4) * 100;
            //this.Text = this.Name + this.isMovable + this.Position;//テスト用のコード
        }

        public void Move(CustomButton cb)
        {
            if (this.isMovable == true)
            {
                int tempTop;
                int tempLeft;
                string tempPosition;
                tempTop = this.Top;
                tempLeft = this.Left;
                tempPosition = this.Position;
                this.Top = cb.Top;
                this.Left = cb.Left;
                this.Position = cb.Position;
                cb.Top = tempTop;
                cb.Left = tempLeft;
                cb.Position = tempPosition;
            }
        }
    }
}
終わりに
いかがでしたか。オブジェクト指向を意識しなくてもVisual Studioを使ってC#のプログラムを作ることはできます。しかしこの記事で紹介した15パズル程度の簡単なプログラムでも、オブジェクト指向を意識して作ると、似たコードを繰り返し書く必要のない、合理的でわかりやすいプログラムになります。また縦横4×4のパズルを5×5など大きなサイズに変更することも簡単です。見栄えをよくするにはタイルの色を変更するなどデザインを工夫し、完成した時のメッセージを派手にするといいでしょう。またゲーム性を高めるなら、何回のクリックで完成できたかをカウントしてもよいでしょうし、時間を測って競うのもよいですね。またタイマーオブジェクトを使って、ある決めた時間内に完成させるようにしてもおもしろそうです。オブジェクト指向を身に着けて、いろいろなプログラミングにチャレンジしてください。
この記事をシェアしてください
関連記事
バックナンバー
この記事の筆者

筆者の人気記事
Think ITでは、技術情報が詰まったメールマガジン「Think IT Weekly」の配信サービスを提供しています。メルマガ会員登録を済ませれば、メルマガだけでなく、さまざまな限定特典を入手できるようになります。
