Windows Phone Tips集
第5回
Windows 縦向きのページ(personalInfoPage.xaml)の追加
Windows 縦向きのページ(personalInfoPage.xaml)の追加
VS2010メニューの「プロジェクト(P)/新しい項目の追加(W)」と選択して、「Windows Phone 縦向きのページ」を選択し、「名前(N)」にpersonalInfoPage.xamlと指定して、[追加(A)]ボタンをクリックします。このページには選択した氏名の詳細データが表示されます。
personalInfoPage.xamlの編集とコントロールの配置
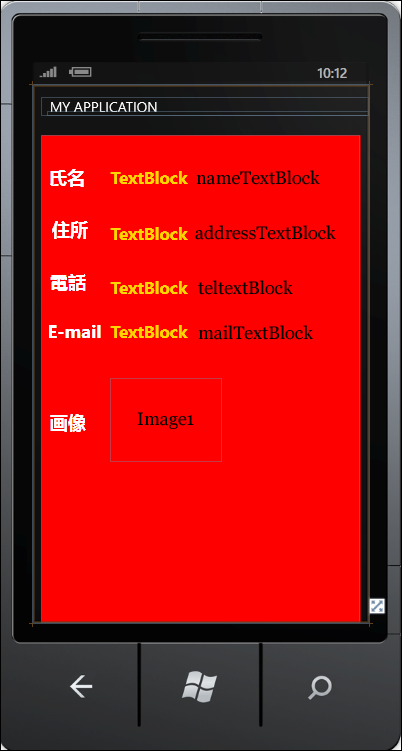
表示されるエミュレーターデザイン画面上の、PageTitleというNameを持つTextBlockの、Textの値を削除します。ここにはプログラムから「氏名」が表示されます。ツールボックスからTextBlockを9個、Imageコントロールを1個配置します。書き出されるXAMLコードをリスト3のように編集します。
リスト3 編集されたXAMLコード(personalInfoPage.xaml)
(1)TurnstileTransitionm(画面が右から左に回転するトランジッション)のコードを追加しています。<phone:PhoneApplicationPage>要素にtoolkitという名前空間を追加する必要があります。これらの手順については、「第1回:Bing APIを使ってWeb検索とImage検索を実装する」を参照してください。また、App.xaml内のコードを書きかえる点も忘れないようにしてください。
(2)Windows Phone 7.1 SDK 日本語版では、フォントの設定なしにアプリケーションを実行し、タイトルやテキストに日本語を使った場合、日本語フォントが使われないで変な表示になってしまうことがあります。これを解消するには、書き出されるXAMLコードの、アプリケーションのトップである<phone:PhoneApplicationPage>要素内に、

Language=  "ja-JP"

と指定しておきます。
(3)x:NameがContentPanelという<Grid> 要素内に、子要素として、項目名となる<TextBlock>要素を5
個と値を表示する<TextBlock>要素を4個、<Image>要素を1個配置しています。Backgropund( 背景色)にはRedを指定しています。
<phone:PhoneApplicationPage
  x:Class="ImageAndPersonalInfo.personalInfoPage"
  xmlns="http://schemas.microsoft.com/winfx/2006/xaml/presentation"
  xmlns:x="http://schemas.microsoft.com/winfx/2006/xaml"
  xmlns:phone="clr-namespace:Microsoft.Phone.Controls;assembly=Microsoft.Phone"
  xmlns:shell="clr-namespace:Microsoft.Phone.Shell;assembly=Microsoft.Phone"
  xmlns:d="http://schemas.microsoft.com/expression/blend/2008"
  xmlns:mc="http://schemas.openxmlformats.org/markup-compatibility/2006"
  FontFamily="{StaticResource PhoneFontFamilyNormal}"
  FontSize="{StaticResource PhoneFontSizeNormal}"
  Foreground="{StaticResource PhoneForegroundBrush}"
  SupportedOrientations="Portrait" Orientation="Portrait"
  mc:Ignorable="d" d:DesignHeight="768" d:DesignWidth="480"
  shell:SystemTray.IsVisible="True" xmlns:toolkit="clr-namespace:Microsoft.Phone.Controls;assembly=Microsoft.Phone.Controls.Toolkit" ■(1)
Language=”ja-JP”>  ■(2)

  <toolkit:TransitionService.NavigationInTransition> ■(1)
    <toolkit:NavigationInTransition>
      <toolkit:NavigationInTransition.Backward>
        <toolkit:TurnstileTransition Mode="BackwardIn"/>
      </toolkit:NavigationInTransition.Backward>
      <toolkit:NavigationInTransition.Forward>
        <toolkit:TurnstileTransition Mode="ForwardIn"/>
      </toolkit:NavigationInTransition.Forward>
    </toolkit:NavigationInTransition>
  </toolkit:TransitionService.NavigationInTransition>
  <toolkit:TransitionService.NavigationOutTransition>
    <toolkit:NavigationOutTransition>
      <toolkit:NavigationOutTransition.Backward>
        <toolkit:TurnstileTransition Mode="BackwardOut"/>
      </toolkit:NavigationOutTransition.Backward>
      <toolkit:NavigationOutTransition.Forward>
        <toolkit:TurnstileTransition Mode="ForwardOut"/>
      </toolkit:NavigationOutTransition.Forward>
    </toolkit:NavigationOutTransition>
  </toolkit:TransitionService.NavigationOutTransition> ■(1)

  <!--LayoutRoot は、全てのページ コンテンツが配置されるルート グリッドです-->
  <Grid x:Name="LayoutRoot" Background="Transparent">
    <Grid.RowDefinitions>
      <RowDefinition Height="Auto"/>
      <RowDefinition Height="*"/>
    </Grid.RowDefinitions>

    <!--TitlePanel は、アプリケーション名とページ タイトルを格納します-->
    <StackPanel x:Name="TitlePanel" Grid.Row="0" Margin="12,17,0,28">
      <TextBlock x:Name="ApplicationTitle" Text="MY APPLICATION" Style="{StaticResource PhoneTextNormalStyle}"/>
      <TextBlock x:Name="PageTitle"  Margin="9,-7,0,0" Style="{StaticResource PhoneTextTitle1Style}"/>
    </StackPanel>

    <!--ContentPanel - 追加コンテンツをここに入力します-->
    <Grid x:Name="ContentPanel" Grid.Row="1" Margin="12,0,12,0" Background="Red"> ■(3)
      <TextBlock FontSize="26" FontWeight="Bold" Height="45" HorizontalAlignment="Left" Margin="11,41,0,0" Name="TextBlock1" Text="氏名" VerticalAlignment="Top" Width="64" />
      <TextBlock FontSize="26" FontWeight="Bold" Height="45" HorizontalAlignment="Left" Margin="15,115,0,0" Name="TextBlock2" Text="住所" VerticalAlignment="Top" Width="64" />
      <TextBlock FontSize="26" FontWeight="Bold" Height="45" HorizontalAlignment="Left" Margin="12,192,0,0" Name="TextBlock3" Text="電話" VerticalAlignment="Top" Width="64" />
      <TextBlock FontSize="26" FontWeight="Bold" Height="45" HorizontalAlignment="Left" Margin="9,261,0,0" Name="TextBlock4" Text="E-mail" VerticalAlignment="Top" Width="83" />
      <TextBlock FontSize="26" FontWeight="Bold" Height="45" HorizontalAlignment="Left" Margin="12,392,0,0" Name="TextBlock5" Text="画像" VerticalAlignment="Top" Width="83" />
      <TextBlock Height="37" HorizontalAlignment="Left" Margin="99,43,0,0" Name="nameTextBlock" Text="TextBlock" VerticalAlignment="Top" Width="293" FontSize="24" FontWeight="Bold" Foreground="Gold" />
      <TextBlock FontSize="24" FontWeight="Bold" Foreground="Gold" Height="37" HorizontalAlignment="Left" Margin="99,123,0,0" Name="addressTextBlock" Text="TextBlock" VerticalAlignment="Top" Width="325" />
      <TextBlock FontSize="24" FontWeight="Bold" Foreground="Gold" Height="37" HorizontalAlignment="Left" Margin="99,200,0,0" Name="telTextBlock" Text="TextBlock" VerticalAlignment="Top" Width="293" />
      <TextBlock FontSize="24" FontWeight="Bold" Foreground="Gold" Height="37" HorizontalAlignment="Left" Margin="99,263,0,0" Name="mailTextBlock" Text="TextBlock" VerticalAlignment="Top" Width="351" />
      <Image Height="120" HorizontalAlignment="Left" Margin="99,347,0,0" Name="Image1" Stretch="Fill" VerticalAlignment="Top" Width="160" />
    </Grid> ■(3)
  </Grid>
  ~コード略~
</phone:PhoneApplicationPage>
図3のような表示になります。
|
|
| 図3:各コントロールを配置した(クリックで拡大) |
次に、MainPage.xamlを展開して表示される、MainPage.xaml.vbをダブルクリックしてリスト4のコードを記述します。
ロジックコードを記述する
リスト4 (MainPage.xaml.vb)
Imports System.Windows.Documents
  Imports System.Windows.Input
  Imports System.Windows.Media
  Imports System.Windows.Media.Animation
  Imports System.Windows.Shapes
  Imports Microsoft.Phone.Controls
  Imports System.Xml.Linq
  Imports System.Windows.Media.Imaging

  ImageInfoクラス内に、文字列型の「画像名」プロパティを定義しています。

  Public Class ImageInfo
    Property 画像名 As String
  End Class

  personalInfoクラス内に、文字列型の「氏名」、「住所」、「電話」、「メール」、「画像」プロパティを定義しています。
  Public Class personalInfo
    Property 氏名 As String
    Property 住所 As String
    Property 電話 As String
    Property メール As String
    Property 画像 As String
  End Class

  Partial Public Class MainPage
    Inherits PhoneApplicationPage

  XML要素を表すXElementクラス型のメンバ変数、myDocとreadXmlを宣言しています。
    Dim myDoc As XElement
    Dim readXml As XElement

    ' Constructor
    Public Sub New()
      InitializeComponent()

      ' Set the data context of the listbox control to the sample data
      DataContext = App.ViewModel
    End Sub

    ' Load data for the ViewModel Items
ページが読み込まれた時の処理
XElement.LoadメソッドでXML文書ファイル(photo_etc.xml)を読み込みます。ImageInfoクラス型の新しいリストmyImageInfoオブジェクトを作成します。
Descendantsメソッドで、子孫要素である全ての<画像名>要素のコレクションに対して、各要素を変数result に格納しながら、ImageInfoクラスの「画像名」プロパティに、<画像名>要素の値を指定し、AddメソッドでmyImageInfoオブジェクトに追加していきます。2ページ目のimageListBoxのItemsSourceプロパティにmyImageInfoオブジェクトを追加します。画像の一覧が表示されます。
サーバーからperonalInfo.xmlを読み込み、その内容を表示するDownLoadXmlDataプロシージャを実行します。
  Private Sub MainPage_Loaded(ByVal sender As Object, ByVal e As RoutedEventArgs) Handles Me.Loaded
    'If Not App.ViewModel.IsDataLoaded Then
    '    App.ViewModel.LoadData()
    'End If
    Dim xmldoc As XElement = XElement.Load("photo_etc.xml")
    Dim myImageInfo As New List(Of ImageInfo)

    For Each result In From c In xmldoc.Descendants("画像名") Select c
      myImageInfo.Add(New ImageInfo With {.画像名 = "Image/" & result.Value})
    Next
    imageListBox.ItemsSource = myImageInfo
    DownloadXmlData()
  End Sub
2ページ目の画像一覧から任意の画像が選択された時の処理
DirectCastでimageListBoxから選択された項目を、ImageInfoクラスにキャストして、「画像名」プロパティの値を取得して、変数selectImageNameに格納します。Image1のSourceプロパティに相対Uriで指定したselectImageName変数の値を指定します。Pivot1のSelectetdIndexプロパティに0を指定することで、自動的に入力ページに戻ります。これで1ページ目の画像の欄に、2ページ目の画像一覧から選択した画像が反映されます。
  Private Sub imageListBox_SelectionChanged(sender As Object, e As System.Windows.Controls.SelectionChangedEventArgs) Handles imageListBox.SelectionChanged
    Try
      Dim selectImageName As String = DirectCast(imageListBox.SelectedItem, ImageInfo).画像名
      Image1.Source = New BitmapImage(New Uri(selectImageName, UriKind.Relative))
      Pivot1.SelectedIndex = 0
    Catch
      Exit Sub
    End Try
  End Sub
「データを保存し氏名から詳細情報を表示する」サンプルプログラム
You don't have access to download this file.
- この記事のキーワード
関連記事
バックナンバー
この記事の筆者

筆者の人気記事
Think ITでは、技術情報が詰まったメールマガジン「Think IT Weekly」の配信サービスを提供しています。メルマガ会員登録を済ませれば、メルマガだけでなく、さまざまな限定特典を入手できるようになります。
