入力したデータを分離ストレージに保存し、一覧で表示する
今回は入力したデータを、XML形式で分離ストレージに保存し、データの一覧や、データの追加を行います。データの編集は、編集したXMLがうまく分離ストレージに保存されないので、編集処理は省いています。このサンプルはエミュレーターで動作を確認できます。実機(IS12T)が必要条件ではありません。まずは、
2011年12月9日 20:00
今回は入力したデータを、XML形式で分離ストレージに保存し、データの一覧や、データの追加を行います。データの編集は、編集したXMLがうまく分離ストレージに保存されないので、編集処理は省いています。
このサンプルはエミュレーターで動作を確認できます。実機(IS12T)が必要条件ではありません。
まずは、このプログラムで実装する機能の動作を、下記に解説しておきます。
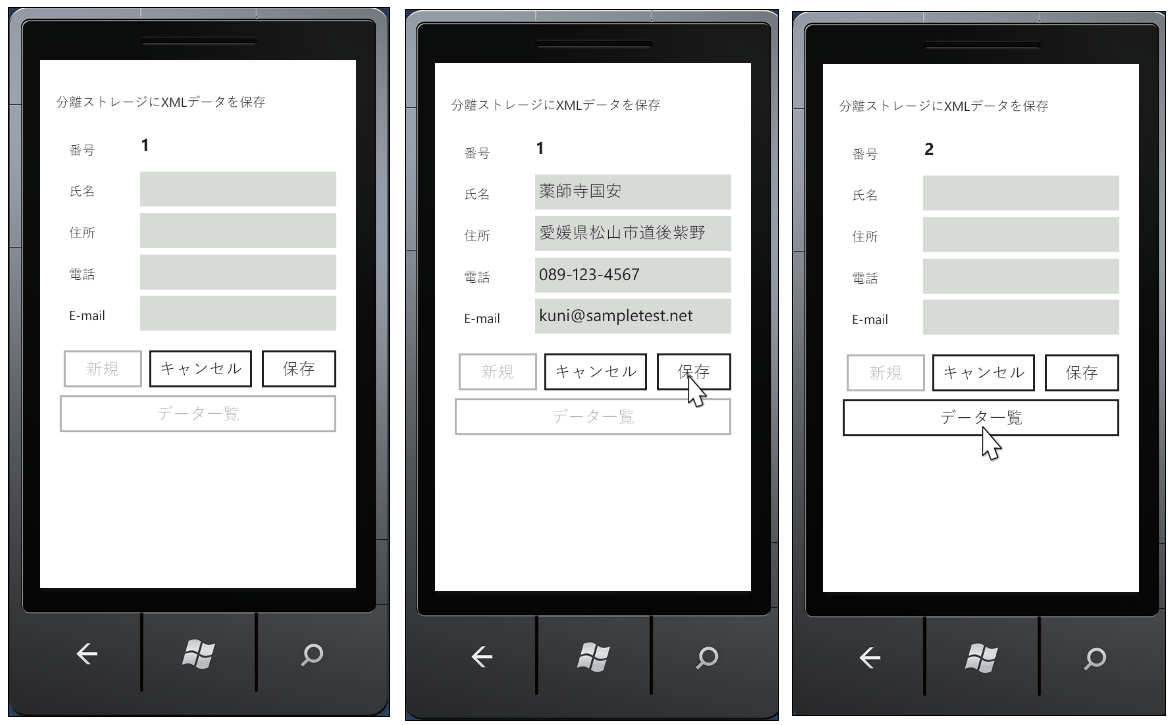
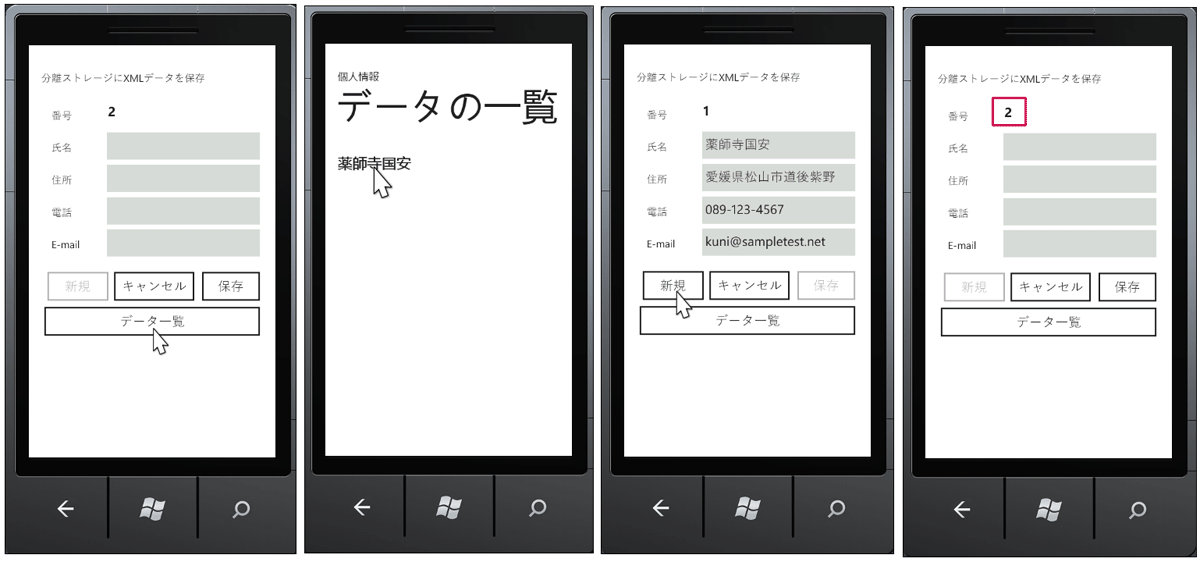
デバッグを開始すると、「番号、氏名、住所、電話、E-mail」の項目が表示されます。「番号」は自動的に入力されます。まだデータが1件も作成されていない状態では、[データ一覧]ボタンは使用不可となっています。データを入力して[保存]ボタンをタップすると[データ一覧]の使用が可能になります(図1)。また、[新規]ボタンの使用も不可となっています。起動直後はデータの入力が可能になっていますので、[新規]ボタンは使用不可となっています。[データ一覧]から任意のデータを表示させた時点で、[新規]ボタンの使用が可能になります(図2)。
|
| 図1:データを入力して[保存]をタップすると[データ一覧]が使用可能になる(クリックで拡大) |
|
| 図2:[データ一覧]で任意のデータを選択すると、該当するデータが表示され、[新規]ボタンの使用も可能になる (クリックで拡大) |
サンプル一式は、会員限定特典としてダウンロードできます。記事末尾をご確認ください。
実機(IS12T)で動かした動画はこちらです。
プロジェクトの作成
VS 2010のメニューから[ファイル(F)/新規作成(N)/プロジェクト(P)]を選択します。次に、「Windows Phone アプリケーション」を選択して、「名前(N)」に任意のプロジェクト名を指定します。ここでは「IsolateStorageXmlSave」という名前を付けています。Windows Phoneのバージョンは7.1を選択します。
また、XML to LINQを使用するため、VS2010メニューの「プロジェクト(P)/参照の追加(R)」から、System.Xml.Linqを追加しておいてください。
MainPage.xamlの編集とコントロールの追加
x:NameがPageTitleというTextBlockを削除します。ApplicationTitleという名前のTextBlockのTextプロパティに「分離ストレージにXMLデータを保存」と指定します。
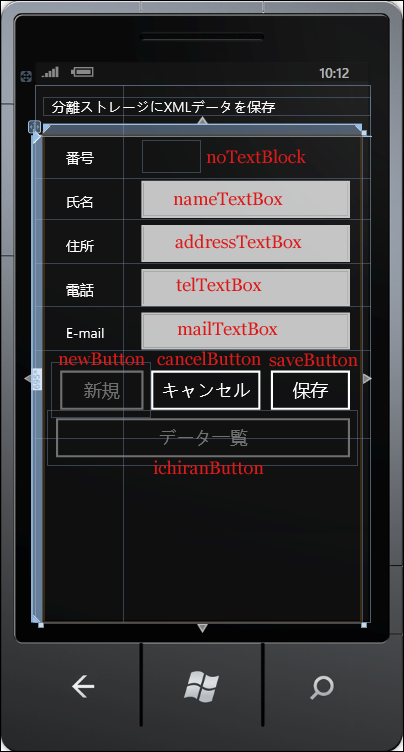
ツールボックスからTextBlockコントロールを6個、TextBoxコントロールを4個、Buttonコントロールを4個配置します。6個のTextBlockのうち5個は項目名を表示します。残りの1個はデータの件数(番号)を表示させるのに使用します。newButtonはIsEnabledのチェックを外して、最初は使用不可としておきます。また、ichiranButtonもデータが保存されるまでは、IsEnabledのチェックを外して使用不可としておきます(図3)。
書き出されるXAMLコードはリスト1のようになります。
|
| 図3:各種コントロールを配置した(クリックで拡大) |
リスト1 書き出されたXAMLコード(MainPage.xaml)
(1)「新規」と「データ一覧」ボタンのみIsEnabledにFalseが指定され、最初は使用不可となっています。
  <phone:PhoneApplicationPage
  x:Class="IsolateStorageXmlSave.MainPage"
  xmlns="http://schemas.microsoft.com/winfx/2006/xaml/presentation"
  xmlns:x="http://schemas.microsoft.com/winfx/2006/xaml"
  xmlns:phone="clr-namespace:Microsoft.Phone.Controls;assembly=Microsoft.Phone"
  xmlns:shell="clr-namespace:Microsoft.Phone.Shell;assembly=Microsoft.Phone"
  xmlns:d="http://schemas.microsoft.com/expression/blend/2008"
  xmlns:mc="http://schemas.openxmlformats.org/markup-compatibility/2006"
  mc:Ignorable="d" d:DesignWidth="480" d:DesignHeight="768"
  FontFamily="{StaticResource PhoneFontFamilyNormal}"
  FontSize="{StaticResource PhoneFontSizeNormal}"
  Foreground="{StaticResource PhoneForegroundBrush}"
  SupportedOrientations="Portrait" Orientation="Portrait"
  shell:SystemTray.IsVisible="True" Language="ja-JP">

  <!--LayoutRoot は、全てのページ コンテンツが配置されるルート グリッドです-->
  <Grid x:Name="LayoutRoot" Background="Transparent">
    <Grid.ColumnDefinitions>
      <ColumnDefinition Width="126*" />
      <ColumnDefinition Width="354*" />
    </Grid.ColumnDefinitions>
    <Grid.RowDefinitions>
      <RowDefinition Height="Auto"/>
      <RowDefinition Height="61*"/>
      <RowDefinition Height="59*" />
      <RowDefinition Height="63*" />
      <RowDefinition Height="61*" />
      <RowDefinition Height="63*" />
      <RowDefinition Height="126*" />
      <RowDefinition Height="263*" />
    </Grid.RowDefinitions>

    <!--TitlePanel は、アプリケーション名とページ タイトルを格納します-->
    <StackPanel x:Name="TitlePanel" Margin="12,17,0,28" Grid.ColumnSpan="2">
      <TextBlock x:Name="ApplicationTitle" Text="分離ストレージにXMLデータを保存" Style="{StaticResource PhoneTextNormalStyle}"/>
    </StackPanel>

    <!--ContentPanel - 追加コンテンツをここに入力します-->
    <Grid x:Name="ContentPanel" Grid.Row="1" Margin="12,0" Grid.RowSpan="7" Grid.ColumnSpan="2">
      <Grid.RowDefinitions>
        <RowDefinition Height="*" />
        <RowDefinition Height="695*" />
      </Grid.RowDefinitions>
      <TextBlock Height="33" HorizontalAlignment="Left" Margin="32,17,0,0" Name="TextBlock1" Text="番号" VerticalAlignment="Top" Width="54" Grid.Row="1" />
      <TextBlock Height="33" HorizontalAlignment="Left" Margin="32,79,0,0" Name="TextBlock2" Text="氏名" VerticalAlignment="Top" Width="54" Grid.Row="1" />
      <TextBox Height="77" HorizontalAlignment="Left" Margin="128,52,0,0" Name="nameTextBox" VerticalAlignment="Top" Width="322" Grid.Row="1" />
      <TextBlock Height="33" HorizontalAlignment="Left" Margin="32,142,0,0" Name="TextBlock3" Text="住所" VerticalAlignment="Top" Width="54" Grid.Row="1" />
      <TextBox Height="77" HorizontalAlignment="Left" Margin="128,115,0,0" Name="addressTextBox" VerticalAlignment="Top" Width="322" Grid.Row="1" />
      <TextBlock Grid.Row="1" Height="33" HorizontalAlignment="Left" Margin="32,205,0,0" Name="TextBlock4" Text="電話" VerticalAlignment="Top" Width="54" />
      <TextBox Grid.Row="1" Height="77" HorizontalAlignment="Left" Margin="128,178,0,0" Name="telTextBox" VerticalAlignment="Top" Width="322" />
      <TextBlock Grid.Row="1" Height="33" HorizontalAlignment="Left" Margin="32,267,0,0" Name="TextBlock5" Text="E-mail" VerticalAlignment="Top" Width="65" />
      <TextBox Grid.Row="1" Height="77" HorizontalAlignment="Left" Margin="128,240,0,0" Name="mailTextBox" VerticalAlignment="Top" Width="322" />
      <Button Content="キャンセル" Grid.Row="1" Height="80" HorizontalAlignment="Left" Margin="142,323,0,0" Name="cancelButton" VerticalAlignment="Top" Width="180" />
      <Button Content="保存" Grid.Row="1" Height="80" HorizontalAlignment="Left" Margin="313,323,0,0" Name="saveButton1" VerticalAlignment="Top" Width="137" />
      <Button Content="データ一覧" Grid.Row="1" Height="80" HorizontalAlignment="Left" Margin="6,391,0,0" Name="ichiranButton" VerticalAlignment="Top" Width="444" IsEnabled="False" /> ■(1)
      <TextBlock Grid.Row="1" Height="48" HorizontalAlignment="Left" Margin="142,5,0,0" Name="noTextBlock" Text="" VerticalAlignment="Top" Width="84" FontSize="26" FontWeight="Bold" />
      <Button Content="新規" Grid.Row="1" Height="80" HorizontalAlignment="Left" Margin="12,323,0,0" Name="newButton" VerticalAlignment="Top" Width="143" IsEnabled="False" /> ■(1)
    </Grid>
  </Grid>
  <!--ApplicationBar の使用法を示すサンプル コード-->
 ~コード略~
</phone:PhoneApplicationPage>
次に、MainPage.xamlを展開して表示される、MainPage.xaml.vbをダブルクリックしてリスト2のコードを記述します。
この記事をシェアしてください
関連記事
バックナンバー
この記事の筆者

筆者の人気記事
Think ITでは、技術情報が詰まったメールマガジン「Think IT Weekly」の配信サービスを提供しています。メルマガ会員登録を済ませれば、メルマガだけでなく、さまざまな限定特典を入手できるようになります。
