Page Transition効果の追加
Page Transition効果の追加
TurnstileTransitionm(画面が右から左に回転するトランジッション)のコードを追加します。Page Transtionの詳細については、「これから始めるWindows Phone 7 プログラミング(基本編)」の「第3回 ページ遷移時にTransition効果を適用する」を参照してください。App.xaml.vb内の
RootFrame = New PhoneApplicationFrame()
の部分を、
RootFrame = New TransitionFrame
と書き換えることを忘れないようにしてください。
<toolkit:TransitionService.NavigationInTransition>
    <toolkit:NavigationInTransition>
      <toolkit:NavigationInTransition.Backward>
        <toolkit:TurnstileTransition Mode="BackwardIn"/>
      </toolkit:NavigationInTransition.Backward>
      <toolkit:NavigationInTransition.Forward>
        <toolkit:TurnstileTransition Mode="ForwardIn"/>
      </toolkit:NavigationInTransition.Forward>
    </toolkit:NavigationInTransition>
  </toolkit:TransitionService.NavigationInTransition>
  <toolkit:TransitionService.NavigationOutTransition>
    <toolkit:NavigationOutTransition>
      <toolkit:NavigationOutTransition.Backward>
        <toolkit:TurnstileTransition Mode="BackwardOut"/>
      </toolkit:NavigationOutTransition.Backward>
      <toolkit:NavigationOutTransition.Forward>
        <toolkit:TurnstileTransition Mode="ForwardOut"/>
      </toolkit:NavigationOutTransition.Forward>
    </toolkit:NavigationOutTransition>
  </toolkit:TransitionService.NavigationOutTransition>
コードを追加すると全体に波線がかかり、エラーとなってしまいます。この波線を解除するには、以下の手順に従います。
(1):VS2010メニューの「プロジェクト(P)/参照の追加(R)」から、
Microsoft.Phone.Controls.Toolkit
を追加します。
「.NET」タブ内にMicrosoft.Phone.Controls.Toolkitが見当たらない場合は、
「Silverlight for Windows Phone Toolkit - Nov 2011.msi」
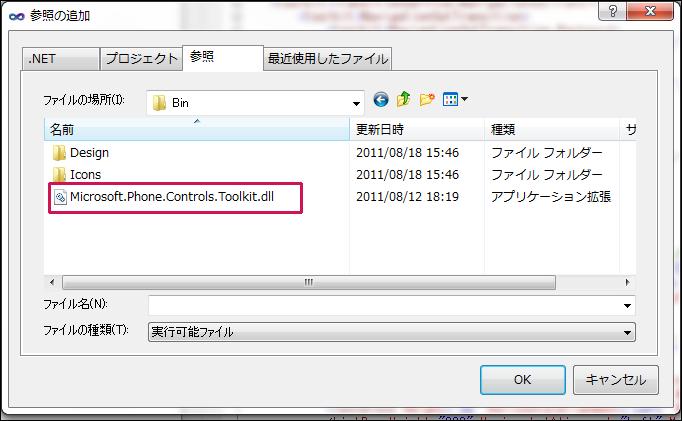
をインストールしている場合なら、「参照」タブから、
C:\Program Files\Microsoft SDKs\Windows Phone\v7.1\Toolkit\Oct11\Bin
フォルダにある、Microsoft.Phone.Controls.Toolkit.dll を指定して[OK]ボタンをクリックします(図6)。
|
|
| 図6:「参照」タブからMicrosoft.Phone.Controls.Toolkit.dllを指定した(クリックで拡大) |
(2):toolkitという名前空間を指定します。
要素内に属性として、
xmlns:toolkit=”
と入力すると値の一覧が表示されますので、その名から
Microsoft.Phone.Controls(Microsoft.Phone.Controls.Toolkit)
を選択します(図7)。
「プロジェクト(P)/参照の追加(R)」から、Microsoft.Phone.Controls.Toolkitを追加していなければ、この値は表示されませんので、注意してください。
|
|
| 図7:toolkitという名前空間を指定する(クリックで拡大) |

書き出されるXAMLコードは省略します。
Windows Phone 縦向きのページ(MapPage.xaml)の追加
VS2010メニューの「プロジェクト(P)/新しい項目の追加(W)」と選択して、「Windows Phone 縦向きのページ」を選択し、「名前(N)」にMapPage.xamlと指定して、[追加(A)]ボタンをクリックします。このページには、入力した住所の場所が表示されます。
表示されるエミュレーターデザイン画面上の、ApplicationTitleというx:Nameの、TextBlockコントロールのTextプロパティに「Windows Phone Tips」と指定します。また、PageTitleというx:Nameを持つTextBlockを削除します。ツールボックスからButtonコントロールを1個とMapコントロールを配置します。ButtonコントロールのContentプロパティには「航空写真」と指定しておきます。プロパティの[ブラシ]パネルにあるBackgroud(背景色)にCrimson、Foreground(文字色)にWhiteを指定しておきます。
書き出されるXAMLコードをリスト2のように編集します。
リスト2 編集されたXAMLコード(MapPage.xaml)
(1)Bing Maps Account Centerより取得したApplicationIDを指定します。ApplicationIDを指定していないと、実行時にMap上にエラーが表示されます。
<phone:PhoneApplicationPage
  x:Class="AddressSearchForMap.MapPage"
  xmlns="http://schemas.microsoft.com/winfx/2006/xaml/presentation"
  xmlns:x="http://schemas.microsoft.com/winfx/2006/xaml"
  xmlns:phone="clr-namespace:Microsoft.Phone.Controls;assembly=Microsoft.Phone"
  xmlns:shell="clr-namespace:Microsoft.Phone.Shell;assembly=Microsoft.Phone"
  xmlns:d="http://schemas.microsoft.com/expression/blend/2008"
  xmlns:mc="http://schemas.openxmlformats.org/markup-compatibility/2006"
  FontFamily="{StaticResource PhoneFontFamilyNormal}"
  FontSize="{StaticResource PhoneFontSizeNormal}"
  Foreground="{StaticResource PhoneForegroundBrush}"
  SupportedOrientations="Portrait" Orientation="Portrait"
  mc:Ignorable="d" d:DesignHeight="768" d:DesignWidth="480" Language="ja-JP"
  shell:SystemTray.IsVisible="True" xmlns:my="clr-namespace:Microsoft.Phone.Controls.Maps;assembly=Microsoft.Phone.Controls.Maps">

  <!--LayoutRoot は、すべてのページ コンテンツが配置されるルート グリッドです-->
  <Grid x:Name="LayoutRoot" Background="Transparent">
    <Grid.RowDefinitions>
      <RowDefinition Height="Auto"/>
      <RowDefinition Height="*"/>
    </Grid.RowDefinitions>

    <!--TitlePanel は、アプリケーション名とページ タイトルを格納します-->
    <StackPanel x:Name="TitlePanel" Grid.Row="0" Margin="12,17,0,28">
      <TextBlock x:Name="ApplicationTitle" Text="Windows Phone Tips" Style="{StaticResource PhoneTextNormalStyle}"/>
    </StackPanel>

    <!--ContentPanel - 追加コンテンツをここに入力します-->
    <Grid x:Name="ContentPanel" Grid.Row="1" Margin="12,0,12,0">
      <Button x:Name="Button1" Content="航空写真" Margin="0,18,0,608" Height="70" Background="Crimson" />
      <my:Map Height="611" HorizontalAlignment="Left" Margin="18,79,0,0" Name="Map1" VerticalAlignment="Top" Width="423">
        <my:Map.CredentialsProvider>
          <my:ApplicationIdCredentialsProvider ApplicationId=" Bing Maps Account Centerより取得したApplicationID " /> ■(1)
        </my:Map.CredentialsProvider>
      </my:Map>
    </Grid>
  </Grid>

  <!--ApplicationBar の使用法を示すサンプル コード-->
  ~コード略~
</phone:PhoneApplicationPage>
バックナンバー
この記事の筆者

筆者の人気記事
Think ITでは、技術情報が詰まったメールマガジン「Think IT Weekly」の配信サービスを提供しています。メルマガ会員登録を済ませれば、メルマガだけでなく、さまざまな限定特典を入手できるようになります。
