はじめに
連載5回目の今回は、JBoss FuseにおいてWebサービスを利用する手順について解説します。
Webサービス編では、以下の内容を理解します。
- JBoss FuseにおけるWebサービスの構成
- CamelルートをWebサービス化する
- WebサービスをCamelルートから呼び出す
- その他
作成するものの構成は図1のようになります。
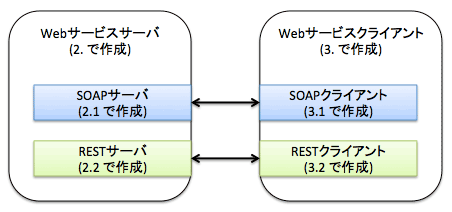
図1:今回作成するアプリケーション構成
作成したものはJBoss Fuseにデプロイしますので、必ず事前にJBoss Fuseを起動しておいてください。
$ cd <Fuseのインストールディレクトリ>/bin
$ ./fuse
1.JBoss FuseにおけるWebサービスの構成
JBoss FuseのWebサービスは、Apache CXFを用いて実現されています。また、Apache CamelにはCXF用のコンポーネントが用意されており、Camel ルートをWebサービス化したり、Camel ルートからWebサービスを呼び出したりできます(図2)。

図2:FuseのWebサービス構成
図2にもあるように、JBoss FuseではHTTPを利用したSOAPの他、JMSを利用したSOAPやRESTなども利用することができます(JBoss FuseにはSpring Web ServiceコンポーネントというSpringによる実装や、単にHTTPを呼び出すためのコンポーネントなども含まれますが、今回は説明を割愛します)。
2.CamelルートをWebサービス化する
ここでは、次の2つを実装します。
- SOAP/HTTP によるWebサービス化
- RESTful Webサービス化
各手順を確認する前に、事前準備をします。まず、これら2つのCamelルートを作成するためのFuseプロジェクトを作成します。
サーバー用Fuseプロジェクトの設定
| 設定 | 値 |
|---|---|
| Group Id | com.mycompany(デフォルト) |
| Artifact Id | camel-archetype-blueprintを選択後、wsserverに変更(図3) |
| Version | 1.0.0-SNAPSHOT |
| Package | (Group IdとArtifact Idから自動生成) |
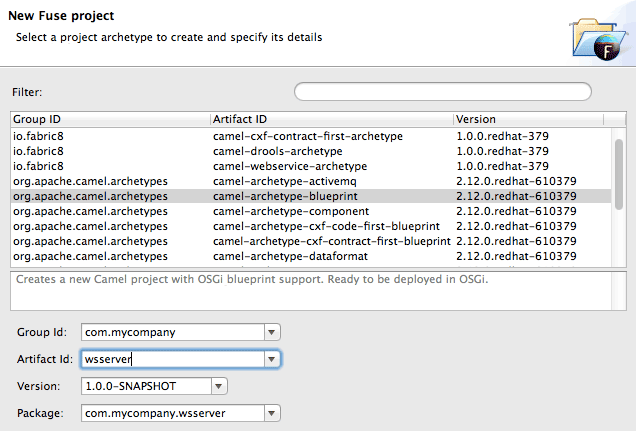
図3:Fuseプロジェクトの作成
なお、Artifact IDとして「camel-archetype-blueprint」ではなく、「camel-archetype-cxf-code-first-blueprint」や「camel-archetype-cxf-contract-first-blueprint」を選択すると、SOAPサービスを利用したサンプルを確認することができます。
作成後、不要なクラスやCamelルート、テストコードは削除しておきます(図4の赤線箇所)。
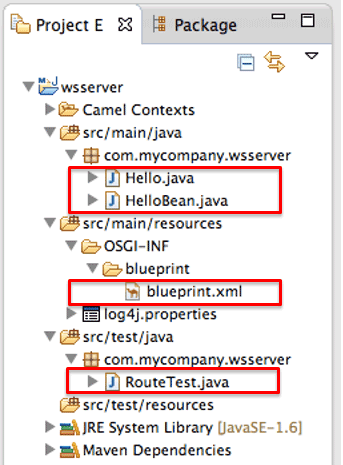
図4:初期状態のFuseプロジェクト
次にFuseプロジェクト内の「pom.xml」に、以下の依存ライブラリ設定を追加します。必ずpom.xml内の
リスト1:pom.xmlに追加する依存ライブラリの設定
<dependency>
    <groupId>org.apache.camel</groupId>
    <artifactId>camel-cxf</artifactId>
    <version>2.12.0.redhat-610379</version>
</dependency>
<dependency>
    <groupId>org.apache.cxf</groupId>
    <artifactId>cxf-rt-transports-http</artifactId>
    <version>2.7.0.redhat-610379</version>
</dependency>
SOAP/HTTP によるWebサービス化
【手順1】インターフェース作成
SOAPのインターフェースとなるプログラムを作成します。
リスト2
package com.mycompany.wsserver;
import javax.jws.WebService;
@WebService
public interface OrderEndpoint {
    String order(String OrderID);
}
このインターフェースはString「OrderID」を受け取り、Stringデータを返します。インターフェースにはjavax.jws.WebServiceアノテーションを設定しています。
【手順2】Camelルート作成
以下のようなCamelルートを作成します([New]−[Camel XML File])。必ずOSGi Blueprintで作成するようにしてください。
SOAPサーバーのCamelルート設定
| 設定 | 値 |
|---|---|
| RouteContainer | /wsserver/src/main/resources/OSGI-INF/blueprint |
| File name | soapServer.xml |
| Framework | OSGi Blueprint |
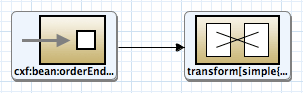
図5:SOAPサーバーのCamelルート
以下のように設定します。
各ノードの設定
| 位置 | 追加するノード | プロパティ | 設定 |
|---|---|---|---|
| 1 | Endpoint | Uri | cxf:bean:orderEndpoint |
| 2 | Transform | Expression | OK : ${body} |
| Language | simple |
設定ができたら保存します。処理の内容は、Webサービスのリクエストを受けたら、メッセージとして「OK:」を付与して返すというものになります。
【手順3】Camelルートへの設定追加
【手順2】でプロセスの大枠を作成したら、追加で設定を入れていきます。Sourceモードでリスト3の強調されている行を追記します。
リスト3
<?xml version="1.0" encoding="UTF-8"?>
<blueprint xmlns="http://www.osgi.org/xmlns/blueprint/v1.0.0"
       xmlns:camel="http://camel.apache.org/schema/blueprint"
       xmlns:xsi="http://www.w3.org/2001/XMLSchema-instance"
       xmlns:cxf="http://camel.apache.org/schema/blueprint/cxf"
       xsi:schemaLocation="http://www.osgi.org/xmlns/blueprint/v1.0.0 http://www.osgi.org/xmlns/blueprint/v1.0.0/blueprint.xsd
       http://camel.apache.org/schema/blueprint/cxf http://camel.apache.org/schema/blueprint/cxf/camel-cxf.xsd
       http://camel.apache.org/schema/blueprint http://camel.apache.org/schema/blueprint/camel-blueprint.xsd">
  <cxf:cxfEndpoint id="orderEndpoint"
       address="/order/"
       serviceClass="com.mycompany.wsserver.OrderEndpoint"/>
  <camelContext trace="false" xmlns="http://camel.apache.org/schema/blueprint">
    <route>
        <from uri="cxf:bean:orderEndpoint"/>
        <transform>
            <constant>OK : ${body}</constant>
        </transform>
    </route>
</camelContext>
</blueprint>
この設定で追加しているのはCXFコンポーネントを利用するためのXMLスキーマの設定と、CXFコンポーネントが参照するWebサービスの設定です。XMLスキーマの設定(xmlns:cxf及び、xsi:schemaLocationに追加している箇所)についてはおまじないなので、この通りに設定してください。
Webサービスの設定では、以下のようなことをしています。
リスト4
  <cxf:cxfEndpoint id="orderEndpoint" (1)
       address="/order/"
       serviceClass="com.mycompany.wsserver.OrderEndpoint"/> (2)
  <camelContext trace="false" xmlns="http://camel.apache.org/schema/blueprint">
    <route>
        <from uri="cxf:bean:orderEndpoint"/>
- uriの「cxf:bean:」の後に指定したIDで「cxf:cxfEndpoint」を参照する。
- 作成済みインターフェースを設定する。
【手順4】バンドルの作成
作成したJavaプログラム、Camelルートをバンドルとしてビルドします。JBoss Developer Studio(以下、JBDS)ではFUSEプロジェクトを右クリックし、[Run As]−[Maven Install]でビルドされます。ビルドされたバンドルは、Mavenリポジトリに格納されます。
【手順5】バンドルのインストール
Mavenリポジトリに格納されたバンドルをFuseサーバーインスタンスにインストールします。
JBossFuse:admin@root> osgi:install -s mvn:com.mycompany/wsserver/1.0.0-SNAPSHOT
Bundle ID: 334
【手順6】確認
SOAPサービスのインストールに成功していると、「http://localhost:8181/cxf」において一覧に登録されています。

図6:SOAPサービスの確認
この一覧に表示されるWSDLの横にあるリンクをクリックすると、作成したWebサービスに対応するWSDLが表示されます(図7)。
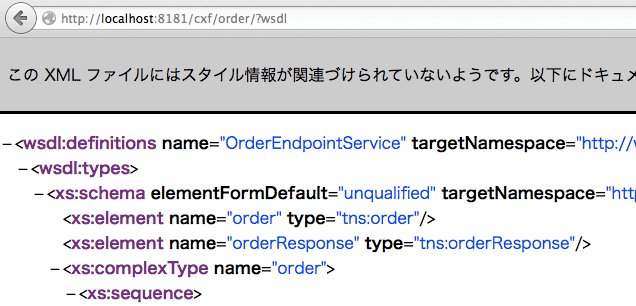
図7:作成したサービスに対応したWSDL
Webサービスの動作確認は、SoapUIなどを用いて行います。

図8:SoapUIによる確認
- この記事のキーワード
バックナンバー
この記事の筆者

Think ITでは、技術情報が詰まったメールマガジン「Think IT Weekly」の配信サービスを提供しています。メルマガ会員登録を済ませれば、メルマガだけでなく、さまざまな限定特典を入手できるようになります。
