Flask
Flask
Flaskは、Armin Ronacherによって開発されたオープンソースライセンス(BSDライセンス)のフレームワークです。テンプレートエンジンとしてJinja2、WSGIツールキットとしてWerkzeug(ヴェルクツォイク)を利用しています。
- Jinja2: Pythonで利用できるHTMLテンプレートエンジン
- Werkzeug: WSGIアプリケーションのためのユーティリティを集めたライブラリ
データベースの抽象化など、必要に応じて拡張(Extension)を行う軽量なフレームワークです。

・Flask - Getting Started
実際にFlaskを動かしてみましょう。以下のコマンドを実行して、Flaskをインストールします。
$ python -m pip install Flaskhello.pyファイルを作成します。from flask import Flask, Response
app = Flask(__name__)
@app.route('/hello')
def hello():
return 'Hello, World'
@app.route('/hello/')
def name(name):
response = Response('Hello, '+ name)
response.mimetype = 'text/plain'
return response $ export FLASK_APP=hello.py #起動するアプリをFlaskに伝える
$ export FLASK_ENV=development #サーバーを開発モードに設定
$ flask run
* Serving Flask app 'hello' (lazy loading)
* Environment: production
WARNING: This is a development server. Do not use it in a production deployment.
Use a production WSGI server instead.
* Debug mode: off
* Running on http://127.0.0.1:5000/ (Press CTRL+C to quit)http://127.0.0.1:5000/helloにアクセスします。・Flaskプロジェクトのレイアウト
Flaskではディレクトリ構造などが特に定められているわけではありませんが、プロジェクト内に以下のようなディレクトリを持つことがプラクティスとされています。
flaskr/: アプリケーションのコードとファイルを含んだPythonパッケージtests/: テストモジュールを含んだディレクトリvenv/: Flaskとその他の依存対象がインストールされたPythonの仮想環境- その他のファイル: インストールなどに利用
・Flaskアプリケーションのルーティング
Flaskでは、Route()デコレータを使用して関数とURLを関連付けできます。変数を扱いたい場合には< >を利用します。デコレータとは、関数やクラスにフレームワークの機能などを付加するための修飾子です。

・FlaskアプリケーションのHTTPメソッド
HTTPメソッドの記述も、Route()デコレータ内で行います。
@app.route('/book/json', methods=['GET'])
def book():
  book = Book('example title', 'example author')
  return jsonify(book.__dict__)
・Flaskで簡単なAPIを作成
実際にAPIを作成してみます。FlaskはDjangoよりもAPIに特化したフレームワークのため、簡単に実装できます。返却する値としてJSONを利用したいため、Extensionを追加してJSONレスポンスを取得するAPIを作成します。
hello.pyという名前のファイルを作成し、中身を以下のようにします。
from flask import Flask, Response, jsonify

class Book:
  def __init__(self, title, author):
    self.title = title
    self.author = author

app = Flask(__name__)

@app.route('/hello')
def hello():
  return 'Hello, World'

@app.route('/hello/')
def name(name):
  response = Response('Hello, '+ name)
  response.mimetype = 'text/plain'
  return response

@app.route('/book/json', methods=['GET'])
def book():
  book = Book('example title', 'example author')
return jsonify(book.__dict__) flask runコマンドを利用し、サーバを起動します。$ export FLASK_APP=hello.py #起動するアプリをFlaskに伝える
$ export FLASK_ENV=development #サーバーを開発モードに設定
$ flask runcurlを実行します。$ curl -X GET http://127.0.0.1:5000/book/json
{
"author": "example author",
"title": "example title"
}FastAPI
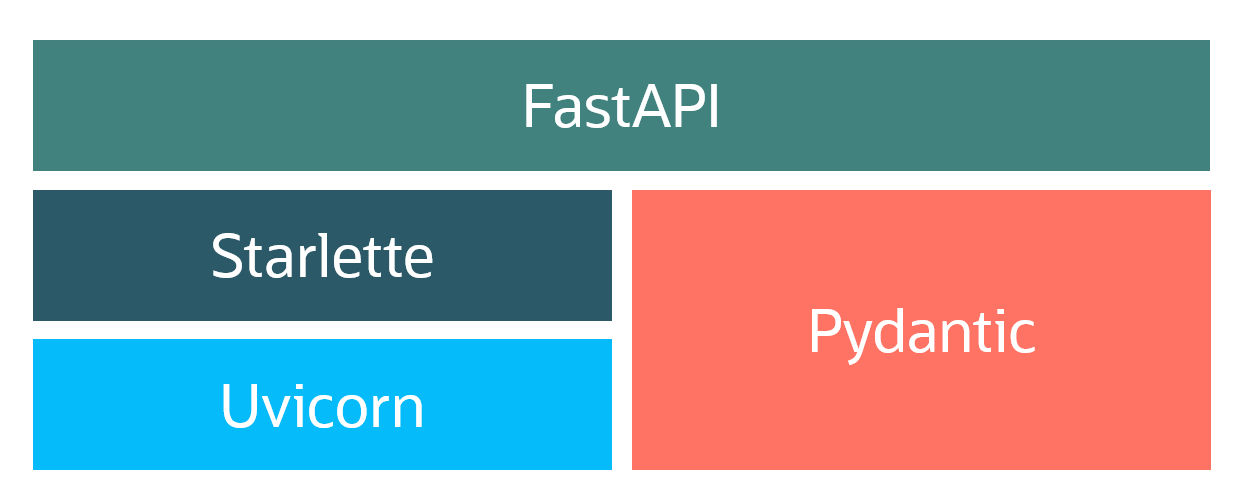
FastAPIは@tiangolo(Sebastián Ramírez)によって開発された、Python 3.6以降でAPIを構築するためのオープンソース(MIT)・Webフレームワークです。REST APIの実装に特化しており、OpenAPIに準拠しています。自動でAPIドキュメントを生成する機能があり、Flaskのようにプラグインによる拡張も可能です。Starlette/Uvicorn/Pydanticをベースにしたフレームワークで、以下を担う構造です。
- Starlette/Uvicorn: Web部分(ASGI Server)
- Pydantic: データ部分(Validation/Serialization)
・FastAPI - Getting Started
実際にFastAPIを動かしてみましょう。以下のコマンドを実行して、FastAPIをインストールします。
$ python -m pip install fastapihello.pyファイルを作成します。from fastapi import FastAPI
app = FastAPI()
@app.get('/')
def read_root():
return {'hello':'world'}$ python -m pip install "uvicorn[standard]"$ uvicorn hello:app --reload
INFO: Will watch for changes in these directories: ['/home/opc/develop/python/fastapi']
INFO: Uvicorn running on http://127.0.0.1:8000 (Press CTRL+C to quit)
INFO: Started reloader process [13722] using watchgod
INFO: Started server process [13724]
INFO: Waiting for application startup.
INFO: Application startup complete.$ curl -X GET http://127.0.0.1:8000
{"hello":"world"}・FastAPIアプリケーションのHTTPメソッド
FastAPIのHTTPメソッド指定はFlaskとは若干異なり、それぞれのデコレータが用意されています。
class Item(BaseModel):
id: int
@app.post('/items/')
async def post_item(item: Item):
return item・FastAPIアプリケーションのルーティング
関数とパスを関連付ける形でアプリケーションのルーティングを行います。
@app.get('/')
def read_root():
return {'hello':'world'}@app.get('/items/{item_id}')
def get_item(item_id: int, q: str = None):
return {'item_id': item_id, 'q': q}@app.get('/items/')
async def get_item(item_id: int = 0):
return {'item_id': item_id}・FastAPIの自動ドキュメント生成[endpoint]/docsにアクセスすると、自動生成された Swagger UIにアクセスできます。

・FastAPIで簡単なAPIを作成
ここまでのサンプルコードをhello.pyに記述します。
from fastapi import FastAPI

app = FastAPI()

@app.get('/')
def read_root():
  return {'hello':'world'}
@app.get('/items/{item_id}')
def get_item(item_id: int, q: str = None):
return {'item_id': item_id, 'q': q}
@app.get('/items/')
async def get_item(item_id: int = 0):
return {'item_id': item_id}
from pydantic import BaseModel
class Item(BaseModel):
  id: int

@app.post('/items/')
async def post_item(item: Item):
return item$ uvicorn hello:app$ curl -X GET http://127.0.0.1:8000/items/1
{"item_id":1,"q":null}
$ curl -X GET http://127.0.0.1:8000/items/?item_id=1000
{"item_id":1000}
$ curl -X 'POST' \
> 'http://127.0.0.1:8000/items/' \
> -H 'accept: application/json' \
> -H 'Content-Type: application/json' \
> -d '{
> "id": 0
> }'
{"id":0}- この記事のキーワード
この記事をシェアしてください
関連記事
バックナンバー
この記事の筆者

Think ITでは、技術情報が詰まったメールマガジン「Think IT Weekly」の配信サービスを提供しています。メルマガ会員登録を済ませれば、メルマガだけでなく、さまざまな限定特典を入手できるようになります。
