XAML(BingMap.xaml)の編集
XAML(BingMap.xaml)の編集
BingMaps.xamlをリスト3のように編集します。
リスト3 編集されたXAMLコード(BingMaps.xaml)
(1)Mapの資格情報プロバイダーを設定する<my:Map.CredentialsProvider>プロパティ要素内に、<my:ApplicationIdCredentialsProvider>要素を記述し、ApplicationIdプロパティにMaps Account Centerより取得したKeyを指定します。このサンプルでは「XXXXXXXXXXXXX」を指定していますので、動作させる場合は、各自がKeyを取得して、サンプルコードの「XXXXXXXXXXXXX」内に入力してください。
<phone:PhoneApplicationPage
  x:Class="WP7_Panorama.BingMaps"
  xmlns="http://schemas.microsoft.com/winfx/2006/xaml/presentation"
  xmlns:x="http://schemas.microsoft.com/winfx/2006/xaml"
  xmlns:phone="clr-namespace:Microsoft.Phone.Controls;assembly=Microsoft.Phone"
  xmlns:shell="clr-namespace:Microsoft.Phone.Shell;assembly=Microsoft.Phone"
  xmlns:d="http://schemas.microsoft.com/expression/blend/2008"
  xmlns:mc="http://schemas.openxmlformats.org/markup-compatibility/2006"
  FontFamily="{StaticResource PhoneFontFamilyNormal}"
  FontSize="{StaticResource PhoneFontSizeNormal}"
  Foreground="{StaticResource PhoneForegroundBrush}"
  SupportedOrientations="Portrait" Orientation="Portrait"
  mc:Ignorable="d" d:DesignHeight="768" d:DesignWidth="480"
  shell:SystemTray.IsVisible="True" xmlns:my="clr-namespace:Microsoft.Phone.Controls.Maps;assembly=Microsoft.Phone.Controls.Maps">

  <!--LayoutRoot is the root grid where all page content is placed-->
  <Grid x:Name="LayoutRoot" Background="Transparent">
    <Grid.RowDefinitions>
      <RowDefinition Height="Auto"/>
      <RowDefinition Height="*"/>
    </Grid.RowDefinitions>

    <!--TitlePanel contains the name of the application and page title-->
    <StackPanel x:Name="TitlePanel" Grid.Row="0" Margin="12,17,0,28">
      <TextBlock x:Name="ApplicationTitle" Text="APPLICATION" Style="{StaticResource PhoneTextNormalStyle}"/>
      <TextBlock x:Name="PageTitle"  Margin="9,-7,0,0" Style="{StaticResource PhoneTextTitle1Style}"/>
      <Button x:Name="Button1" Content="道路を表示中"/>
    </StackPanel>

    <!--ContentPanel - place additional content here-->
    <Grid x:Name="ContentPanel" Grid.Row="1" Margin="12,0,12,0">
      <my:Map Height="569" HorizontalAlignment="Left" Margin="20,23,0,0" Name="Map1" VerticalAlignment="Top" Width="424"> ■(1)
        <my:Map.CredentialsProvider>
          <my:ApplicationIdCredentialsProvider ApplicationId="XXXXXXXXXXXXX" />
        </my:Map.CredentialsProvider>
      </my:Map>
    </Grid>
  </Grid>
  ~コード略~
</phone:PhoneApplicationPage>
リスト1のAddress.xmlを見るとわかりますが、緯度と経度が設定されています。任意の場所の緯度と経度を取得する方法について解説します。
Bing Mapsで任意の場所の緯度と経度を取得する方法
下記URLからBingの地図検索画面に入ります。
→参照:bing 地図
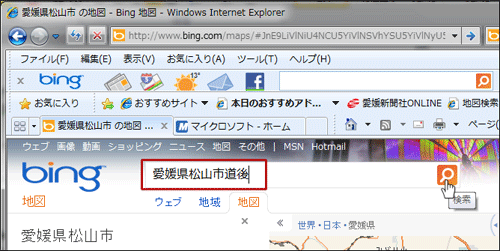
検索入力ボックスに場所を入力します。この例では「愛媛県松山市道後」と入力します(図12)。
| 図12:Bing地図検索画面の入力ボックスに「愛媛県松山市道後」と入力した(クリックで拡大) |
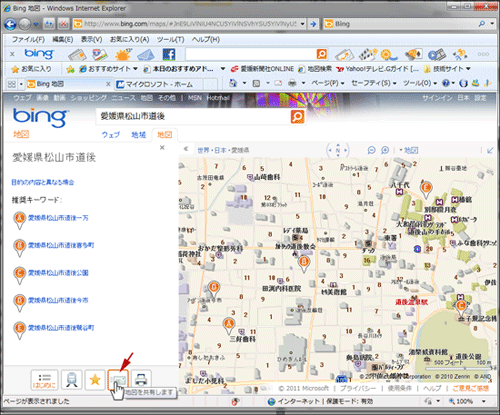
「検索」の虫眼鏡アイコンをクリックします。「愛媛県松山市道後」近辺の地図が表示されます。画面左下にある「地図を共有します」アイコンをクリックします(図13)。
| 図13:画面左下にある「地図を共有します」アイコンをクリックする(クリックで拡大) |
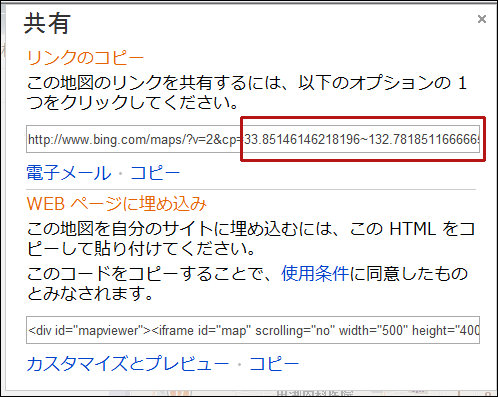
すると、「共有」ダイアログボックスが開き、「リンクのコピー」欄に、
http://www.bing.com/maps/?v=2&cp=33.85146146218196~132.7818511666665&lvl=16&dir=0&sty=r&FORM=LMLTCC
と表示されます。cp=33.85146146218196~132.7818511666665 の最初の値が「緯度」で~以降の値が「経度」です。cp=緯度~経度となっています。このサンプルでは小数点以下4桁までを取得して、リスト1のように緯度と経度をXML文書内に記述しています(図14)。
|
|
| 図14:緯度と経度が表示される |
検索入力ボックスに住所を入力して、必要な緯度と経度を取得してください。
<後編に続きます>
- この記事のキーワード


