GotoStateActionアクションを使ってトリガーを指定する(3ページ目)
書き出されるXMLコードはリスト1のようになります。
リスト1: 書き出されたXMLコード(MainPage.xaml)
<UserControl
    xmlns="http://schemas.microsoft.com/winfx/2006/xaml/presentation"
    xmlns:x="http://schemas.microsoft.com/winfx/2006/xaml"
    xmlns:d="http://schemas.microsoft.com/expression/blend/2008"
    xmlns:mc="http://schemas.openxmlformats.org/markup-compatibility/2006"
    xmlns:i="http://schemas.microsoft.com/expression/2010/interactivity" xmlns:ei="http://schemas.microsoft.com/expression/2010/interactions" x:Class="SL4_GotoStateAction.MainPage"
    mc:Ignorable="d"
    d:DesignHeight="300" d:DesignWidth="400" Width="900" Height="600">
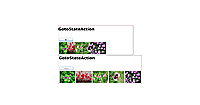
(1)NameがLayoutRootの<Canvas>要素に、ImageSlidInのGotoStateActionが設定されています。
    <Canvas x:Name="LayoutRoot" Background="White">
    	<i:Interaction.Triggers>
    		<i:EventTrigger>
    			<ei:GoToStateAction StateName="ImageSlideIn"/>■(1)
    		</i:EventTrigger>
    	</i:Interaction.Triggers>
    	<VisualStateManager.VisualStateGroups>

(2)ImageSlideInの状態が設定され、Go_Buttonの<Visibility>要素にCollapsedが指定されています。
    		<VisualStateGroup x:Name="VisualStateGroup">
    			<VisualState x:Name="ImageSlideIn"> ■(2)
    				<Storyboard>
    					<DoubleAnimationUsingKeyFrames Storyboard.TargetProperty="(Canvas.Left)" Storyboard.TargetName="Image2">
    						<EasingDoubleKeyFrame KeyTime="0" Value="34"/>
    						<EasingDoubleKeyFrame KeyTime="0:0:1" Value="200"/>
    					</DoubleAnimationUsingKeyFrames>
    					<DoubleAnimationUsingKeyFrames Storyboard.TargetProperty="(Canvas.Left)" Storyboard.TargetName="Image3">
    						<EasingDoubleKeyFrame KeyTime="0" Value="34"/>
    						<EasingDoubleKeyFrame KeyTime="0:0:1" Value="366"/>
    					</DoubleAnimationUsingKeyFrames>
    					<DoubleAnimationUsingKeyFrames Storyboard.TargetProperty="(Canvas.Left)" Storyboard.TargetName="Image4">
    						<EasingDoubleKeyFrame KeyTime="0" Value="34"/>
    						<EasingDoubleKeyFrame KeyTime="0:0:1" Value="532"/>
    					</DoubleAnimationUsingKeyFrames>
    					<DoubleAnimationUsingKeyFrames Storyboard.TargetProperty="(Canvas.Left)" Storyboard.TargetName="Image5">
    						<EasingDoubleKeyFrame KeyTime="0" Value="34"/>
    						<EasingDoubleKeyFrame KeyTime="0:0:1" Value="698"/>
    					</DoubleAnimationUsingKeyFrames>
    					<ObjectAnimationUsingKeyFrames Storyboard.TargetProperty="(UIElement.Visibility)" Storyboard.TargetName="Go_Button">
    						<DiscreteObjectKeyFrame KeyTime="0:0:1">
    							<DiscreteObjectKeyFrame.Value>
    							<Visibility>Collapsed</Visibility>■(2)
    							</DiscreteObjectKeyFrame.Value>
    						</DiscreteObjectKeyFrame>
    					</ObjectAnimationUsingKeyFrames>
    				</Storyboard>
    			</VisualState>

(3)ImageSlideOutの状態が設定され、Reset_Buttonの<Visibility>要素にVisibleが設定されています。
    			<VisualState x:Name="ImageSlideOut"> ■(3)
    				<Storyboard>
    					<DoubleAnimationUsingKeyFrames Storyboard.TargetProperty="(Canvas.Left)" Storyboard.TargetName="Image2">
    						<EasingDoubleKeyFrame KeyTime="0" Value="200"/>
    						<EasingDoubleKeyFrame KeyTime="0:0:1" Value="34"/>
    					</DoubleAnimationUsingKeyFrames>
    					<DoubleAnimationUsingKeyFrames Storyboard.TargetProperty="(Canvas.Left)" Storyboard.TargetName="Image3">
    						<EasingDoubleKeyFrame KeyTime="0" Value="366"/>
    						<EasingDoubleKeyFrame KeyTime="0:0:1" Value="34"/>
    					</DoubleAnimationUsingKeyFrames>
    					<DoubleAnimationUsingKeyFrames Storyboard.TargetProperty="(Canvas.Left)" Storyboard.TargetName="Image4">
    						<EasingDoubleKeyFrame KeyTime="0" Value="532"/>
    						<EasingDoubleKeyFrame KeyTime="0:0:1" Value="34"/>
    					</DoubleAnimationUsingKeyFrames>
    					<DoubleAnimationUsingKeyFrames Storyboard.TargetProperty="(Canvas.Left)" Storyboard.TargetName="Image5">
    						<EasingDoubleKeyFrame KeyTime="0" Value="698"/>
    						<EasingDoubleKeyFrame KeyTime="0:0:1" Value="34"/>
    					</DoubleAnimationUsingKeyFrames>
    					<ObjectAnimationUsingKeyFrames Storyboard.TargetProperty="(UIElement.Visibility)" Storyboard.TargetName="Go_Button">
    						<DiscreteObjectKeyFrame KeyTime="0:0:1">
    							<DiscreteObjectKeyFrame.Value>
    								<Visibility>Visible</Visibility>■(3)
    							</DiscreteObjectKeyFrame.Value>
    						</DiscreteObjectKeyFrame>
    					</ObjectAnimationUsingKeyFrames>
    				</Storyboard>
    			</VisualState>
    		</VisualStateGroup>
    	</VisualStateManager.VisualStateGroups>
        <TextBlock Canvas.Left="30" Canvas.Top="24" Height="58" x:Name="TextBlock1" Text="GotoStateAction" Width="408" FontSize="40" FontWeight="Bold" />
        <Button Canvas.Left="36" Canvas.Top="113" Content="リセット" Height="44" x:Name="Reset_Button" Width="128" >
        	<i:Interaction.Triggers>
        		<i:EventTrigger EventName="Click">
        			<ei:GoToStateAction StateName="ImageSlideOut"/>
        		</i:EventTrigger>
        	</i:Interaction.Triggers>
        </Button>
        <Button Canvas.Left="36" Canvas.Top="113" Content="実行" Height="44" x:Name="Go_Button" Width="128" >
        	<i:Interaction.Triggers>
        		<i:EventTrigger EventName="Click">
        			<ei:GoToStateAction StateName="ImageSlideIn"/>
        		</i:EventTrigger>
        	</i:Interaction.Triggers>
        </Button>
        <Image Canvas.Left="34" Canvas.Top="185" Height="120" x:Name="Image1" Stretch="Fill" Width="160" Source="/SL4_GotoStateAction;component/Image/おしろい花.jpg" />
        <Image Canvas.Left="200" Canvas.Top="185" Height="120" x:Name="Image2" Stretch="Fill" Width="160" Source="/SL4_GotoStateAction;component/Image/サルビア.jpg" />
        <Image Canvas.Left="366" Canvas.Top="185" Height="120" x:Name="Image3" Stretch="Fill" Width="160" Source="/SL4_GotoStateAction;component/Image/ベゴニア.jpg" />
        <Image Canvas.Left="532" Canvas.Top="185" Height="120" x:Name="Image4" Stretch="Fill" Width="160" Source="/SL4_GotoStateAction;component/Image/ポピー.jpg" />
        <Image Canvas.Left="698" Canvas.Top="185" Height="120" x:Name="Image5" Stretch="Fill" Width="160" Source="/SL4_GotoStateAction;component/Image/マツバギク.jpg" />
    </Canvas>
</UserControl>
VS2010の画面に戻った時、XAMLコードに波線が表示され、エラーとなってデザイン画面が表示されない場合は、一度VS2010を終了し、再度起動し直すことで解決します。
ロジックコードはありません。
いかがだったでしょうか?5回の連載で、ビヘイビアーを使ったサンプルを紹介しました。ビヘイビアーを使うと、ロジックコードをほとんど、または、一切記述することなく、動きのあるページを容易に作成することができます。ほとんどがBlend4内での設定で可能になります。皆さんにビヘイビアーのすごさを実感していただければ幸いです。
本年には、Silverlight5がリリースされる予定です。40以上もの新機能が追加される模様です。それまでに、VS2010とBlend 4の基本操作をマスターしておきませんか。
- この記事のキーワード


