プロジェクトの作成(Windows Phoneアプリケーション)
プロジェクトの作成(Windows Phoneアプリケーション)
VS 2010のメニューから[ファイル(F)/新規作成(N)/プロジェクト(P)]と選択します。次に、「インストールされたテンプレート」から「Silverlight for Windows Phone」を選択し、右に表示される項目から「Windows Phone アプリケーション」を選択して、「名前(N)」に任意のプロジェクト名を指定します。ここでは「KINECT_WindowsPhone_CheckPerson」という名前を付けています。Windows Phone OSのバージョンは7.1を選択します。
参照の追加
VS2010のメニューから「プロジェクト(P)/参照の追加(R)」と選択して、各種コンポーネントを追加しておきます。今回追加するのは、Coding4Fun.Kinect.KinectService.CommonとCoding4Fun.Kinect.KinectService.PhoneClientとSystem.Xml.Linqの3つです。「.NET」タブ内に表示されていないDLLファイルは「参照」タブからDLLファイルを指定します。
Coding4Fun.Kinect.KinectService.Common.dlとCoding4Fun.Kinect.KinectService.PhoneClient.dllは、kinectservice.zipを解凍したフォルダの、\KinectService\Phone Client\フォルダ内に存在しますので、これを指定してください。System.Xml.Linqは「.NET」タブ内にあります。
コントロールの配置
ツールボックスからデザイン画面上にTextBlockコントロールを4個、Imageコントロールを1個、ListBoxコントロールを1個、Buttonコントロールを1個配置します。NameがTextBlock1というTextBlockは非表示にしておきます。ここにはKinectセンサーの視野範囲内にプレイヤーが入ったかどうかを判別するブール値を書き込んでいます。もうひとつNameがinTextBlockというTextBlockも非表示としておきます。ここには、現在の年月日時間分秒を書き込んでいます。書き出されるコードはリスト1、レイアウトは図6になります。
リスト1 (MainPage.xaml)
- (1)Kinectセンサーの視野範囲内にプレイヤーが入ったかどうかを判別するブール値を格納するTextBlockコントロールで非表示にしておきます。
- (2)実写を表示するImageコントロールです。
- (3)Kinectセンサーの視野範囲内のプレイヤーがいると、その時点の年月日時間分秒が追加されて表示されるListBoxコントロールです。
- (4)現在の年月日時間分秒を格納するTextBlockコントロールで非表示にしておきます。
- (5)IPアドレスを入力するTextBoxコントロール(addressTextBox)です。
<phone:PhoneApplicationPage
  x:Class="KINECT_WindowsPhone_CheckPerson.MainPage"
  xmlns="http://schemas.microsoft.com/winfx/2006/xaml/presentation"
  xmlns:x="http://schemas.microsoft.com/winfx/2006/xaml"
  xmlns:phone="clr-namespace:Microsoft.Phone.Controls;assembly=Microsoft.Phone"
  xmlns:shell="clr-namespace:Microsoft.Phone.Shell;assembly=Microsoft.Phone"
  xmlns:d="http://schemas.microsoft.com/expression/blend/2008"
  xmlns:mc="http://schemas.openxmlformats.org/markup-compatibility/2006"
  mc:Ignorable="d" d:DesignWidth="480" d:DesignHeight="768"
  FontFamily="{StaticResource PhoneFontFamilyNormal}"
  FontSize="{StaticResource PhoneFontSizeNormal}"
  Foreground="{StaticResource PhoneForegroundBrush}"
  SupportedOrientations="Portrait" Orientation="Portrait"
  shell:SystemTray.IsVisible="True">

  <!--LayoutRoot は、全てのページ コンテンツが配置されるルート グリッドです-->
  <Grid x:Name="LayoutRoot" Background="Transparent">
    <Grid x:Name="ContentPanel" Grid.Row="1" Margin="12,0,12,0">
      <TextBlock Height="61" HorizontalAlignment="Left" Margin="141,490,0,0" Name="TextBlock1" Text="" VerticalAlignment="Top" Width="162" FontSize="28" FontWeight="Bold" Visibility="Collapsed" />■(1)
      <Image Height="336" Name="Image1" Stretch="Fill" Width="448" Margin="16,41,16,391" />■(2)
      <ListBox Height="98" HorizontalAlignment="Left" Margin="20,563,0,0" Name="ListBox1" VerticalAlignment="Top" Width="436" FontSize="24" FontWeight="Bold" Foreground="Gold" />■(3)
      <Button Content="データ一覧" Height="84" HorizontalAlignment="Left" Margin="18,467,0,0" Name="dataButton" VerticalAlignment="Top" Width="433" />
      <TextBlock Height="48" HorizontalAlignment="Left" Margin="16,687,0,0" Name="inTextBlock"  VerticalAlignment="Top" Width="413" FontSize="28" FontWeight="Bold" Visibility="Collapsed" />■(4)
      <TextBlock Height="46" HorizontalAlignment="Left" Margin="16,415,0,0" Name="TextBlock3" Text="Address" VerticalAlignment="Top" Width="81" />
      <TextBox Height="71" HorizontalAlignment="Left" Margin="90,396,0,0" Name="addressTextBox"  VerticalAlignment="Top" Width="271" />■(5)
      <Button Content="OK " Height="67" HorizontalAlignment="Left" Margin="352,396,0,0" Name="okButton" VerticalAlignment="Top" Width="84" />
    </Grid>
  </Grid>
 ~コード略~
</phone:PhoneApplicationPage>

次に[データ一覧]ボタンをクリックして遷移する、DataIchiranPage.xamlを作成します。
Windows Phone 縦向きのページ(DataIchiranPage.xaml)の追加
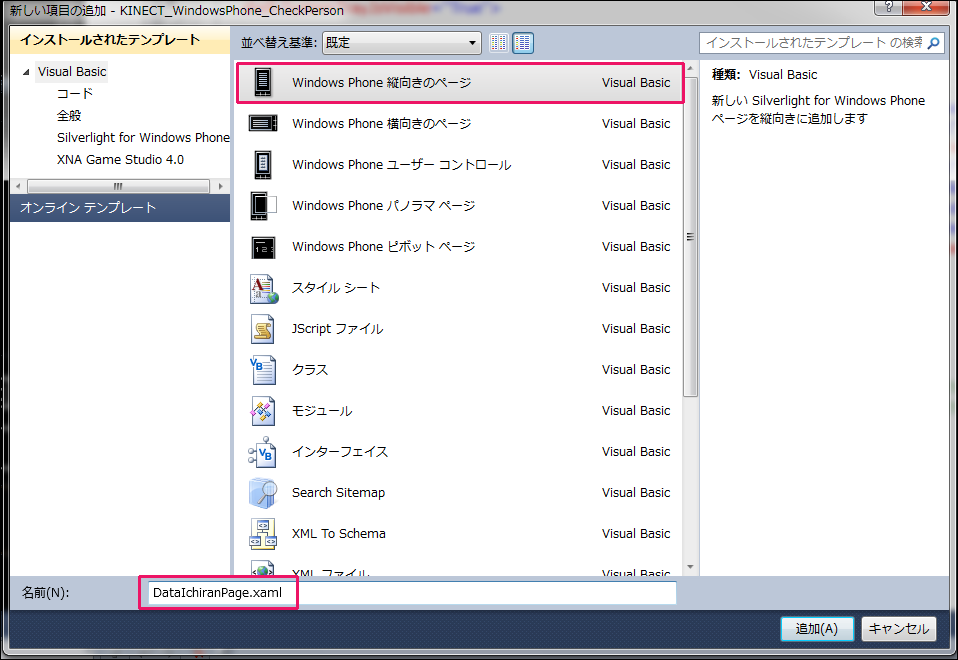
VS2010メニューの「プロジェクト(P)/新しい項目の追加(W)」と選択して、「Windows Phone 縦向きのページ」を選択します。「名前(N) 」にはDataIchiranPage.xamlと指定して[追加(A)]ボタンをクリックします(図7)。
コントロールの追加(DataIchiranPage.xaml)
ツールボックスからListBoxとButtonコントロールを1個ずつ配置します。
書き出されるXAMLコードは省略します。レイアウトは図8のようになります。

次に、ソリューションエクスプローラー内のMainPage.xamlを展開して表示される、MainPage.xaml.vbをダブルクリックしてリスト2のコードを記述します。
バックナンバー
この記事の筆者

筆者の人気記事
Think ITでは、技術情報が詰まったメールマガジン「Think IT Weekly」の配信サービスを提供しています。メルマガ会員登録を済ませれば、メルマガだけでなく、さまざまな限定特典を入手できるようになります。
