エディタの拡張
はじめに今回は、プラグインのメインの機能として動作するエディタを拡張する方法について説明します。エディタのプラグインは、エディタを開いたときに表示されるメニューやツールバーの動作(アクション)を追加できます。図1:ワークベンチ・ウィンドウ(画像をクリックすると別ウィンドウに拡大図を表示します)エデ
2005年8月15日 20:00
はじめに
今回は、プラグインのメインの機能として動作するエディタを拡張する方法について説明します。エディタのプラグインは、エディタを開いたときに表示されるメニューやツールバーの動作(アクション)を追加できます。
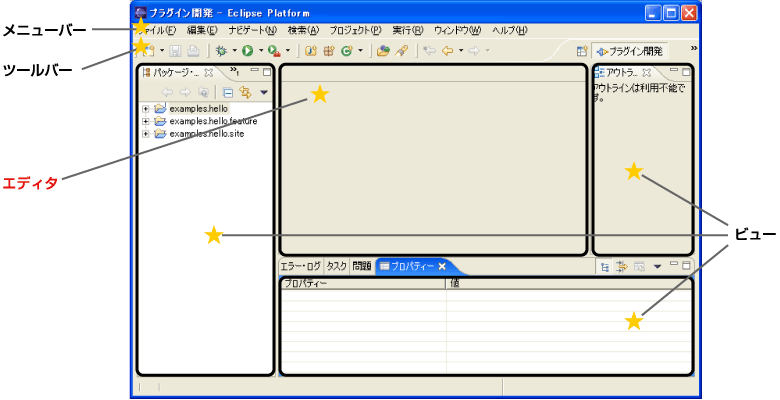
図1:ワークベンチ・ウィンドウ
(画像をクリックすると別ウィンドウに拡大図を表示します)
エディタの追加
それでは以下の手順で、本連載の第5回で作成した「Hello2プラグイン」に「Hello,Eclipse world」と表示されるエディタ(図2)を追加しましょう。
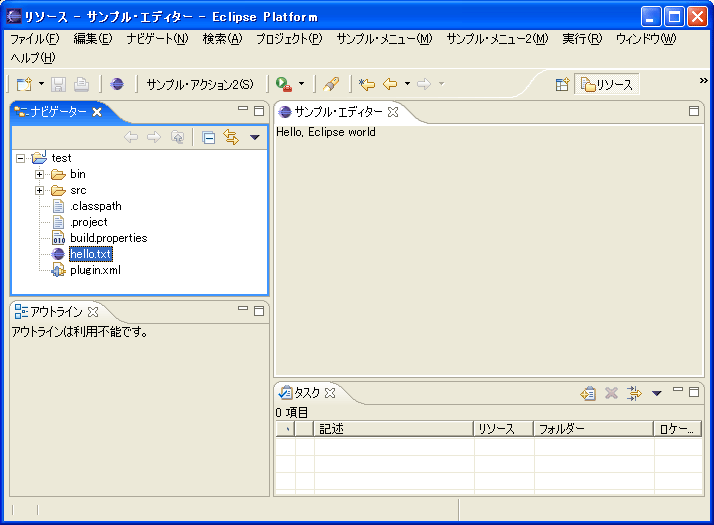
図2:実行例
(画像をクリックすると別ウィンドウに拡大図を表示します)
はじめにマニフェスト・エディターの「拡張」ページを表示し、「追加」ボタンをクリックして、「新規拡張」ウィザードを起動します。次に拡張ポイント"org.eclipse.ui.editors"を選択し、「新規拡張」ウィザードを終了します。
"editor"のプロパティ設定
"org.eclipse.ui.editors"を右クリックします。表示されたポップアップ・メニューから「新規」-「editor」を選択し、"editor"のプロパティを以下のように設定し、保管します。
| プロパティ | 値 |
| 内容 | |
| id | examples.hello2.editors.SampleEditor |
| エディタを識別するID | |
| name | サンプル・エディター |
| 名前 | |
| icon | icons/sample.gif |
| アイコンのパス | |
| extensions | txt |
| エディタによって認識されているファイルの拡張子のリスト(コンマ区切り) | |
| class | examples.hello2.editors.SampleEditor |
| org.eclipse.ui.IEditorPartを実装するクラス(エディタ・クラス)の名前。 このプロパティが指定された場合は、contributorClassプロパティも指定しなければいけません | |
| command | 値:なし |
| 外部エディタを起動するために実行するコマンド | |
| launcher | 値:なし |
| org.eclipse.ui.IEditorLauncherを実装するクラスの名前 | |
| contributorClass | examples.hello2.editors.SampleEditorContributor |
| org.eclipse.ui.IEditorActionBarContributorを実装するクラス(エディタ・コントリビュータ・クラス)の名前。 ワークベンチのメニューおよびツールバーにアクションを追加するために使用します | |
| default | 値:なし |
| trueの場合、このエディタがextensionsプロパティで指定したファイルのデフォルト・エディタとして使用されます | |
| filenames | 値:なし |
| エディタによって認識されているファイル名のリスト | |
| symbolicFontName | 値:なし |
| フォントのシンボル名 |
クラスを作成しエディタを追加
「概要」ページの「すべての拡張」から「org.eclipse.ui.editors」-「サンプル・エディター」を選択し、「拡張エレメント詳細」の「class」リンクをクリックして、examples.hello2.editors.SampleEditorクラスを作成します。
SampleEditorクラスに以下のようにコードを記述します。
 public class SampleEditor extends EditorPart {

    public SampleEditor() {
        super();
    }

    public void doSave(IProgressMonitor monitor) {
    }

    public void doSaveAs() {
    }

    public void init(IEditorSite site, IEditorInput input) throws PartInitException {
        setSite(site);
        setInput(input);
    }

    public boolean isDirty() {
        return false;
    }

    public boolean isSaveAsAllowed() {
        return false;
    }

    public void createPartControl(Composite parent) {
        Label label = new Label(parent, SWT.NONE);
        label.setText("Hello, Eclipse world");
    }

    public void setFocus() {
    }

} 次に「概要」ページの「すべての拡張」から「org.eclipse.ui.editors」-「サンプル・エディター」を選択し、「拡張エレメント詳細」の「contributorClass」リンクをクリックして、 examples.hello2.editors.SampleEditorContributorクラスを作成します。
 public class SampleEditorContributor extends EditorActionBarContributor {

    public SampleEditorContributor() {
        super();
    }

} 以上でエディタを追加することができました。ワークベンチ・ランタイムを起動し、本連載の第5回で作成したhello.txtファイルを「サンプル・エディター」で開いてみてください(図2)。
ここまでは、エディタを追加する手順について説明しました。次に拡張ポイントとエディタ・クラス、エディタ・コントリビュータ・クラスについて説明します。
この記事をシェアしてください
関連記事
バックナンバー
この記事の筆者

筆者の人気記事
Think ITでは、技術情報が詰まったメールマガジン「Think IT Weekly」の配信サービスを提供しています。メルマガ会員登録を済ませれば、メルマガだけでなく、さまざまな限定特典を入手できるようになります。
