虫眼鏡でズームするサンプルとその応用

カメラでの拡大映像の表示
ここからは、先ほどのズーム機能の応用編として、カメラでの撮影時にズームを使うサンプルを解説します。このサンプルの動作は下記の通りです。
- まずは実機を横向きにして使用します。
- プログラムを実機にデプロイするとすぐにカメラが起動します。
- カメラ上には「等倍」と「3倍」のRadioButtonが配置されています(規定値は等倍)。
- 「3倍」をチェックすると、カメラの画像が実物より3倍の大きさで表示されます(図4)。
この処理はMarketplaceに上げているThe ZOOM で使用しています。カメラ上でタップすることで4段階まで拡大して撮影できるアプリです。
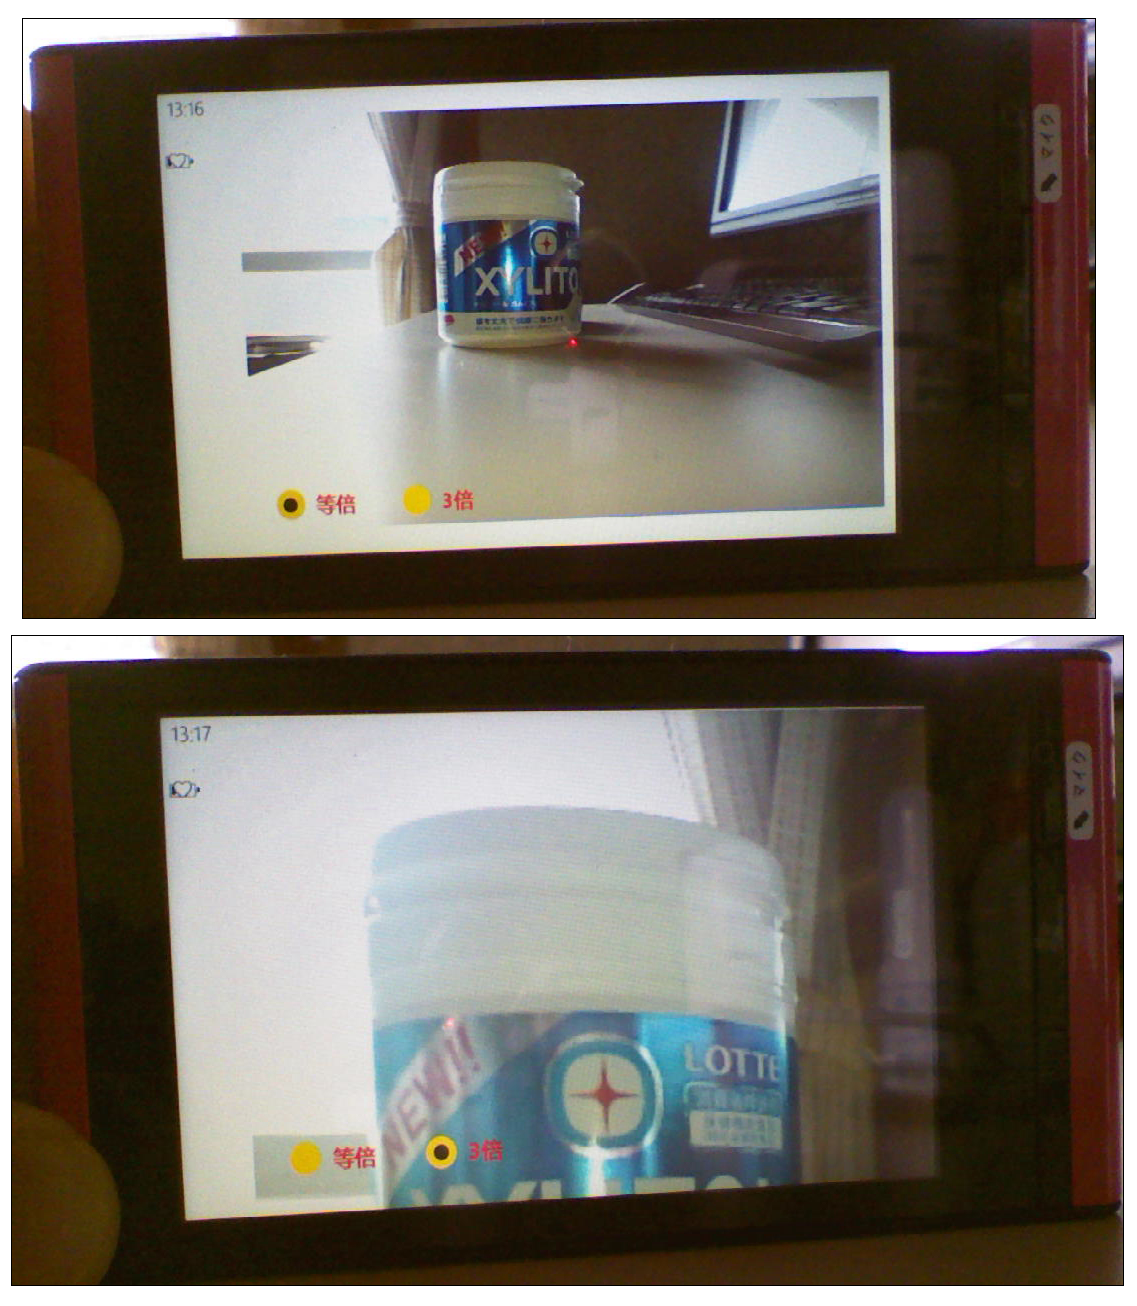 |
図4:カメラの画像を等倍から3倍ズームに切り替えたところ(クリックで拡大) |
サンプル一式は、会員限定特典としてダウンロードできます。記事末尾をご確認ください。
プロジェクトの作成
VS 2010のメニューから[ファイル(F)/新規作成(N)/プロジェクト(P)]と選択します。
次に、「Windows Phone アプリケーション」を選択して、「名前(N)」に任意のプロジェクト名を指定します(ここでは「WP71_ TheZoom」と指定)。Windows Phoneのバージョンは7.1を選択します。
MainPage.xamlの編集とコントロールの追加
ツールボックスからRectangleコントロールを1個、Imageコントロールを1個、RadioButtonコントロールを2個配置します。
RadioButtonコントロールのプロパティにある[共通]パネルのContentに「等倍」「3倍」と指定します。GroupNameには2つ共に同じ名称zoomと指定します。
(*)同じ名称を指定しないと、RadioButtonに複数チェックが入ってしまいますので、必ず任意の同じ名称を指定してください。
[ブラシ]パネル内のBackgroundやForegroundに適当な色を指定します。書き出されるXAMLコードをリスト3のように編集します。
リスト3 編集されたXAMLコード(MainPage.xaml)
(1)エミュレーターを横向きで表示するため、SupportedOrientationsにLandscape、OrientationにLandscapeLeftと指定しています。これらはPhoneApplicationPageのプロパティから設定できます(図2参照)。
(2)
(3)x:NameがmainImageの
(4)2つの
<phone:PhoneApplicationPage
  x:Class="WP71_TheZoom.MainPage"
  xmlns="http://schemas.microsoft.com/winfx/2006/xaml/presentation"
  xmlns:x="http://schemas.microsoft.com/winfx/2006/xaml"
  xmlns:phone="clr-namespace:Microsoft.Phone.Controls;assembly=Microsoft.Phone"
  xmlns:shell="clr-namespace:Microsoft.Phone.Shell;assembly=Microsoft.Phone"
  xmlns:d="http://schemas.microsoft.com/expression/blend/2008"
  xmlns:mc="http://schemas.openxmlformats.org/markup-compatibility/2006"
  mc:Ignorable="d" d:DesignWidth="728" d:DesignHeight="480"
  FontFamily="{StaticResource PhoneFontFamilyNormal}"
  FontSize="{StaticResource PhoneFontSizeNormal}"
  Foreground="{StaticResource PhoneForegroundBrush}"
  SupportedOrientations="Landscape" Orientation="LandscapeLeft"
  shell:SystemTray.IsVisible="True"> ■(1)

  <!--LayoutRoot は、すべてのページ コンテンツが配置されるルート グリッドです-->
  <Grid x:Name="LayoutRoot" Background="Transparent">
    <Rectangle Width="704" HorizontalAlignment="Left" Margin="12,25,0,28"> ■(2)
      <Rectangle.Fill> ■(2)
        <VideoBrush x:Name="myVideoBrush" /> ■(2)
      </Rectangle.Fill> ■(2)
    </Rectangle> ■(2)

    <Image x:Name="mainImage"
        Width="629" Height="451"
        HorizontalAlignment="Left" VerticalAlignment="Bottom"
        Stretch="Uniform" Margin="-3,0,0,28"> ■(3)
      <Image.RenderTransform> ■(3)
        <ScaleTransform x:Name="myZoom" ScaleX="0" ScaleY="0" /> ■(3)
      </Image.RenderTransform> ■(3)
      <Image.Clip> ■(3)
        <EllipseGeometry x:Name="lens" Center="0,0" RadiusX="450" RadiusY="450" />
      </Image.Clip> ■(3)
    </Image> ■(3)
    <RadioButton Content="3倍" GroupName="zoom" Height="73" HorizontalAlignment="Right" Margin="0,390,436,0" Name="sanbaiRadioButton" VerticalAlignment="Top" Width="128" FontSize="22" FontWeight="Bold" Foreground="Red" Background="Gold" BorderBrush="Navy" /> ■(4)
    <RadioButton Content="等倍" GroupName="zoom" Height="82" HorizontalAlignment="Left" IsChecked="True" Margin="24,386,0,0" Name="toubaiRadioButton" VerticalAlignment="Top" Width="112" FontSize="22" FontWeight="Bold" Foreground="Red" Background="Gold" BorderBrush="Navy" /> ■(4)
  </Grid>
  <!--ApplicationBar の使用法を示すサンプル コード-->
  ~コード略~
</phone:PhoneApplicationPage>
レイアウト図は図5になります。
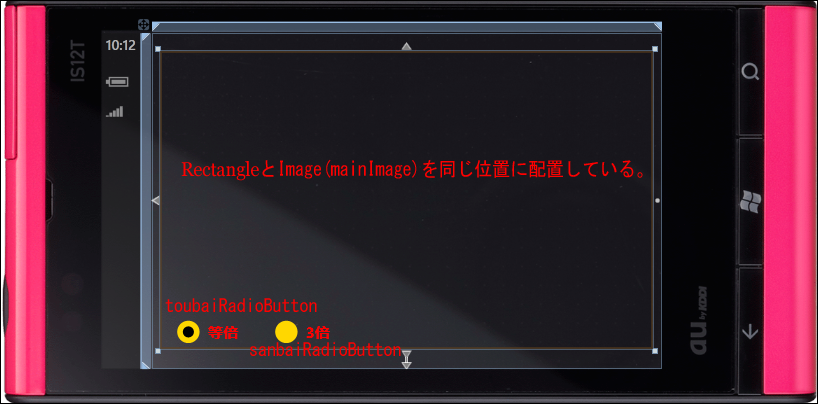 |
図5:各コントロールを配置した(クリックで拡大) |
画像の一部を拡大するサンプル
カメラで拡大表示するサンプル


