ロジックコードを記述する
書き出されるXAMLはリスト1のようになります。
リスト1: 書き出されたXAMLコード(MainPage.xaml)
<UserControl
    xmlns="http://schemas.microsoft.com/winfx/2006/xaml/presentation"
    xmlns:x="http://schemas.microsoft.com/winfx/2006/xaml"
    xmlns:d="http://schemas.microsoft.com/expression/blend/2008"
    xmlns:mc="http://schemas.openxmlformats.org/markup-compatibility/2006"
    xmlns:i="http://schemas.microsoft.com/expression/2010/interactivity" xmlns:ei="http://schemas.microsoft.com/expression/2010/interactions" x:Class="SL4_MouseDragElementBehavior.MainPage"
    mc:Ignorable="d"
    d:DesignHeight="300" d:DesignWidth="400" Width="800" Height="600">
(1)<UserControl.Resources>プロパティ要素内にStoryboardが定義されている。NameはStoryboard1となっている。
	<UserControl.Resources>■(1)
		<Storyboard x:Name="Storyboard1"  RepeatBehavior="Forever">
			<DoubleAnimation Duration="0:0:1" To="360" Storyboard.TargetProperty="(UIElement.Projection).(PlaneProjection.RotationY)" Storyboard.TargetName="Image1" d:IsOptimized="True"/>
		</Storyboard>
	</UserControl.Resources>

    <Grid x:Name="LayoutRoot" Background="White">
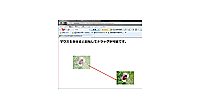
        <TextBlock Height="47" HorizontalAlignment="Left" Margin="18,13,0,0" x:Name="TextBlock1" Text="マウスを乗せると回転してドラッグが可能です。" VerticalAlignment="Top" Width="698" FontSize="28" FontWeight="Bold" />

(2)<Image>要素内に、<ei:MouseDragElementBehavior>要素と、<ei:ChangePropertyAction>要素が定義されている。
        <Image Height="120" HorizontalAlignment="Left" Margin="134,161,0,0" x:Name="Image1" Stretch="Fill" VerticalAlignment="Top" Width="160" Source="/SL4_MouseDragElementBehavior;component/Image/ポピー.jpg" >■(2)
        	<Image.Projection>
        		<PlaneProjection/>
        	</Image.Projection>
        	<i:Interaction.Behaviors>
        		<ei:MouseDragElementBehavior/>
        	</i:Interaction.Behaviors>
        	<i:Interaction.Triggers>
        		<i:EventTrigger EventName="MouseEnter">
        			<ei:ChangePropertyAction PropertyName="Opacity" Value="0.5"/>
        		</i:EventTrigger>
        		<i:EventTrigger EventName="MouseLeave">
        			<ei:ChangePropertyAction PropertyName="Opacity" Value="1"/>
        		</i:EventTrigger>
        	</i:Interaction.Triggers>
        </Image>
    </Grid>
</UserControl>
ロジックコードを記述する
次に処理を記述します。
ソリューションエクスプローラー内のSilverlightControl1.xamlを展開し、SilverlightControl1.xaml.vbをダブルクリックしてコード画面を開きます。
リスト2のようにロジックコードを記述します。
Option Strict On

Partial Public Class MainPage
    Inherits UserControl

    Public Sub New()
        InitializeComponent()
    End Sub

■画像の上にマウスカーソルが乗った時の処理
Y軸を中心に回転するストーリーボードを実行します。
    Private Sub Image1_MouseEnter(ByVal sender As Object, ByVal e As System.Windows.Input.MouseEventArgs) Handles Image1.MouseEnter
        Storyboard1.Begin()
    End Sub

■画像の上からマウスポインターが外れた時の処理
ストーリーボードを中止します。
    Private Sub Image1_MouseLeave(ByVal sender As Object, ByVal e As System.Windows.Input.MouseEventArgs) Handles Image1.MouseLeave
        Storyboard1.Stop()
    End Sub
End Class
ビヘイビアを使用すると、画像のドラッグに関するコードは不要になります。また透明化の設定もプロパティに値を指定するだけで済みます。最小限のコードで画像の移動と回転が実現できます。
- この記事のキーワード


