これから始めるWindows Phone プログラミング(基本編) 第7回
MainPage.xamlの編集
MainPage.xamlの編集
リスト2 書き出され編集されたXAMLコード(MainPage.xaml)
(1)エミュレーターを横に倒した場合、画像もそれに伴って横向きに表示されるようにするには、PhoneApplicationPageを選択し、表示されるプロパティウィンドウの[その他]パネルにあるSupportedOrientationsプロパティに、PortraitOrLandscapeを指定します。
(2)第3回の連載で解説したPage Transitionのコードを記述しています。TurnstileTransition効果を持たせています。Transition効果を有効にするには、第3回の解説を参考にApp.xaml.vb内を書き換えてください。
(3)<phone:PhoneApplicationPage.Resources>プロパティ要素内に、ListBoxTemplateというキーのテンプレートを定義します。<StackPanel>要素内に、<TextBlock>要素を配置し、Textプロパティに「タイトル」をバインドします。次に<Image>要素を配置し、WidthとHeightを指定して、Sourceプロパティに「画像名」をバインドします。Marginプロパティに10を指定して、余白を設けます。<StackPanel>要素のスタックされる要素の向きを設定するOrientationプロパティの値は、デフォルトでVerticalですので、タイトルの下に画像が表示されるようになります。ここで指定する名称はVBコード内のクラスで定義するプロパティ名です。
(4)<controls:Pivot >要素の、最初の子要素<controls:PivotItem>のHeaderプロパティに、「画像一覧」と指定します。
(5)<controls:PivotItem>要素内の、x:NameがListBox1の<ListBox>要素のItemTemplateに(3)で定義したListBoxTemplateを参照させます。
(6)2番目のPivot itemの<controls:PivotItem>要素のHeaderプロパティに「個人情報」と指定します。子要素として<ListBox>要素を配置します。文字サイズは40としておきます。
(7)3番目のPivot itemの<controls:PivotItem>要素のHeaderプロパティに「My Favorite Site」と指定します。子要素として<ListBox>要素を配置します。文字サイズは40としておきます。
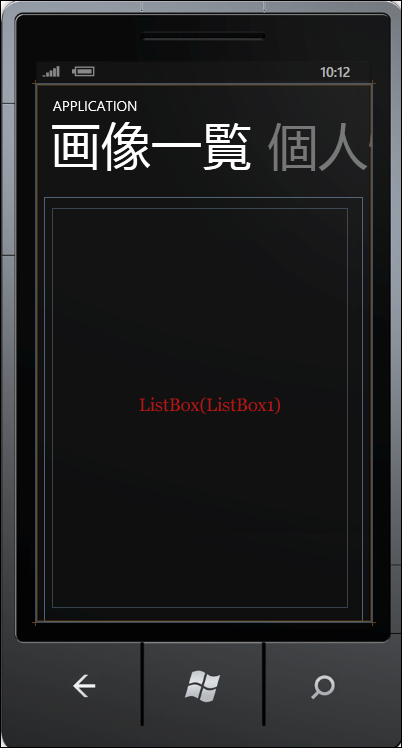
全て設定すると図7のようになります。
<phone:PhoneApplicationPage
x:Class="WP7_Pivot.MainPage"
xmlns="http://schemas.microsoft.com/winfx/2006/xaml/presentation"
xmlns:x="http://schemas.microsoft.com/winfx/2006/xaml"
xmlns:phone="clr-namespace:Microsoft.Phone.Controls;assembly=Microsoft.Phone"
xmlns:shell="clr-namespace:Microsoft.Phone.Shell;assembly=Microsoft.Phone"
xmlns:controls="clr-namespace:Microsoft.Phone.Controls;assembly=Microsoft.Phone.Controls"
xmlns:d="http://schemas.microsoft.com/expression/blend/2008"
xmlns:mc="http://schemas.openxmlformats.org/markup-compatibility/2006"
xmlns:toolkit="clr-namespace:Microsoft.Phone.Controls;assembly=Microsoft.Phone.Controls.Toolkit"
mc:Ignorable="d" d:DesignWidth="480" d:DesignHeight="768"
d:DataContext="{d:DesignData SampleData/MainViewModelSampleData.xaml}"
FontFamily="{StaticResource PhoneFontFamilyNormal}"
FontSize="{StaticResource PhoneFontSizeNormal}"
Foreground="{StaticResource PhoneForegroundBrush}"
SupportedOrientations="PortraitOrLandscape" Orientation="Portrait" ■(1)
shell:SystemTray.IsVisible="True">
<toolkit:TransitionService.NavigationInTransition> ■(2)
<toolkit:NavigationInTransition>
<toolkit:NavigationInTransition.Backward>
<toolkit:TurnstileTransition Mode="BackwardIn"/>
</toolkit:NavigationInTransition.Backward>
<toolkit:NavigationInTransition.Forward>
<toolkit:TurnstileTransition Mode="ForwardIn"/>
</toolkit:NavigationInTransition.Forward>
</toolkit:NavigationInTransition>
</toolkit:TransitionService.NavigationInTransition>
<toolkit:TransitionService.NavigationOutTransition>
<toolkit:NavigationOutTransition>
<toolkit:NavigationOutTransition.Backward>
<toolkit:TurnstileTransition Mode="BackwardOut"/>
</toolkit:NavigationOutTransition.Backward>
<toolkit:NavigationOutTransition.Forward>
<toolkit:TurnstileTransition Mode="ForwardOut"/>
</toolkit:NavigationOutTransition.Forward>
</toolkit:NavigationOutTransition>
</toolkit:TransitionService.NavigationOutTransition>
<phone:PhoneApplicationPage.Resources>
<DataTemplate x:Key="ListBoxTemplate"> ■(3)
<StackPanel>
<TextBlock Text="{Binding タイトル}" />
<Image Width="320" Height="240" Source="{Binding 画像名}" Margin="10"/>
</StackPanel>
</DataTemplate>
</phone:PhoneApplicationPage.Resources>
<!--LayoutRoot is the root grid where all page content is placed-->
<Grid x:Name="LayoutRoot" Background="Transparent">
<!--Pivot Control-->
<controls:Pivot Title="APPLICATION" x:Name="Pivot1">
<!--Pivot item one-->
<controls:PivotItem Header="画像一覧"> ■(4)
<Grid>
<ListBox Height="571" HorizontalAlignment="Left" Margin="11,16,0,0" Name="ListBox1" VerticalAlignment="Top" Width="424" ItemTemplate="{StaticResource ListBoxTemplate}" /> ■(5)
</Grid>
</controls:PivotItem>
<!--Pivot item two-->
<controls:PivotItem Header="個人情報"> ■(6)
<ListBox Height="Auto" HorizontalAlignment="Left" Name="ListBox2" Width="454" FontFamily="Portable User Interface" FontSize="40" />
</controls:PivotItem>
<controls:PivotItem Header="My Favorite Site"> ■(7)
<ListBox Height="Auto" HorizontalAlignment="Left" Name="ListBox3" Width="454" FontFamily="Portable User Interface" FontSize="40" />
</controls:PivotItem>
</controls:Pivot>
</Grid>
~コード略~
</phone:PhoneApplicationPage>
|
| 図7:リスト2を設定して表示されるMainPage.xamlのデザイン画面。表示はされてないが、横に「個人情報」、「My Favorite Site」画面が続いている(クリックで拡大) |
Windows Phone Portrait Page(ImageComment.xaml)の追加
VS2010メニューの「プロジェクト(P)/新しい項目の追加(W)」と選択して、「Windows Phone Portrait Page」を追加します。「名前(N)」には、ImageComment.xamlと指定します(図8)。画像と説明を表示するページです。
|
| 図8:「Windows Phone Portrait Page」を追加する(クリックで拡大) |
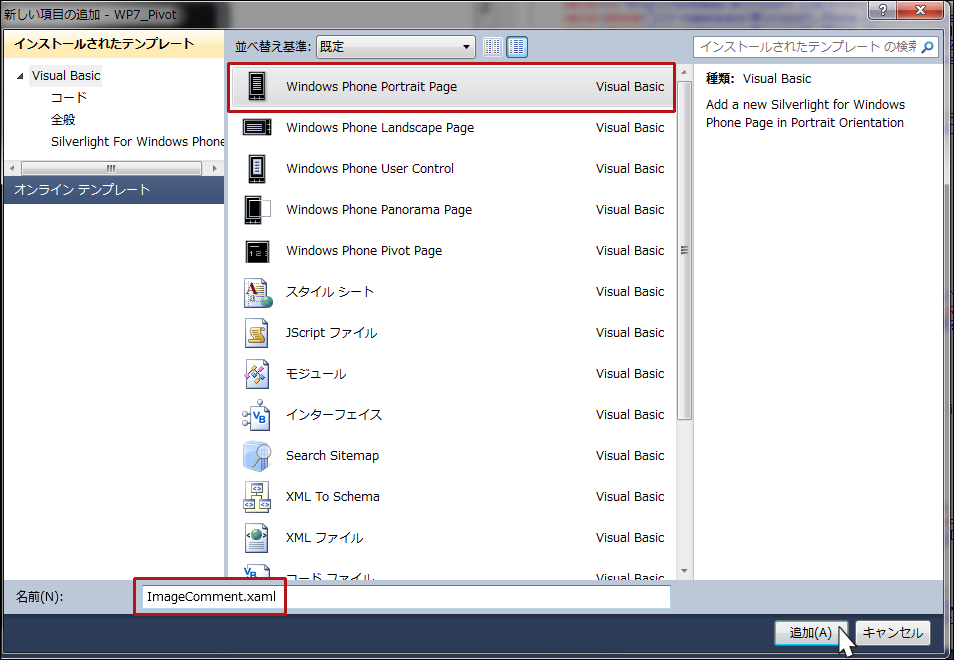
図8から[追加(A)]ボタンをクリックして表示されるエミュレーターデザイン画面上に、ツールボックスからListBoxコントロールを1個配置します。ListBoxコントロールのWidthとHeightにはAutoを指定します。
「ピボットページを作成する(前編)」サンプルプログラム
You don't have access to download this file.
この記事をシェアしてください
関連記事
バックナンバー
この記事の筆者

筆者の人気記事
Think ITでは、技術情報が詰まったメールマガジン「Think IT Weekly」の配信サービスを提供しています。メルマガ会員登録を済ませれば、メルマガだけでなく、さまざまな限定特典を入手できるようになります。
