コントロールのレイアウト(MainPage.xaml)
コントロールのレイアウト(MainPage.xaml)
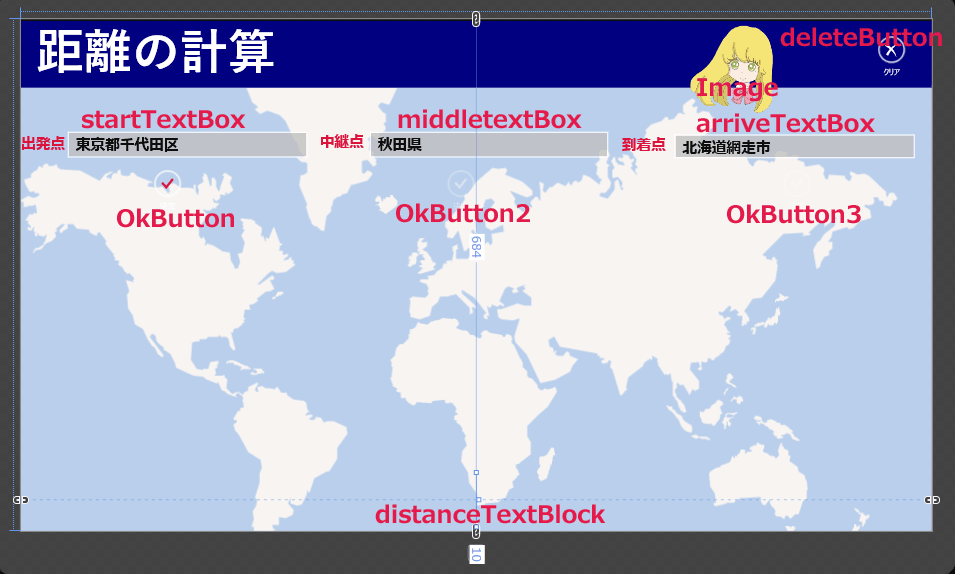
ツールボックスからデザイン画面上に、各コントロールを配置します。
書き出されるXAMLコードはリスト1のようになります。
リスト1 書き出されたXAMLコード(MainPage.xaml)
(1)Mapsという名前空間を定義しています。
(2)Grid要素全体をViewBox要素で囲みます。ViewBox要素は、伸縮およびスケーリングを実行して単一の子を使用可能な領域全体に引き伸ばすことができるコンテンツ・デコレータを定義します。
(3)「myMap」という名前のMaps:Map要素を配置し、[Credentials]プロパティに「Bing Maps Account Centerで取得したBing Maps Key」を指定します。Bing Maps Keyの取得方法は後述しています。
(4)StackPanel要素を配置し、Orientationプロパティに「Horizontal」と指定します。背景色(Background)には「Navy」と指定します。その子要素として、タイトルを表示するTextBlock要素を配置し、キャラクタに音声を喋らすための、名前が「MediaElement1」というMediaElement要素を時配置します。
(5)「出発点」の項目名となるTextBlock要素を配置します。次に「satrtTextBox」という名前のTextBox要素を配置します。Textプロパティにはあらかじめ適当な住所を入力しています。
(6)「到達点」の項目名となるTextBlock要素を配置します。次に「arriveTextBox」という名前のTextBox要素を配置します。Textプロパティにはあらかじめ適当な住所を入力しています。
(7)「中継点」の項目名となるTextBlock要素を配置します。次に「middleTextBox」という名前のTextBox要素を配置します。Textプロパティにはあらかじめ適当な住所を入力しています。
(8)AppbarButton要素を3個配置し、名前に「OkButton」、「OkButton2」、「OkButton3」と指定します。Iconプロパティに「Accept」、Labelプロパティに「決定」と指定します。「OkButton2」、「OkButton3」は、最初の状態では使用不可としておきます。
(9)もう1個AppBarButton要素を配置し、名前には「deleteButton」と付けています。Iconプロパティに「Clear」、Labelプロパティに「クリア」と指定しています。
(10)「出発点」から「到達点」までの距離を表示する、「distanceTextBlock」という名前のTextBlock要素を配置します。
(11)キャラクタを表示するImage要素を配置し、Sourceプロパティにソリューション・エクスプローラー内のImageフォルダ内にあるsyoko5.pngを指定しておきます。
以上、すべてをレイアウトしたのが図7になります。
<Page
  xmlns="http://schemas.microsoft.com/winfx/2006/xaml/presentation"
  xmlns:x="http://schemas.microsoft.com/winfx/2006/xaml"
  xmlns:local="using:TheDistanceBetweenTwoPoints_VS2013"
  xmlns:d="http://schemas.microsoft.com/expression/blend/2008"
  xmlns:mc="http://schemas.openxmlformats.org/markup-compatibility/2006"
  xmlns:Maps="using:Bing.Maps"■(1)
  x:Class="TheDistanceBetweenTwoPoints_VS2013.MainPage"
  mc:Ignorable="d">
  <Viewbox>■(2)
    <Grid Background="{ThemeResource ApplicationPageBackgroundThemeBrush}">
      <Maps:Map HorizontalAlignment="Left" Height="668" Margin="0,100,0,0" VerticalAlignment="Top" Width="1366" Credentials="Bing Maps Account Centerで取得したBing Maps Key" x:Name="myMap" />■(3)
      <StackPanel HorizontalAlignment="Left" Height="100" Margin="0,3,0,0" VerticalAlignment="Top" Width="1366" Background="Navy" Orientation="Horizontal">■(4)
        <TextBlock HorizontalAlignment="Left" Height="98" Margin="22,0,0,0" TextWrapping="Wrap" Text="距離の計算" Width="384" FontFamily="Yu Gothic" FontSize="72" FontWeight="Bold"/>■(4)
        <MediaElement HorizontalAlignment="Left" Height="3" Margin="654,0,0,0" Width="4" x:Name="MediaElement1"/>■(4)
      </StackPanel>■(4)
      <TextBlock HorizontalAlignment="Left" Height="42" Margin="0,172,0,0" TextWrapping="Wrap" Text="出発点" VerticalAlignment="Top" Width="112" FontFamily="Meiryo UI" FontSize="22" FontWeight="Bold" Foreground="Crimson"/>■(5)
      <TextBox x:Name="startTextBox" HorizontalAlignment="Left" Height="39" Margin="70,169,0,0" TextWrapping="Wrap" VerticalAlignment="Top" Width="360" FontFamily="Meiryo UI" FontSize="22" FontWeight="Bold" Text="東京都千代田区" Background="Silver"/>■(5)
      <TextBlock HorizontalAlignment="Left" Height="39" Margin="901,173,0,0" TextWrapping="Wrap" Text="到着点" VerticalAlignment="Top" Width="79" FontFamily="Meiryo UI" FontSize="22" FontWeight="Bold" Foreground="Crimson"/>■(6)
      <TextBox x:Name="arriveTextBox" HorizontalAlignment="Left" Height="36" Margin="980,173,0,0" TextWrapping="Wrap" VerticalAlignment="Top" Width="361" FontFamily="Meiryo UI" FontSize="22" FontWeight="Bold" Text="北海道網走市" Background="Silver"/>■(6)
      <TextBlock HorizontalAlignment="Left" Height="42" TextWrapping="Wrap" Text="中継点" VerticalAlignment="Top" Width="112" FontFamily="Meiryo UI" FontSize="22" FontWeight="Bold" Foreground="Crimson" Margin="448,169,0,0"/>■(7)
      <TextBox x:Name="middleTextBox" HorizontalAlignment="Left" Height="39" TextWrapping="Wrap" VerticalAlignment="Top" Width="358" FontFamily="Meiryo UI" FontSize="22" FontWeight="Bold" Text="秋田県" Background="Silver" Margin="523,169,0,0"/>■(7)
      <AppBarButton x:Name="OkButton" HorizontalAlignment="Left" Height="94" Margin="160,213,0,0" VerticalAlignment="Top" Width="120" Icon="Accept" Label="決定" Background="Black" BorderBrush="Black" Foreground="Crimson"/>■(8)
      <AppBarButton x:Name="OkButton2" HorizontalAlignment="Left" Height="103" VerticalAlignment="Top" Width="120" Icon="Accept" Label="決定" Background="Black" BorderBrush="Black" Foreground="Crimson" Margin="600,213,0,0" IsEnabled="False"/>■(8)
      <AppBarButton x:Name="OkButton3" HorizontalAlignment="Left" Height="105" VerticalAlignment="Top" Width="120" Icon="Accept" Label="決定" Background="Black" BorderBrush="Black" Foreground="Crimson" Margin="1104,213,0,0" IsEnabled="False"/>■(8)
      <AppBarButton x:Name="deleteButton"  Margin="1256,12,0,0" Icon="Clear" Label="クリア" Height="88"/>■(9)
      <TextBlock x:Name="distanceTextBlock" Margin="10,684,10,10" FontFamily="Meiryo UI" FontSize="45" Foreground="Crimson" FontWeight="Bold" HorizontalAlignment="Center"/>■(10)
      <Image HorizontalAlignment="Left" Height="131" Margin="1004,10,0,0" VerticalAlignment="Top" Width="129" Source="Image/syoko5.png"/>■(11)
    </Grid>
  </Viewbox>■(2)
</Page>
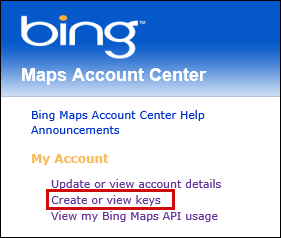
Bing Maps Keyの取得方法
Bing Mapsを使用するには下記URLのBing Maps Account Centerに行って専用のライセンスキーを取得する必要があります。
> Bing Maps Account Center
Windows Live IDを持っている方はSign Inし、持ってない方は先にWindows Live IDを作成する必要があります。筆者はIDを持っているので、Sign Inから入ると、左に「Create or View keys」のメニューがあるので、これをタップします(図8)。
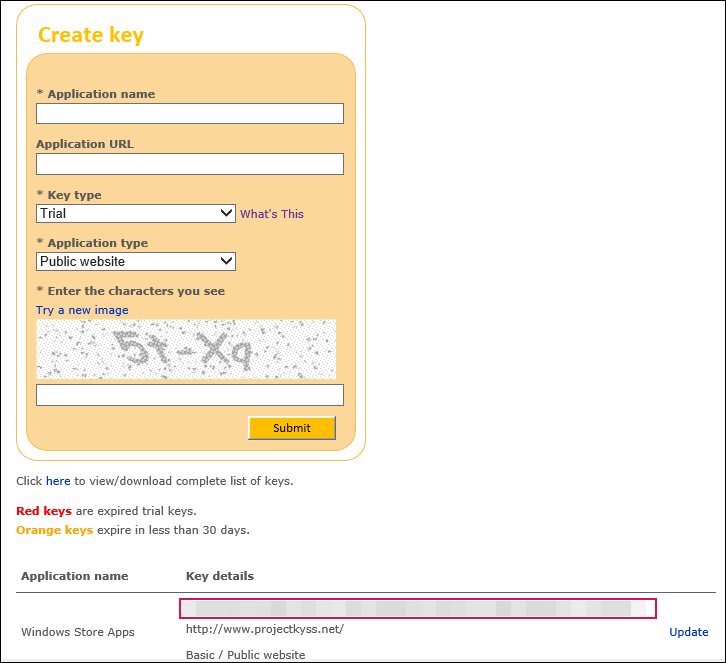
「Create key」の画面が表示されるので、必要な項目を入力してSubmitします。筆者は既にキーを持っているので、下記にキーが表示されています(図9)。Key typeはBasicとなっています。BasicでPublic websiteの場合は、「アプリケーションが制限なしに利用され、125,000 のトランザクションの任意の種類の 12 ヶ月の期間内を超えない、公開ウェブサイト。」となっているようです。このkeyをBing Mapsの中で使用します。
- この記事のキーワード
関連記事
バックナンバー
この記事の筆者

筆者の人気記事
Think ITでは、技術情報が詰まったメールマガジン「Think IT Weekly」の配信サービスを提供しています。メルマガ会員登録を済ませれば、メルマガだけでなく、さまざまな限定特典を入手できるようになります。
