郵便番号検索
郵便番号検索
郵便番号 API を使って、住所から郵便番号を検索します。
まず、このサンプルの機能の動作を下記に解説したします。
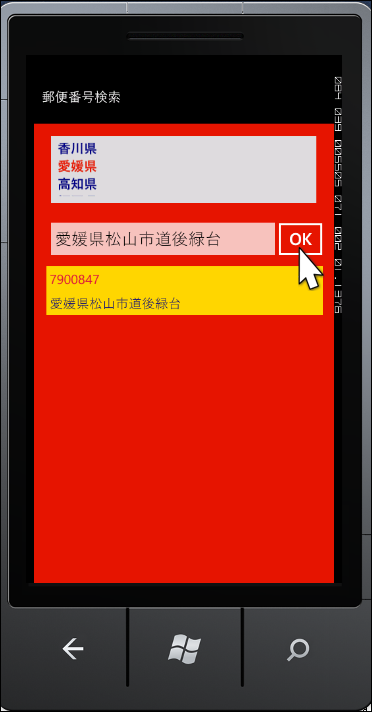
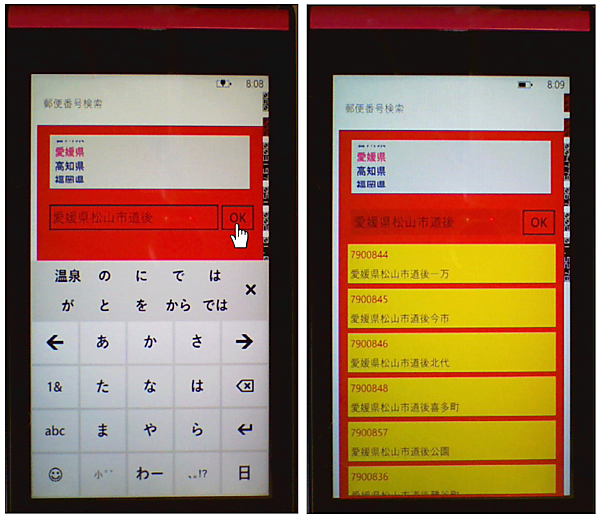
画面が表示されると、リストボックスに都道府県の一覧が表示されます。任意の都道府県を選択して、[OK]ボタンをクリックすると、該当する郵便番号が表示されます(図5)。さらに絞り込みたい場合は、入力ボックスにフォーカスを移し、入力パネルから住所を入力して、[OK]ボタンをクリックします。絞り込まれた住所の郵便番号が表示されます(図6)。
| 図5:「愛媛県」を選択して[OK]ボタンをクリックした結果(クリックで拡大) |
サンプルは以下よりダウンロードできます。
→ 「郵便番号検索」のサンプルファイル(164KB)
※サンプル実行でエラーが発生した場合は、「ソリューションのビルド」を実行後、再度、デバッグ開始を行ってください
| 図6:「愛媛県」をさらに絞り込んだ結果(クリックで拡大) |
プロジェクトの作成
VS 2010のメニューから[ファイル(F)/新規作成(N)/プロジェクト(P)]を選択します。次に、「Windows Phone アプリケーション」を選択して、「名前(N)」に任意のプロジェクト名を指定します。ここでは「PostalGuideSearch」という名前を付けています。Windows Phoneのバージョンは7.1を選択します。リスト3のXML文書ファイル(pref.xml)を追加しておきます。ダウンロードされたサンプルファイルには、これらのファイルは追加済みです。
リスト3 XML文書ファイル(pref.xml)
<?xml version="1.0"?>
<一覧>
    <都道府県>北海道</都道府県>
    <都道府県>青森県</都道府県>
    <都道府県>岩手県</都道府県>
    <都道府県>宮城県</都道府県>
    <都道府県>秋田県</都道府県>
    ~<都道府県></都道府県>繰り返し~
</一覧>
MainPage.xamlの編集とコントロールの配置
x:NameがApplicationTitleというTextBlockコントロールのTextプロパティに「郵便番号検索」と指定します。
x:NameがPageTitleというTextBlockコントロールは削除します。
ツールボックスからListBoxを2個、TextBoxを1個、Buttonを1個、図7のように配置します。Buttonコントロールは初期状態では、IsEnabledのチェックを外し、クリック不可としておきます。「都道府県」名が選択された状態で、Buttonの使用を可能とします。
ContentPanelというx:Nameの
| 図7:各種コントロールを配置した(クリックで拡大) |
書き出されるXAMLコードをリスト4のように編集します。
リスト4 編集されたXAMLコード(MainPage.xaml)
(1)<phone:PhoneApplicationPage.Resources> プロパティ要素内に配置した、<DataTemplate> 要素に、ListBoxTemplate というキー名を付け、中に <TextBlock> 要素を 4 個配置します。4 個の <TextBlock> 要素の Text プロパティには、それぞれ、「zipcode」、「prefecture」、「city」、「town」をバインドします。これは、[OK] ボタンがクリックされた時 <ListBox> 要素の ItemTemplate に適用されるテンプレートです。 ここで指定する名称はVBコード内のクラスで定義するプロパティ名です。
(2)ListBox コントロールの ItemTemplate に、ItemTemplate="{StaticResource ListBoxTemplate}" といった記述方法で、(1) の ListBoxTemplate を関連付けます。

<phone:PhoneApplicationPage
  x:Class="PostalGuideSearch.MainPage"
  xmlns="http://schemas.microsoft.com/winfx/2006/xaml/presentation"
  xmlns:x="http://schemas.microsoft.com/winfx/2006/xaml"
  xmlns:phone="clr-namespace:Microsoft.Phone.Controls;assembly=Microsoft.Phone"
  xmlns:shell="clr-namespace:Microsoft.Phone.Shell;assembly=Microsoft.Phone"
  xmlns:d="http://schemas.microsoft.com/expression/blend/2008"
  xmlns:mc="http://schemas.openxmlformats.org/markup-compatibility/2006"
  mc:Ignorable="d" d:DesignWidth="480" d:DesignHeight="768"
  FontFamily="{StaticResource PhoneFontFamilyNormal}"
  FontSize="{StaticResource PhoneFontSizeNormal}"
  Foreground="{StaticResource PhoneForegroundBrush}"
  SupportedOrientations="Portrait" Orientation="Portrait"
  shell:SystemTray.IsVisible="True" Language="ja-JP">
  <phone:PhoneApplicationPage.Resources> ■(1)
    <DataTemplate x:Key="ListBoxTemplate">
      <StackPanel Background="Gold" Margin="5">
        <TextBlock Text="{Binding zipcode}" Foreground="Crimson" Padding="5"/> ■(1)
        <StackPanel Orientation="Horizontal" Width="420" Margin="5">
          <TextBlock Text="{Binding prefecture}" Foreground="Navy"/> ■(1)
          <TextBlock Text="{Binding city}" Foreground="Navy"/> ■(1)
          <TextBlock Text="{Binding town}" Foreground="Navy"/> ■(1)
        </StackPanel>
      </StackPanel>
    </DataTemplate>
  </phone:PhoneApplicationPage.Resources>
  <!--LayoutRoot is the root grid where all page content is placed-->
  <Grid x:Name="LayoutRoot" Background="Transparent">
    <Grid.RowDefinitions>
      <RowDefinition Height="Auto"/>
      <RowDefinition Height="*"/>
    </Grid.RowDefinitions>

    <!--TitlePanel contains the name of the application and page title-->
    <StackPanel x:Name="TitlePanel" Grid.Row="0" Margin="12,17,0,28">
      <TextBlock x:Name="ApplicationTitle" Text="郵便番号検索" Style="{StaticResource PhoneTextNormalStyle}"/>
    </StackPanel>

    <!--ContentPanel - place additional content here-->
    <Grid x:Name="ContentPanel" Grid.Row="1" Margin="12,0,12,0" Background="Red">
      <ListBox Height="101" HorizontalAlignment="Left" Margin="26,19,0,0" Name="prefListBox" VerticalAlignment="Top" Width="403" Background="Gainsboro" Foreground="Navy" Padding="10" FontWeight="Bold" />
      <TextBox Height="73" HorizontalAlignment="Left" Margin="14,138,0,0" Name="TextBox1" VerticalAlignment="Top" Width="364" />
      <Button Content="OK" Height="72" HorizontalAlignment="Left" Margin="360,139,0,0" Name="Button1" VerticalAlignment="Top" Width="90" IsEnabled="False" />
      <ListBox Height="480" HorizontalAlignment="Left" Margin="14,211,0,0" Name="resultListBox" VerticalAlignment="Top" Width="430" ItemTemplate="{StaticResource ListBoxTemplate}"/> ■(2)
    </Grid>
  </Grid>
~コード略~
</phone:PhoneApplicationPage>
ソリューションエクスプローラー内のMainPage.xamlを展開して表示される、MainPage.xaml.vbをダブルクリックして、リスト5のコードを記述します。
ロジックコードを記述する
リスト5 (MainPage.xaml.vb)
Option Strict On
Imports System.Xml.Linq
Imports System.Net

AddressInfoクラス内に「zipcode」、「prefecture」、「city」、「town」のプロパティを定義しておきます。
Public Class AddressInfo
  Property zipcode As String
  Property prefecture As String
  Property city As String
  Property town As String
End Class
Partial Public Class MainPage
  Inherits PhoneApplicationPage

  ~コード略~
ページが読み込まれた時の処理
XElement.Loadメソッドで、「都道府県」名を記述したXML文書ファイル(pref.xml)を読み込みます。
文字列型の新しいリストであるprefListを作成します。
Descendantsメソッドで、子孫要素であるすべての <都道府県>要素のコレクションに対して、各要素を変数 resultに格納しながら、Addメソッドで<都道府県>要素の値を、リストであるprefListに追加していきます。
ListBox(prefListBox)のItemsSourceプロパティにprefListオブジェクトを指定します。これで、都道府県の一覧が表示されます。
  Private Sub MainPage_Loaded(sender As Object, e As System.Windows.RoutedEventArgs) Handles MyBase.Loaded
    Dim xmldoc As XElement = XElement.Load("pref.xml")
    Dim prefList As New List(Of String)

    For Each result In From c In xmldoc.Descendants("都道府県") Select c
      prefList.Add(result.Value)
    Next
    prefListBox.ItemsSource = prefList
  End Sub
都道府県から項目を選択した時の処理
入力ボックスであるTextBoxに選択した都道府県名を表示します。[OK]ボタンの使用を可能とします。
  Private Sub prefListBox_SelectionChanged(sender As Object, e As System.Windows.Controls.SelectionChangedEventArgs) Handles prefListBox.SelectionChanged
    TextBox1.Text = prefListBox.SelectedItem.ToString
    Button1.IsEnabled = True
  End Sub
[OK]ボタンがクリックされた時の処理
API へのリクエストは、検索キーワードなどの条件を下記のような URL で指定します。(REST)
Dim myUri As String = String.Format("http://api.postalcode.jp/v1/zipsearch/v1/zipsearch?word={0}&format=xml", TextBox1.Text)

wordにTextBoxに入力された値が入ります。formatにはxmlを指定します。
新しいWebClientのインスタンスmyWebClientオブジェクトを生成します。DownloadStringAsyncメソッドで、Uri として指定したリソースをダウンロードします。
AddHandler メソッドでダウンロードが完了した DownloadStringCompleted イベントに、イベントハンドラを追加します。イベントハンドラ内では、ダウンロードされた文字列としての結果 XML を、Parse メソッドで読み込みます。Descendants メソッドで、子孫要素であるすべての <address> 要素のコレクションに対して、各要素を変数 result に格納しながら、AddressInfo クラスの「zipcode」、「prefecture」、「city」、「town」プロパティに、<zipcode>、<prefecture>、<city>、<town>要素の値を指定し、AddressInfo クラスの新しいリストとして作成した、myAddressInfo オブジェクトに追加していきます。ListBox(resultListBox)のItemsSourceプロパティにmyAddressInfoオブジェクトを指定します。これで、該当する郵便番号の一覧が表示されます。
  Private Sub Button1_Click(sender As Object, e As System.Windows.RoutedEventArgs) Handles Button1.Click
    Dim myUri As String = String.Format("http://api.postalcode.jp/v1/zipsearch/v1/zipsearch?word={0}&format=xml", TextBox1.Text)
    Dim myWebClient As New WebClient
    myWebClient.DownloadStringAsync(New Uri(myUri, UriKind.Absolute))

    AddHandler myWebClient.DownloadStringCompleted, Sub(resultSender As Object, resultArgs As DownloadStringCompletedEventArgs)
      Dim xmldoc As XElement = XElement.Parse(resultArgs.Result)
      Dim myAddressInfo As New List(Of AddressInfo)
      For Each result In From c In xmldoc.Descendants("address") Select c
        With myAddressInfo
         .Add(New AddressInfo With {.zipcode = result.Element("zipcode").Value,
                                    .prefecture = result.Element("prefecture").Value,
                                    .city = result.Element("city").Value,
                                    .town = result.Element("town").Value})
        End With
      Next
        resultListBox.ItemsSource = myAddressInfo
    End Sub
  End Sub
End Class
| 図8:郵便番号検索を実機で動かしたところ(クリックで拡大) |
- この記事のキーワード


