3Dモデルに「テクスチャ」を貼って模様を付けてみよう
第12回の今回は、3Dモデルに「テクスチャ」を貼り付けてマテリアルを表示する解説をします。
2025年12月10日 6:30
はじめに
3Dポリゴンの表面に2D画像を貼ることで模様や質感を表現することができます。テクスチャはフラグメントシェーダー内でマテリアルの色を決定する仕組みです。
前回までに作成した「lib/Matrix3D.js」「lib/Model3D.js」「lib/UltraMotion3D.js」「lib/Vector3D.js」「lib/WGSL.js」「index.html」にコードを追記し、今回は図のような少女モデルをレンダリングします。少女のモデルデータ「models/StillRedGirl.js」ファイルは、こちらの「DOWNLOAD」メニューからダウンロードできる「webgpu.zip」ファイルに入っています。
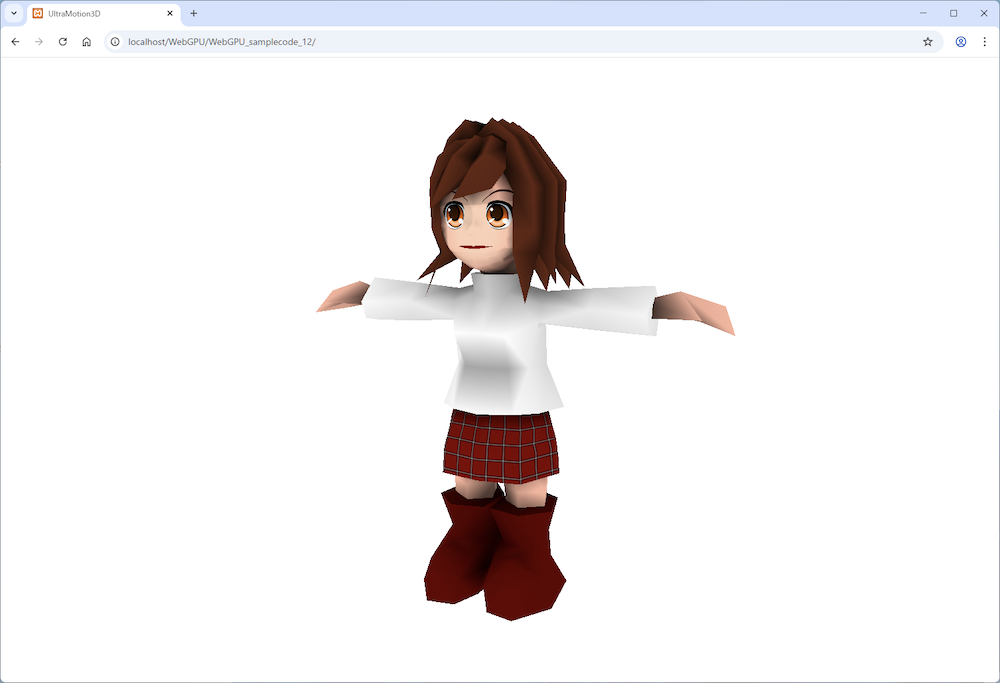
図:テクスチャを貼った少女
3Dデータからマテリアルにテクスチャを反映させる
この連載での3Dモデルのテクスチャには「0インデックスのマテリアル1個だけでテクスチャが使える」という制約があります。そのため、第11回でも少し触れたように、1つのマテリアルごとに分けてマテリアルをユニフォームバッファでシェーダーに渡した方が良いかもしれません。そうすればマテリアルごとのテクスチャを全て反映できるようになります。
Materialクラスの実装
「StillRedGirl.js」の setMaterial メソッドには、新しく texture 引数を指定できるようになっています。ただし、1つの3Dモデルを“1スキン=1マテリアル=1テクスチャ”で構成している場合に限ります。
テクスチャを使用する場合、フラグメントシェーダー側で特殊な処理を行っており、(R,G,B,A)のR成分を自己照明(emi)の値として利用するようにしています。
・サンプルコード「lib」→「Material.js」class Material {
constructor(r,g,b,a,dif,amb,emi,spc,power,texture) {
if ( texture )
this.r = emi;
else
this.r = r;
this.g = g;
this.b = b;
this.a = a;
this.dif = dif;
this.amb = amb;
this.emi = emi;
this.spc = spc;
this.power = power;
this.texture = texture;
}
setColor(r,g,b,a) {
this.r = r;
this.g = g;
this.b = b;
this.a = a;
}
}パイプラインで頂点シェーダーにマテリアルデータを渡す
テクスチャを使うシェーダーには「setPipeline」関数で引数に「WGSL.js」ファイルの「vertWGSL」「fragTextureWGSL」定数を渡して、戻り値を「_pipelineTexture」変数に代入します。パイプラインでさらにUV座標もシェーダーに渡します(テクスチャありでもなしでも)。
・サンプルコード「lib」→「UltraMotion3D.js」var _lastTime = 0;
var _elapsed = 0;
var _num = 0;
var _camera = new Matrix3D();
var _fov = 45.0;
const MAX_NUM = 10000;
const UNIFORM_BUFFER_SIZE = 4 * 16 * 4; // 4byte(float32) * 4x4 matrix * 4
const OFFSET_SIZE = UNIFORM_BUFFER_SIZE; //256の倍数
var _passEncoder = null;
async function initWebGPU(canvas) {
if (!navigator.gpu) {
throw Error('WebGPU not supported.');
}
const adapter = await navigator.gpu.requestAdapter();
if (!adapter) {
throw Error('Could not request WebGPU adapter.');
}
_device = await adapter.requestDevice();
_canvas = document.getElementById(canvas);
_context = _canvas.getContext('webgpu');
_presentationFormat = navigator.gpu.getPreferredCanvasFormat();
_context.configure({
device: _device,
format: _presentationFormat,
alphaMode: 'premultiplied',
});
_pipeline = setPipeline(vertWGSL,fragWGSL);
_pipelineTexture = setPipeline(vertWGSL,fragTextureWGSL);
_uniformBuffer = _device.createBuffer({
size: UNIFORM_BUFFER_SIZE + OFFSET_SIZE * MAX_NUM,
usage: GPUBufferUsage.UNIFORM | GPUBufferUsage.COPY_DST,
});
window.addEventListener("resize", resize, false);
resize();
init();
requestAnimationFrame(everyFrame.bind(everyFrame));
}
function setPipeline(vertexWGSL,fragmentWGSL) {
const pipeline = _device.createRenderPipeline({
layout: 'auto',
vertex: {
module: _device.createShaderModule({
code: vertexWGSL,
}),
entryPoint: 'main',
buffers: [{
attributes: [
{// position
shaderLocation: 0,
offset: 0,
format: 'float32x4',
},{// normal
shaderLocation: 1,
offset: 4*4,
format: 'float32x3',
},{// color
shaderLocation: 2,
offset: 4*(4+3),
format: 'float32x4',
},{// specular
shaderLocation: 3,
offset: 4*(4+3+4),
format: 'float32',
},{// uv
shaderLocation: 4,
offset: 4*(4+3+4+1),
format: 'float32x2',
},
],
arrayStride: 4*(4+3+4+1+2),
stepMode: "vertex",
},],
},
fragment: {
module: _device.createShaderModule({
code: fragmentWGSL,
}),
entryPoint: 'main',
targets: [// 0
{
format: _presentationFormat,
},
],
},
primitive: {
topology: 'triangle-list',
},
depthStencil: {
depthWriteEnabled: true,
depthCompare: 'less',
format: 'depth24plus',
},
});
return pipeline;
}
(中略)
async function loadTexture(texture) {
const response = await fetch(texture);
const imageBitmap = await createImageBitmap(await response.blob());
let imageTexture = _device.createTexture({
size: [imageBitmap.width, imageBitmap.height, 1],
format: 'rgba8unorm',
usage:
GPUTextureUsage.TEXTURE_BINDING |
GPUTextureUsage.COPY_DST |
GPUTextureUsage.RENDER_ATTACHMENT,
});
_device.queue.copyExternalImageToTexture(
{ source: imageBitmap },
{ texture: imageTexture },
[imageBitmap.width, imageBitmap.height]
);
return imageTexture;
}【サンプルコードの解説】
setPipeline関数の戻り値を代入して、テクスチャなしの「_pipeline」変数とテクスチャありの_pipelineTexture変数を用意します。
頂点シェーダーに渡すアトリビュートバッファ「shaderLocation」の4番にUV座標を追加します。オフセットはfloat32の4*(頂点の4個と法線の3個と色の4個と反射光の1個)です。
「loadTexture」関数で画像ファイルからテクスチャを作成します。
頂点シェーダーに色など頂点ごとのデータを渡す
setMaterialメソッドにはテクスチャ用のtexture引数を追加しています。setVメソッドでは頂点に対応するUV座標(u, v)を受け取れるようにし、setIメソッドではvertices配列にそのUV座標を追加します。
さらに、initTextureメソッドでテクスチャを使用する場合は、サンプラーとテクスチャをシェーダーへ渡す処理を行います。
・サンプルコード「lib」→「Model3D.js」class Model3D {
constructor() {
(中略)
}
setMaterial(r,g,b,a,dif,amb,emi,spc,power,texture) {
this.materials.push(new Material(r,g,b,a,dif,amb,emi,spc,power,texture));
}
setV(x,y,z,nx=0,ny=0,nz=1,material=0,u=0,v=0) {
this.preVertices.push(x,y,z,nx,ny,nz,material,u,v);
}
setI(i0,i1,i2) {
var indices = [];
indices.push(i0,i1,i2);
for ( let i = 0; i < indices.length; i++ ) {
const j = indices[i];
const x = this.preVertices[j*9 ];
const y = this.preVertices[j*9+1];
const z = this.preVertices[j*9+2];
const nx = this.preVertices[j*9+3];
const ny = this.preVertices[j*9+4];
const nz = this.preVertices[j*9+5];
const m = this.preVertices[j*9+6];
const r = this.materials[m].r;
const g = this.materials[m].g;
const b = this.materials[m].b;
const a = this.materials[m].a;
const s = this.materials[m].spc;
const u = this.preVertices[j*9+7];
const v = this.preVertices[j*9+8];
this.vertices.push(x,y,z,1,nx,ny,nz,r,g,b,a,s,u,v);
}
}
initBuffers() {
this.vertexArray = new Float32Array(this.vertices);
this.verticesBuffer = _device.createBuffer({
size: this.vertexArray.byteLength,
usage: GPUBufferUsage.VERTEX,
mappedAtCreation: true,
});
new Float32Array(this.verticesBuffer.getMappedRange()).set(this.vertexArray);
this.verticesBuffer.unmap();
if ( this.materials[0].texture ) this.initTexture();
else this.init();
}
async init() {
this.uniformBindGroup = _device.createBindGroup({
layout: _pipeline.getBindGroupLayout(0),
entries: [
{
binding: 0,
resource: {
buffer: _uniformBuffer,
offset: OFFSET_SIZE*this.num,
size: UNIFORM_BUFFER_SIZE,
},
},
],
});
}
async initTexture() {
let imageTexture = await loadTexture(this.materials[0].texture);
const sampler = _device.createSampler({
magFilter: 'linear',
minFilter: 'linear',
});
this.uniformBindGroup = _device.createBindGroup({
layout: _pipelineTexture.getBindGroupLayout(0),
entries: [
{
binding: 0,
resource: {
buffer: _uniformBuffer,
offset: OFFSET_SIZE*this.num,
size: UNIFORM_BUFFER_SIZE,
},
},{
binding: 1,
resource: sampler,
},{
binding: 2,
resource: imageTexture.createView(),
},
],
});
}
getVertexCount() {
return ~~(this.vertexArray.length/14);
}
draw(passEncoder) {
if (this.uniformBindGroup) {
if ( this.materials[0].texture ) _passEncoder.setPipeline(_pipelineTexture);
else _passEncoder.setPipeline(_pipeline);
this.setTransform();
_passEncoder.setBindGroup(0,this.uniformBindGroup);
_passEncoder.setVertexBuffer(0,this.verticesBuffer);
_passEncoder.draw(this.getVertexCount());
}
}
(中略)
addRotateX(delta) {
this.rotate.addX(delta * _elapsed);
}
addRotateY(delta) {
this.rotate.addY(delta * _elapsed);
}
addRotateZ(delta) {
this.rotate.addZ(delta * _elapsed);
}
}【サンプルコードの解説】
setMaterialメソッドでmaterials配列にtextureも追加したMaterialクラスのインスタンスを生成して追加します。
setVメソッドでpreVertices配列に(u,v)引数も追加します。
setIメソッドでvertices配列にpreVertices配列から取得した(u,v)変数も追加します。
「initBuffers」メソッドでマテリアルの0インデックスにテクスチャがあればinitTextureメソッドを呼び出し、なければ「init」メソッドを呼び出します。
initTextureメソッドでテクスチャを読み込んでサンプラーを作成し、グループ0のバインディング0にユニフォームバッファを、バインディング1にサンプラーを、バインディング2にテクスチャイメージをバインド(結ぶ)します。
getVertexCountメソッドは、vertexArrayの要素数を1頂点あたりのデータ数(位置4・法線3・色4・反射光1・UV2の合計14)で除算した値を頂点数として返します。
drawメソッドでテクスチャがある場合は_piplelineTexture変数をパイプラインにセットし、ない場合は_pipeline変数をパイプラインにセットします。
「addRotateX」「addRotateY」「addRotateZ」は1秒間にdelta引数だけ回転させます。
頂点シェーダーとフラグメントシェーダー
今回追記するシェーダーは第8回でコーディングしたテクスチャを使ったコードそのままなので、ここでは解説しません。「UltraMotion3D」ライブラリでは、テクスチャなし用のfragWGSLと、テクスチャあり用のfragTextureWGSLの両方が必要になります。
・サンプルコード「lib」→「WGSL.js」const vertWGSL = `
struct Uniforms {
projectionMatrix : mat4x4f,
viewMatrix : mat4x4f,
worldMatrix : mat4x4f,
normalMatrix : mat4x4f,
}
@group(0) @binding(0) var<uniform> uniforms : Uniforms;
struct VertexOutput {
@builtin(position) position : vec4f,
@location(0) normal : vec3f,
@location(1) color : vec4f,
@location(2) specular : f32,
@location(3) uv : vec2f
}
@vertex
fn main(
@location(0) position: vec4f,
@location(1) normal: vec3f,
@location(2) color: vec4f,
@location(3) specular: f32,
@location(4) uv : vec2f
) -> VertexOutput {
var output : VertexOutput;
output.position = uniforms.projectionMatrix *
uniforms.viewMatrix * uniforms.worldMatrix * position;
output.normal = (uniforms.normalMatrix * vec4f(normal,1)).xyz;
output.color = color;
output.specular = specular;
output.uv = uv;
return output;
}
`;
const fragWGSL = `
struct VertexOutput {
@builtin(position) position : vec4f,
@location(0) normal : vec3f,
@location(1) color : vec4f,
@location(2) specular : f32,
@location(3) uv : vec2f
}
@fragment
fn main(fragData: VertexOutput) -> @location(0) vec4f {
var lightDirection = normalize(vec3f(-1.0,-2.0,-4.0));
var normal = normalize(fragData.normal);
var diffuseLightWeighting = (1+dot(normal,lightDirection))/2;
var reflect = normalize(2.0*diffuseLightWeighting*normal-lightDirection);
var spc = pow(clamp(dot(reflect,lightDirection),0.0,1.0),5.0);
var specular = vec4(fragData.specular,fragData.specular,fragData.specular,1);
var color = fragData.color*clamp(diffuseLightWeighting,0.0,1.0)+spc*specular;
return vec4f(color.rgb,1.0);
}
`;
const fragTextureWGSL = `
@group(0) @binding(1) var mySampler : sampler;
@group(0) @binding(2) var myTexture : texture_2d<f32>;
struct VertexOutput {
@builtin(position) position : vec4f,
@location(0) normal : vec3f,
@location(1) color : vec4f,
@location(2) specular : f32,
@location(3) uv : vec2f
}
@fragment
fn main(fragData: VertexOutput) -> @location(0) vec4f {
var lightDirection = normalize(vec3f(-1.0,-2.0,-4.0));
var normal = normalize(fragData.normal);
var diffuseLightWeighting = (1+dot(normal,lightDirection))/2;
var texColor = textureSample(myTexture, mySampler, fragData.uv);
var emi = fragData.color.r;
var reflect = normalize(2.0*diffuseLightWeighting*normal-lightDirection);
var spc = pow(clamp(dot(reflect,lightDirection),0.0,1.0),5.0);
var specular = vec4(fragData.specular,fragData.specular,fragData.specular,1);
var color = texColor*clamp(emi+diffuseLightWeighting,0.0,1.0)+spc*specular;
return vec4f(color.rgb,1.0);
}
`;実行ファイルindex.htmlファイル
それでは、次のサンプルコードを入力して「Google Chrome」で「index.html」を実行してみましょう。テクスチャファイルを読み込むには、第3回で解説したように「XAMPP」でローカルサーバーを起動しておく必要があります。テクスチャが貼られた少女モデルが表示されれば成功です。
・サンプルコード「index.html」<!DOCTYPE html>
<html lang="ja">
<head>
<meta charset="UTF-8">
<title>UltraMotion3D</title>
<meta name="viewport" content="width=device-width">
<script src="lib/Material.js"></script>
<script src="lib/Vector3D.js"></script>
<script src="lib/Matrix3D.js"></script>
<script src="lib/Model3D.js"></script>
<script src="lib/WGSL.js"></script>
<script src="lib/UltraMotion3D.js"></script>
<script src="models/StillRedGirl.js"></script>
<script type="text/javascript">
var _model;
var _pos = new Vector2D(0,0);
var _click = false;
function init() {
_model = new StillRedGirl();
document.onmousedown = onMouseDown;
document.onmousemove = onMouseMove;
document.onmouseup = onMouseUp;
document.oncontextmenu = function () { return false; }
}
function draw() {
_camera.lookAt(new Vector3D(0,150,500),new Vector3D(0,150,0),new Vector3D(0,1,0))
_model.draw();
}
function onMouseDown(event) {
_pos = getPos(event);
_click = true;
}
function onMouseMove(event) {
if ( _click ) {
pos = getPos(event);
_model.rotate.addX(pos.y-_pos.y);
_model.rotate.addY(pos.x-_pos.x);
_pos = pos;
}
}
function onMouseUp(event) {
_click = false;
}
</script>
</head>
<body onload='initWebGPU("CanvasAnimation");'>
<canvas id="CanvasAnimation" width="1500" height="900"></canvas>
</body>
</html>【サンプルコードの解説】
<script>タグで「models/StillRedGirl.js」ファイルを読み込みます。StillRedGirl.jsのRedGirl.jpgテクスチャはindex.htmlから見てmodelsフォルダにあるので、setMaterialメソッドのtexture引数は“models/RedGirl.jpg”です。
「new StillRedGirl()」で少女モデルのインスタンスを生成して「_model」変数に代入します。
今さらですが、この連載の内容は「Linux(筆者の環境はUbuntu 24.04)」の「Google Chrome」でも「WebGPU」をテストしました。UbuntuのGoogle Chromeではデフォルトで「Vulkan」とWebGPUがオンになっていません。VulkanツールとVulkanドライバーをインストールして、Google ChromeでVulkanとWebGPUを「Enabled」にするとサンプルが実行できます。
おわりに
今回は、少女の3Dモデルにテクスチャ画像の模様を貼ってキャラクターを表示しました。
次回は、骨を曲げると肉が動くような「ボーン」機能について解説します。
この記事をシェアしてください
バックナンバー
この記事の筆者
筆者の人気記事
Think ITでは、技術情報が詰まったメールマガジン「Think IT Weekly」の配信サービスを提供しています。メルマガ会員登録を済ませれば、メルマガだけでなく、さまざまな限定特典を入手できるようになります。
