Windows Phone Tips集 第2弾
第3回
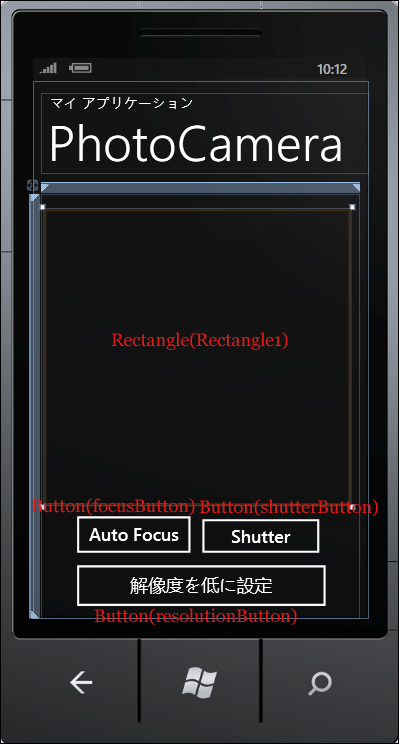
MainPage.xamlの編集とコントロールの追加
MainPage.xamlの編集とコントロールの追加
x:NameがPageTitleというTextBlockのTextプロパティにPhotoCameraと指定します。
ツールボックスからRectangleコントロールを1個と、Buttonコントロールを3個配置します。
書き出されるXAMLコードをリスト1のように編集します。
リスト1 編集されたXAMLコード(MainPage.xaml)
(1)<Rectangle.RenderTransform>プロパティ要素内に<CompositeTransform>要素を配置します。この要素は、1 つのオブジェクトに複数の異なる変換を適用することができる要素です。CenterXとCenterYプロパティにはRectangleコントロールのWidthとHeightの約半分のサイズを指定します。CenterXプロパティでは、CompositeTransform で指定された、全ての変換の中心点の x 座標を設定します。CenterYプロパティでは、CompositeTransform で指定された、全ての変換の中心点の y 座標を設定します。回転を表すRotationに90を指定します。カメラを縦向きで撮った画像もデフォルトでは横向きに表示されるため、90度回転して縦向きに表示されるようにしています。
(2)<Rectangle.Fill>プロパティ要素内に<VideoBrush>要素を配置し、x:NameにmyVideoBrushと指定します。この<VideoBrush>要素内に被写体が表示されます。<VideoBrush>要素は、ビデオ コンテンツで領域を塗りつぶす要素です。

<phone:PhoneApplicationPage
  x:Class="WP71_PhotoCamera.MainPage"
  xmlns="http://schemas.microsoft.com/winfx/2006/xaml/presentation"
  xmlns:x="http://schemas.microsoft.com/winfx/2006/xaml"
  xmlns:phone="clr-namespace:Microsoft.Phone.Controls;assembly=Microsoft.Phone"
  xmlns:shell="clr-namespace:Microsoft.Phone.Shell;assembly=Microsoft.Phone"
  xmlns:d="http://schemas.microsoft.com/expression/blend/2008"
  xmlns:mc="http://schemas.openxmlformats.org/markup-compatibility/2006"
  mc:Ignorable="d" d:DesignWidth="480" d:DesignHeight="768"
  FontFamily="{StaticResource PhoneFontFamilyNormal}"
  FontSize="{StaticResource PhoneFontSizeNormal}"
  Foreground="{StaticResource PhoneForegroundBrush}"
  SupportedOrientations="Portrait" Orientation="Portrait"
  shell:SystemTray.IsVisible="True">

  <!--LayoutRoot は、全てのページ コンテンツが配置されるルート グリッドです-->
  <Grid x:Name="LayoutRoot" Background="Transparent">
    <Grid.RowDefinitions>
      <RowDefinition Height="Auto"/>
      <RowDefinition Height="*"/>
    </Grid.RowDefinitions>

    <!--TitlePanel は、アプリケーション名とページ タイトルを格納します-->
    <StackPanel x:Name="TitlePanel" Grid.Row="0" Margin="12,17,0,28">
      <TextBlock x:Name="ApplicationTitle" Text="マイ アプリケーション" Style="{StaticResource PhoneTextNormalStyle}"/>
      <TextBlock x:Name="PageTitle" Text="PhotoCamera" Margin="9,-7,0,0" Style="{StaticResource PhoneTextTitle1Style}"/>
    </StackPanel>

    <!--ContentPanel - 追加コンテンツをここに入力します-->
    <Grid x:Name="ContentPanel" Grid.Row="1" Margin="12,0,12,0">
      <Rectangle Height="437" HorizontalAlignment="Left" Margin="13,15,0,0" Name="Rectangle1" Stroke="Black" StrokeThickness="1" VerticalAlignment="Top" Width="423">
        <Rectangle.RenderTransform> ■(1)
          <CompositeTransform Rotation="90" CenterX="211" CenterY="218"/> ■(1)
        </Rectangle.RenderTransform>
        <Rectangle.Fill> ■(2)
          <VideoBrush x:Name="myVideoBrush"/> ■(2)
        </Rectangle.Fill>
      </Rectangle>
      <Button Content="Auto Focus" Height="76" HorizontalAlignment="Left" Margin="39,449,0,0" Name="focusButton" VerticalAlignment="Top" Width="186" />
      <Button Content="Shutter" Height="72" HorizontalAlignment="Left" Margin="218,453,0,0" Name="shutterButton" VerticalAlignment="Top" Width="191" />
      <Button Content="解像度を低に設定" Height="82" HorizontalAlignment="Left" Margin="39,519,0,0" Name="resolutionButton" VerticalAlignment="Top" Width="379" />
    </Grid>
  </Grid>

  <!--ApplicationBar の使用法を示すサンプル コード-->
 ~コード略~
</phone:PhoneApplicationPage>
配置図は図3のようになります。
|
|
| 図3:各コントロールを配置した(クリックで拡大) |
次に、MainPage.xamlを展開して表示される、MainPage.xaml.vbをダブルクリックしてリスト2のコードを記述します。
ロジックコードを記述する
リスト2 (MainPage.xaml.vb)
Option Strict On

Windows Phoneのデバイスのハードウェアに関連する情報が含まれているMicrosoft.Devices名前空間をインポートします。今回使用するPhotoCameraクラスは、この名前空間に属しています。
Imports Microsoft.Devices

仮想ファイルシステムを作成および使用するための型が含まれている、System.IO.IsolatedStorage名前空間をインポートします。分離ストレージによって、安全なクライアント側のストレージが提供されます。
Imports System.IO.IsolatedStorage

Imports System.Windows.Media.Imaging

曲、アルバム、再生リスト、およびピクチャを列挙、再生、および表示するためのクラスの含まれる、Microsoft.Xna.Framework.Media名前空間をインポートします。ピクチャへのアクセスを提供するMediaLibrayクラスを使用するため、この名前空間のインポートが必要です。
Imports Microsoft.Xna.Framework.Media

Imports System.IO
Partial Public Class MainPage
  Inherits PhoneApplicationPage

  ' コンストラクター
  Public Sub New()
    InitializeComponent()
  End Sub

PhotoCameraクラス用メンバ変数myPhotoCameraを宣言します。PhotoCameraクラスは、Windows Phoneの静止したカメラ・アプリケーションの基本的なカメラ機能を提供するクラスです。イメージのキャプチャ、フォーカス、解像度、およびフラッシュ・モードなどの機能を構成するためのメンバが含まれています。また、カメラの焦点、イメージのキャプチャ、イメージの可用性のイベントを提供します。
  Dim myPhotoCamera As PhotoCamera

Sharedキーワードで数値型のメンバ変数counterを宣言します。このcounterの値をJPEGファイル名とします。1.jpg、2.jpg・・・・といった具合になります。
  Shared counter As Integer = 0
ページがアクティブになった時呼び出されるメソッド
新しいPhotoCameraのインスタンスmyPhotoCameraオブジェクトを生成します。
AddHandlerステートメントで、カメラ オブジェクトが初期化された時に発生する、Initializedイベントにイベントハンドラを追加します。Succeededプロパティで、カメラ操作が失敗した時は処理を抜けます。
キャプチャ シーケンスが完了すると発生するCaptureCompletedイベントで、myPhotoCamera_CaptureCompletedを実行します。また、イメージが利用可能な場合に発生する、CaptureImageAvailableイベントで、myPhotoCamera_CaptureImageAvailableを実行します。
SetSourceメソッドで、PhotoCameraのキャプチャソースを使用して、VideoBrushのソースを設定します。
  Protected Overrides Sub OnNavigatedTo(e As System.Windows.Navigation.NavigationEventArgs)
    myPhotoCamera = New PhotoCamera
    AddHandler myPhotoCamera.Initialized, Sub(cameraSender As Object, cameraArgs As CameraOperationCompletedEventArgs)
                                          If cameraArgs.Succeeded = False Then Exit Sub
                                      End Sub

    AddHandler myPhotoCamera.CaptureCompleted, AddressOf myPhotoCamera_CaptureCompleted
    AddHandler myPhotoCamera.CaptureImageAvailable, AddressOf myPhotoCamera_CaptureImageAvailable

    myVideoBrush.SetSource(myPhotoCamera)

    MyBase.OnNavigatedTo(e)
  End Sub
「カメラで写した写真をカメラロールに保存する」サンプルプログラム
You don't have access to download this file.
- この記事のキーワード
関連記事
バックナンバー
この記事の筆者

筆者の人気記事
Think ITでは、技術情報が詰まったメールマガジン「Think IT Weekly」の配信サービスを提供しています。メルマガ会員登録を済ませれば、メルマガだけでなく、さまざまな限定特典を入手できるようになります。
