ASP.NETページの作成(TileNotification_NET)
ASP.NETページの作成(TileNotification_NET)
VS2010のメニューから、「ファイル(F)/新規作成(N)/Webサイト(W)」と選択し、表示される画面から「ASP.NET Webサイト」を選択します。「webの場所(L)」に今回は「フォルダ名\TileNotification_NET」と指定し[OK]ボタンをクリックします。
ソリューションエクスプローラー内のDefault.aspxを展開して表示される、Default.aspx.vbにリスト2のコードを記述します。
ロジックコードを記述する
リスト2 (Default.aspx.vb)
Option Strict On
Imports System.IO
Partial Class _Default
  Inherits System.Web.UI.Page
ページが読み込まれた時の処理
サーバー上の物理パスを指定します。
StreamReaderクラスで、POSTされたデータ(Request.InputStream)を取得します。StreamReaderクラスは、特定のエンコーディングのバイトストリームを読み込むTextReader を実装するクラスです。
取得したデータの内容をReadToEndメソッドで読み取り、変数readStrに格納しておきます。
フォルダ名とファイル名(channerlUri.txt)を指定して、読み取ったデータをStreamWriterクラスのWriteメソッドで書き込みます。StreamWriterクラスは、文字を特定のエンコーディングでストリームに書き込むための TextWriterを実装するクラスです。
channerlUri.txtにWindows Phoneから送信されたチャネルURIが保存されます。この保存されたデータを、これ以降で作成するWPFのプログラムから読み込みます。
  Private Sub Page_Load(sender As Object, e As System.EventArgs) Handles Me.Load
    Dim filePath As String = Server.MapPath("./")
    Dim reader As New StreamReader(Me.Request.InputStream(), System.Text.Encoding.UTF8)
    Dim readStr As String = reader.ReadToEnd
    Dim writer As StreamWriter = New StreamWriter(filePath & "SaveData/" & "channelUri.txt", False, System.Text.Encoding.UTF8)
    writer.Write(readStr)
    reader.Close()
    writer.Close()
    Response.Flush()
  End Sub
End Class
通知チャネルを取得してタイルのUI情報を送信するWPFプログラム
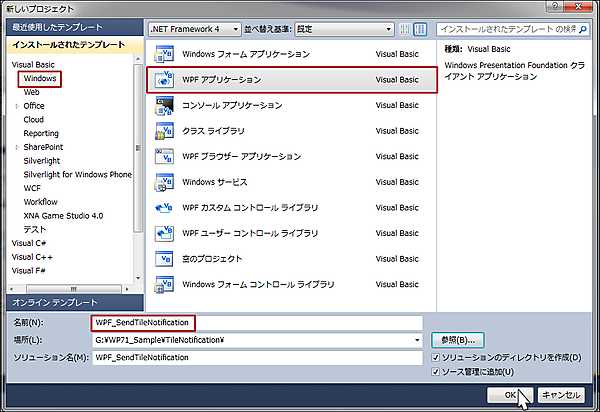
VS2010メニューから「ファイル(F)/新規作成(N)/プロジェクト(P) 」と選択し、「インストールされたテンプレート」から、「Windows」を選択します。右に表示されるパネルから「WPFアプリケーション」を選択します。「名前(N)」に「WPF_SendTileNotification」と指定し、[OK]ボタンをクリックします(図4)。
| 図4:WPFアプリケーションを選択する(クリックで拡大) |
コントロールのレイアウト
まず、Windowのプロパティから[レイアウト]パネルにあるWidthに773、Heightに563と指定します。この値は自由に設定してください。
次に、ツールボックスからMainWindow.xamlのデザイン画面上に、TextBlockを4個、ListBoxを1個、TextBoxを3個、Buttonを1個配置します。各コントロールの配置とNameは図5を参照してください。
ソリューションエクスプローラー内の「WPF_SendTileNotification」の直下にImageというフォルダを作成して、PNG画像を追加しておきます。このPNG画像のプロパティの「ビルドアクション」はデフォルト(Resource)のままで構いません。
次にbin\Debug\フォルダ内にリスト3のXML文書ファイル(ImageInfo.xml)を配置しておきます。bin\Debug\フォルダは、ソリューションエクスプローラー内の「すべてのファイルを表示」アイコンをクリックすると表示されます。
ダウンロードしたファイルには、PNG画像やXML文書ファイルは追加済みです。
| 図5:各コントロールを配置した(クリックで拡大) |
リスト3 XML文書ファイル(ImageInfo.xml)
<?xml version="1.0" encoding="utf-8" ?>
<画像>
  <画像名>cherry173_01.png</画像名>
  <画像名>cherry173_02.png</画像名>
  <画像名>cherry173_03.png</画像名>
</画像>
書き出されるXAMLをリスト4のように編集します。
MainWindow.xamlの編集
リスト4 (MainWindow.xaml)
(1)<Window.Resource>プロパティ要素内にListBoxTemplateというキー名の<DataTemplate>要素を配置します。その中に<StackPanel>要素を配置し、子要素として<Image>要素を配置します。WidthとHeightを指定し、Sourceプロパティに「画像名」をバインドします。この名称は、VBコードのクラス内で定義するプロパティ名です。Marginプロパティに10を指定し、余白を設けます。
(2)(1)で定義したListBoxTemplateをListBoxコントロールから参照します。
<Window x:Class="MainWindow"
  xmlns="http://schemas.microsoft.com/winfx/2006/xaml/presentation"
  xmlns:x="http://schemas.microsoft.com/winfx/2006/xaml"
  Title="MainWindow" Height="563" Width="773">
  <Window.Resources> ■(1)
    <DataTemplate x:Key="ListBoxTemplate">
      <StackPanel>
        <Image Width="173" Height="173" Source="{Binding 画像名}" Margin="10"/> ■(1)
      </StackPanel>
    </DataTemplate>
  </Window.Resources>
  <Grid Height="527" Width="748">
    <ListBox Height="463" HorizontalAlignment="Left" Margin="22,42,0,0" Name="ListBox1" VerticalAlignment="Top" Width="234" ItemTemplate="{StaticResource ListBoxTemplate}"/> ■(2)
    <TextBlock Height="30" HorizontalAlignment="Left" Margin="50,12,0,0" Name="TextBlock1" Text="画像を選択" VerticalAlignment="Top" Width="130" FontSize="24" />
    <TextBlock Height="34" HorizontalAlignment="Left" Margin="296,323,0,0" Name="TextBlock2" Text="URI" VerticalAlignment="Top" Width="52" FontSize="24" Visibility="Collapsed" />
    <TextBlock FontSize="24" Height="34" HorizontalAlignment="Left" Margin="296,42,0,0" Name="TextBlock3" Text="Count" VerticalAlignment="Top" Width="79" />
    <TextBox Height="34" HorizontalAlignment="Left" Margin="477,42,0,0" Name="countTextBox" VerticalAlignment="Top" Width="100" FontSize="22" />
    <TextBlock FontSize="24" Height="34" HorizontalAlignment="Left" Margin="296,141,0,0" Name="TextBlock4" Text="Title" VerticalAlignment="Top" Width="79" />
    <TextBox Height="34" HorizontalAlignment="Left" Margin="477,141,0,0" Name="titleTextBox" VerticalAlignment="Top" Width="229" FontSize="20" />
    <Button Content="タイルに通知を送る" Height="41" HorizontalAlignment="Left" Margin="307,202,0,0" Name="Button1" VerticalAlignment="Top" Width="399" FontSize="24" />
    <TextBlock FontSize="24" Height="34" HorizontalAlignment="Left" Margin="296,90,0,0" Name="TextBlock5" Text="Back Content" VerticalAlignment="Top" Width="159" />
    <TextBox Height="34" HorizontalAlignment="Left" Margin="477,90,0,0" Name="backContentTextBox" VerticalAlignment="Top" Width="229" FontSize="20" />
  </Grid>
</Window>


