新しいボディフレームの準備ができているときに発生するイベント処理
新しいボディフレームの準備ができているときに発生するイベント処理
リスト4:MainWindow.xaml.vbの一部、リスト3の続き
Private Sub myBodyFrameReader_FrameArrived(sender As Object, e As BodyFrameArrivedEventArgs)
    Using myBodyFrame = e.FrameReference.AcquireFrame   (1)
        If myBodyFrame Is Nothing = True Then
            Return
        End If
        myBodyFrame.GetAndRefreshBodyData(myBodies)    (2)
    End Using
    CanvasBody.Children.Clear()   (3)
    For Each body In myBodies
        For Each joint In body.Joints   (4)
            If joint.Value.TrackingState = TrackingState.Tracked Then
                DrawEllipse(joint.Value, 10, Brushes.Transparent)    (5)
                If joint.Value.JointType = JointType.HandRight Then
                    If body.Joints(JointType.HandTipRight).TrackingState = TrackingState.Tracked Then
                        myColorSpacePoint = myKinect.CoordinateMapper.MapCameraPointToColorSpace(body.Joints(JointType.HandTipRight).Position)    (6)
                        myHandPositionX = CInt(myColorSpacePoint.X * 0.5)  (7)
                        myHandPositionY = CInt(myColorSpacePoint.Y * 0.5)
                        DrawHandState(body.Joints(JointType.HandRight), body.HandRightState, body.HandRightConfidence)    (8)
                    End If
                End If
            End If
        Next
    Next
End Sub
- e.FrameReference.AcquireFrameメソッドで、ボディフレームを取得し、myBodyFrameで参照します。myBodyFrameに何もなかった場合は、何も行いません。
- GetAndRefreshBodyDataメソッドで、更新されたボディデータを取得します。
- CanvasBody内を一度クリアしておきます。
- ボディデータの中を、反復処理を行いながら、繰り返し変数jointで関節の位置を反復処理しながら、関節位置を取得していきます。
- 関節が追跡されている場合は、関節の位置と、関節の位置を描く円の大きさ描く色(透明)を指定して、DrawEllipseを実行します。
- 右手が追跡されている場合は、CoordinateMapper.MapCameraPointToColorSpaceメソッドで、関節の位置を、カメラ空間から距離空間へのポイントにマップし、変数myColorSpacePointで参照します。
- 手のXとY軸の位置を取得して、メンバー変数、myHandPositionXとmyHandPositionYに格納します。
- 右手の位置、状態、そして追跡の精度を引数にして、DrawHandStateを実行します。
カラーフレーム到着時のイベント
リスト5:MainWindow.xaml.vbの一部、リスト4の続き
Private Sub myColorFrameReader_FrameArrived(sender As Object, e As ColorFrameArrivedEventArgs)
    Dim colorFramePorcessed As Boolean = False
    Using myColorFrame As ColorFrame = e.FrameReference.AcquireFrame (1)
        If myColorFrame Is Nothing = False Then   (2)
            Dim myColorFrameDescription As FrameDescription = myColorFrame.FrameDescription   (3)
            If myColorFrameDescription.Width = colorBitmap.PixelWidth AndAlso myColorFrameDescription.Height = colorBitmap.PixelHeight Then   (4)
                If myColorFrame.RawColorImageFormat = ColorImageFormat.Bgra Then
                    myColorFrame.CopyRawFrameDataToArray(ColorImagePixelData)    (5)
                Else
                    myColorFrame.CopyConvertedFrameDataToArray(ColorImagePixelData, ColorImageFormat.Bgra)    (6)
                End If
                colorFramePorcessed = True   (7)
            End If
        End If
    End Using
    If colorFramePorcessed = True Then
        colorBitmap.WritePixels(New Int32Rect(0, 0, colorBitmap.PixelWidth, colorBitmap.PixelHeight), ColorImagePixelData, colorBitmap.PixelWidth * BytesPerPixel, 0)    (8)
        roomImage.Source = colorBitmap    (9)
    End If
End Sub
- e.FrameReference.AcquireFrameメソッドでカラーフレームを取得し、myColorFrameで参照します。
- myColorFrameにデータがあった場合の処理です。
- KinectSensor から、イメージフレームのプロパティを取得し、変数myColorFrameDescriptionで参照します。
- 取得したプロパティのWidthとHeightが、それぞれcolorBitmapのPixelWidth、PixelHeightと同じであった場合の処理を行います。
- カラー フレーム データの形式がBgraであった場合は、CopyRawFrameDataToArrayメソッドで、Raw フレームのデータ指定された配列(ColorImagePixelData)にコピーします。
- そうでない場合は、CopyConvertedFrameDataToArrayメソッドで、フレームからBGRA形式のバイト列に変換し、バイト配列に格納します。
- Boolean型で宣言していた変数colorFrameProcessedをTrueで初期化します。
- colorFrameProcessed変数がTrueであった場合は、
colorBitmap(WriteableBitmapクラス)のWritePixelsメソッドで、ビットマップの指定した領域内のピクセルを更新します。CopyConvertedFrameDataToArrayメソッドとWritePixelsメソッドの書式については、第3回目を参照してください。9.roomImageのSourceプロパティにcolorBitmapオブジェクトを指定します。これでRGBカメラからの画像が表示されます。
関節の位置に透明の円を表示する処理
リスト6:MainWindow.xaml.vbの一部、リスト5の続き
Private Sub DrawEllipse(myJoint As Joint, R As Integer, myBrush As Brush)
    Dim myEllipse = New Ellipse
    With myEllipse
        .Width = R
        .Height = R
        .Fill = myBrush
    End With

    point = myKinect.CoordinateMapper.MapCameraPointToDepthSpace(myJoint.Position)   (1)
    If point.X < 0 OrElse point.Y < 0 Then
        Return
    End If
    Canvas.SetLeft(myEllipse, point.X - (R / 2))    (2)
    Canvas.SetTop(myEllipse, point.Y - (R / 2))
    If myJoint.JointType = JointType.HandRight Then
        commonJoint.JointType = JointType.HandRight
        If flag = True Then
            myImage.Margin = New Thickness(point.X, point.Y, 0, 0)    (3)
        End If
        '.Margin = New Thickness(point.X, point.Y, 0, 0)
    End If
    CanvasBody.Children.Add(myEllipse)
End Sub
直径10ピクセルで透明の円を作成します。直径はDrawEllipseを呼ぶ際に指定しています(リスト4)。
- CoordinateMapper.MapCameraPointToDepthSpaceメソッドで、関節の位置を、カメラ空間から距離空間へのポイントにマップし、メンバー変数pointで参照します。
- SetLeftとSetTopメソッドで透明な円を、指定したXとY軸に描きます。
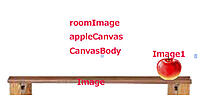
- 関節のタイプが右手であり、変数flagがTrue、つまり手の形がグーの場合は、myImageオブジェクトをPoint.XとPoint.Yの位置に移動します。これにより、リンゴをつかんで移動します。変数flagの初期化は、後述のDrawHandState(リスト7)の中で行っています。プレイヤーには透明な円で関節の位置が表示されていますが、目には見えません。
プレイヤーの手の形によって条件分岐を行う処理
リスト7:MainWindow.xaml.vbの一部、リスト6の続き
Private Sub DrawHandState(joint As Joint, state As HandState, myTrackingConfidence As TrackingConfidence)
    If myTrackingConfidence <> TrackingConfidence.High Then
        Return
    End If

    If state = HandState.Open Then   (1)
        flag = False
    ElseIf state = HandState.Closed Then   (2)
        appleCanvas.Children.Clear()
        Image1.Source = Nothing
        myImage.Margin = New Thickness(point.X, point.Y, 0, 0)
        appleCanvas.Children.Add(myImage)
        flag = True   (3)
    End If
End Sub
- 手がパーの状態なら、flagにFalseを代入します。
- 手がグーの状態の場合は、リンゴが表示されていた領域をクリアし、新しく移動された位置にリンゴを表示します。
- flagにTrueを代入します。
ウインドウが閉じられる場合の処理
リスト8:MainWindow.xaml.vbの一部、リスト7の続き
Private Sub MainWindow_Closing(sender As Object, e As CancelEventArgs) Handles Me.Closing
    If myKinect Is Nothing = False Then
        myKinect.Close()
        myKinect = Nothing
    End If
End Sub
End Class
Kinectが動作している場合は、Kinectを閉じ、全ての関連付けから解放します。
実際にプログラムを動作させると下記の動画のようになります。リンゴをつかんで動かしている感じがお分かりいただけると思います。
- この記事のキーワード


