ページの背景色を設定する
書き出されたXAMLコードのリスト6の箇所を、リスト7のように修正します。
リスト6 元のXAMLコード(MainPage.xaml)
~コード略~
<UserControl.Resources>

  <Style x:Key="TransitioningContentControlStyle1" TargetType="toolkit:TransitioningContentControl">
    <Setter Property="IsTabStop" Value="True"/>
    <Setter Property="HorizontalContentAlignment" Value="Left"/>
    <Setter Property="VerticalContentAlignment" Value="Top"/>
    <Setter Property="Transition" Value="DefaultTransition"/>■ここをリスト7のように修正
    <Setter Property="Template">
      <Setter.Value>
~コード略~
リスト7 修正したXAMLコード(MainPage.xaml)
(1)Blend4でUpTransitionに対してタイムラインを設定したので、ここをUpTransitionに書き換えます。
~コード略~
<UserControl.Resources>

  <Style x:Key="TransitioningContentControlStyle1" TargetType="toolkit:TransitioningContentControl">
    <Setter Property="IsTabStop" Value="True"/>
    <Setter Property="HorizontalContentAlignment" Value="Left"/>
    <Setter Property="VerticalContentAlignment" Value="Top"/>
    <Setter Property="Transition" Value="UpTransition"/>■(1)
    <Setter Property="Template">
      <Setter.Value>
~コード略~
上記のようにコードを書き換えると、VS2010のデザイン画面上にエラーが表示され、デザイン画面が使用できなくなります(図16)。原因は不明ですが、実行には問題ありません。これ以後デザイン画面はBlend4上で確認する必要があります。
|
|
| 図16:VS2010のデザイン画面にエラーが表示されて使用不可となる(クリックで拡大) |
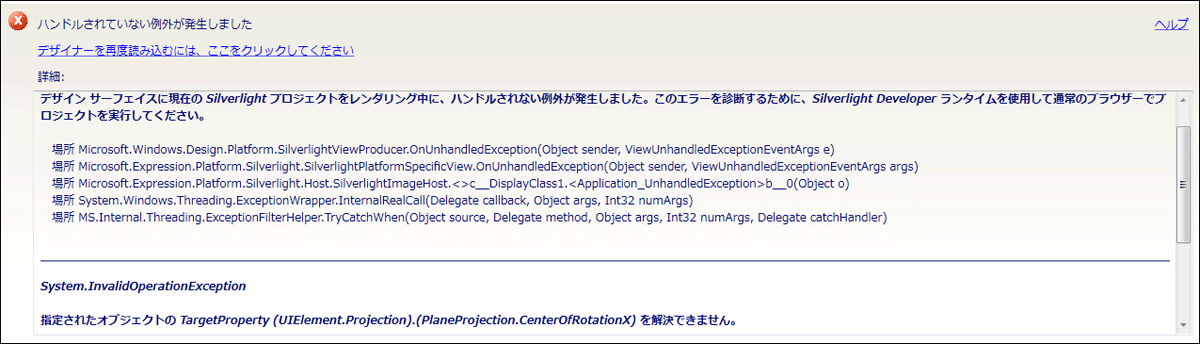
※筆者の環境でだけ生じるエラーかもしれません。
ここで一度VS2010メニューの「デバッグ(D)/デバッグ開始(S)」と選択して実行してみましょう。図17のように、「平家物語」や「方丈記」のリンクをクリックすると、最初に表示されていたページが背後に倒れ、次のページが起き上がって表示されます。
|
|
| 図17:最初に表示されていたページが背後に倒れ、次のページが起き上がって表示される(クリックで拡大) |
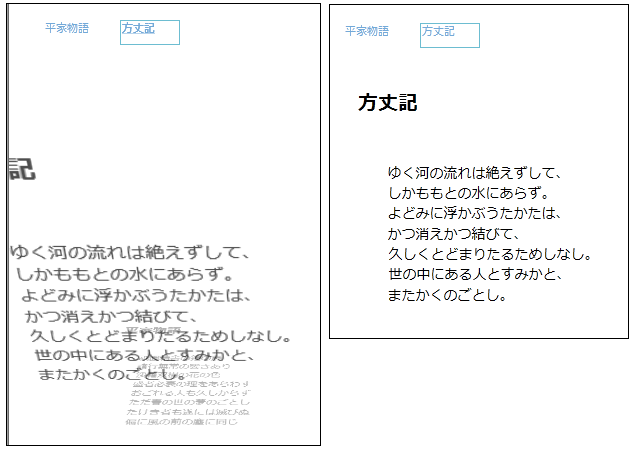
図1を見るとページの背景色が設定されています。ページの背景色を設定しましょう。
ページの背景色を設定する
ページの背景色はBlend4上で設定しますが、その前にXAMLコードに
リスト8 (MainPage.xaml)
~コード略~
<Grid>
  <ContentPresenter x:Name="PreviousContentPresentationSite" ContentTemplate="{TemplateBinding ContentTemplate}" Content="{x:Null}" HorizontalAlignment="{TemplateBinding HorizontalContentAlignment}" VerticalAlignment="{TemplateBinding VerticalContentAlignment}" Width="535" Height="531" Margin="-1,1,0,0">
    <ContentPresenter.Projection>
      <PlaneProjection CenterOfRotationY="1"/>
    </ContentPresenter.Projection>
    <ContentPresenter.RenderTransform>
      <CompositeTransform/>
    </ContentPresenter.RenderTransform>
  </ContentPresenter>
  <ContentPresenter x:Name="CurrentContentPresentationSite" ContentTemplate="{TemplateBinding ContentTemplate}" Content="{x:Null}" HorizontalAlignment="{TemplateBinding HorizontalContentAlignment}" VerticalAlignment="{TemplateBinding VerticalContentAlignment}" Width="535" Height="531" Margin="1,0,0,0">
    <ContentPresenter.Projection>
      <PlaneProjection CenterOfRotationY="1"/>
    </ContentPresenter.Projection>
    <ContentPresenter.RenderTransform>
      <CompositeTransform/>
    </ContentPresenter.RenderTransform>
  </ContentPresenter>
</Grid>
~コード略~
リスト9 要素を追加したコード(MainPage.xaml)
(1)x:NameがPreviousContentPresentationSiteとCurrentContentPresentationSiteの<ContentPresenter>要素を<Border>要素で挟みます。
~コード略~
<Grid>
  <Border>■(1)
    <ContentPresenter x:Name="PreviousContentPresentationSite" ContentTemplate="{TemplateBinding ContentTemplate}" Content="{x:Null}" HorizontalAlignment="{TemplateBinding HorizontalContentAlignment}" VerticalAlignment="{TemplateBinding VerticalContentAlignment}" Width="535" Height="531" Margin="-1,1,0,0">
      <ContentPresenter.Projection>
        <PlaneProjection CenterOfRotationY="1"/>
      </ContentPresenter.Projection>
      <ContentPresenter.RenderTransform>
        <CompositeTransform/>
      </ContentPresenter.RenderTransform>
    </ContentPresenter>
  </Border>■(1)
  <Border>■(1)
    <ContentPresenter x:Name="CurrentContentPresentationSite" ContentTemplate="{TemplateBinding ContentTemplate}" Content="{x:Null}" HorizontalAlignment="{TemplateBinding HorizontalContentAlignment}" VerticalAlignment="{TemplateBinding VerticalContentAlignment}" Width="535" Height="531" Margin="1,0,0,0">
        <ContentPresenter.Projection>
          <PlaneProjection CenterOfRotationY="1"/>
        </ContentPresenter.Projection>
          <ContentPresenter.RenderTransform>
        <CompositeTransform/>
      </ContentPresenter.RenderTransform>
    </ContentPresenter>
  </Border>■(1)
</Grid>
~コード略~
MainPage.xamlを選択してExpression Blend4を起動します。
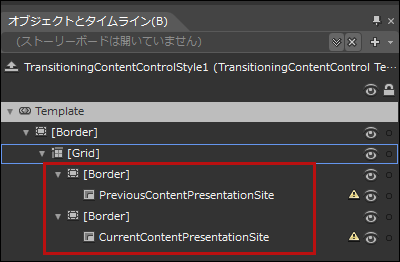
図8から図10の手順で(ただし、図9の場合は、既にテンプレートが作成されていますので、「現在のテンプレートの編集(U)」を選択します)、「オブジェクトとタイムライン(B)」内にPreviousContentPresentationSiteとCurrentContentPresentationSiteを表示させます。これら2つのオブジェクトが今回は[Border]の子として表示されます(図18)。PreviousContentPresentationSiteとCurrentContentPresentationSiteに黄色のびっくりマークの付けいた三角の警告マークが表示されますが、無視して構いません。
|
|
| 図18:PreviousContentPresentationSiteとCurrentContentPresentationSite が[Border]の子として表示される |
最初の[Border]を選択し、プロパティの[ブラシ]パネルにあるBackgroundに水色系統色を指定します。2番目の[Border]には緑系統色を指定します。
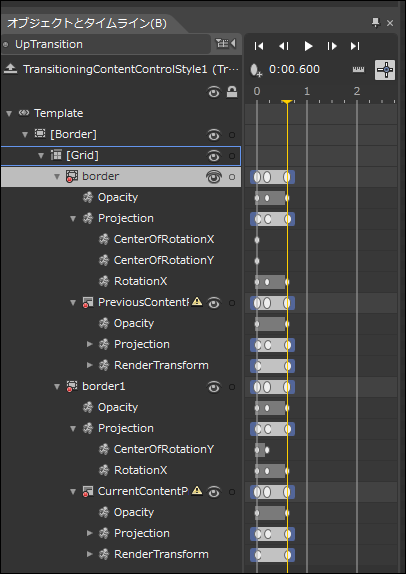
次に「状態(S)」パネル内のUpTranstionを選択し、最初の[Border]を選択します。タイムラインを表示し、表1を参考に、PreviousContentPresentationSiteと全く同じキーフレームを登録します。 プロパティの[変換]パネルにあるProjectionの値や、[外観]パネルにある Opacityの値も、PreviousContentPresentationSiteと全く同じにします。CurrentContentPresentationSiteの[Border]についても同様です。CurrentContentPresentationSiteと同じキーフレームを[Border]に設定してください。表1を参考にキーフレームを設定してください。図19のようになります。
|
|
| 図19:各[Border]にPreviousContentPresentationSiteとCurrentContentPresentationSite と同じキーフレームを設定した |
最後に、アートボードの上部に表示されているオブジェクトの一覧からFrame1を選択し、「オブジェクトとタイムライン(B)」内のLayoutRootを選択し、プロパティの[ブラシ]パネルにあるBackgroundに「グラデーションブラシ」をデフォルトのままで設定します。グレーのグラデーションがかかります。
Blend4のメニューの「プロジェクト(P)/プロジェクトの実行(R)」と選択して実行してみましょう(図20)。
|
|
| 図20:各[Border]に背景色を指定して実行した(クリックで拡大) |

Blend4を終了し、VS2010上からも実行して動作を確認しておきましょう。
- この記事のキーワード
関連記事
バックナンバー
この記事の筆者

筆者の人気記事
Think ITでは、技術情報が詰まったメールマガジン「Think IT Weekly」の配信サービスを提供しています。メルマガ会員登録を済ませれば、メルマガだけでなく、さまざまな限定特典を入手できるようになります。
